Getting Started
Get your institutional-grade MPC-TEE self-custody service immediately!
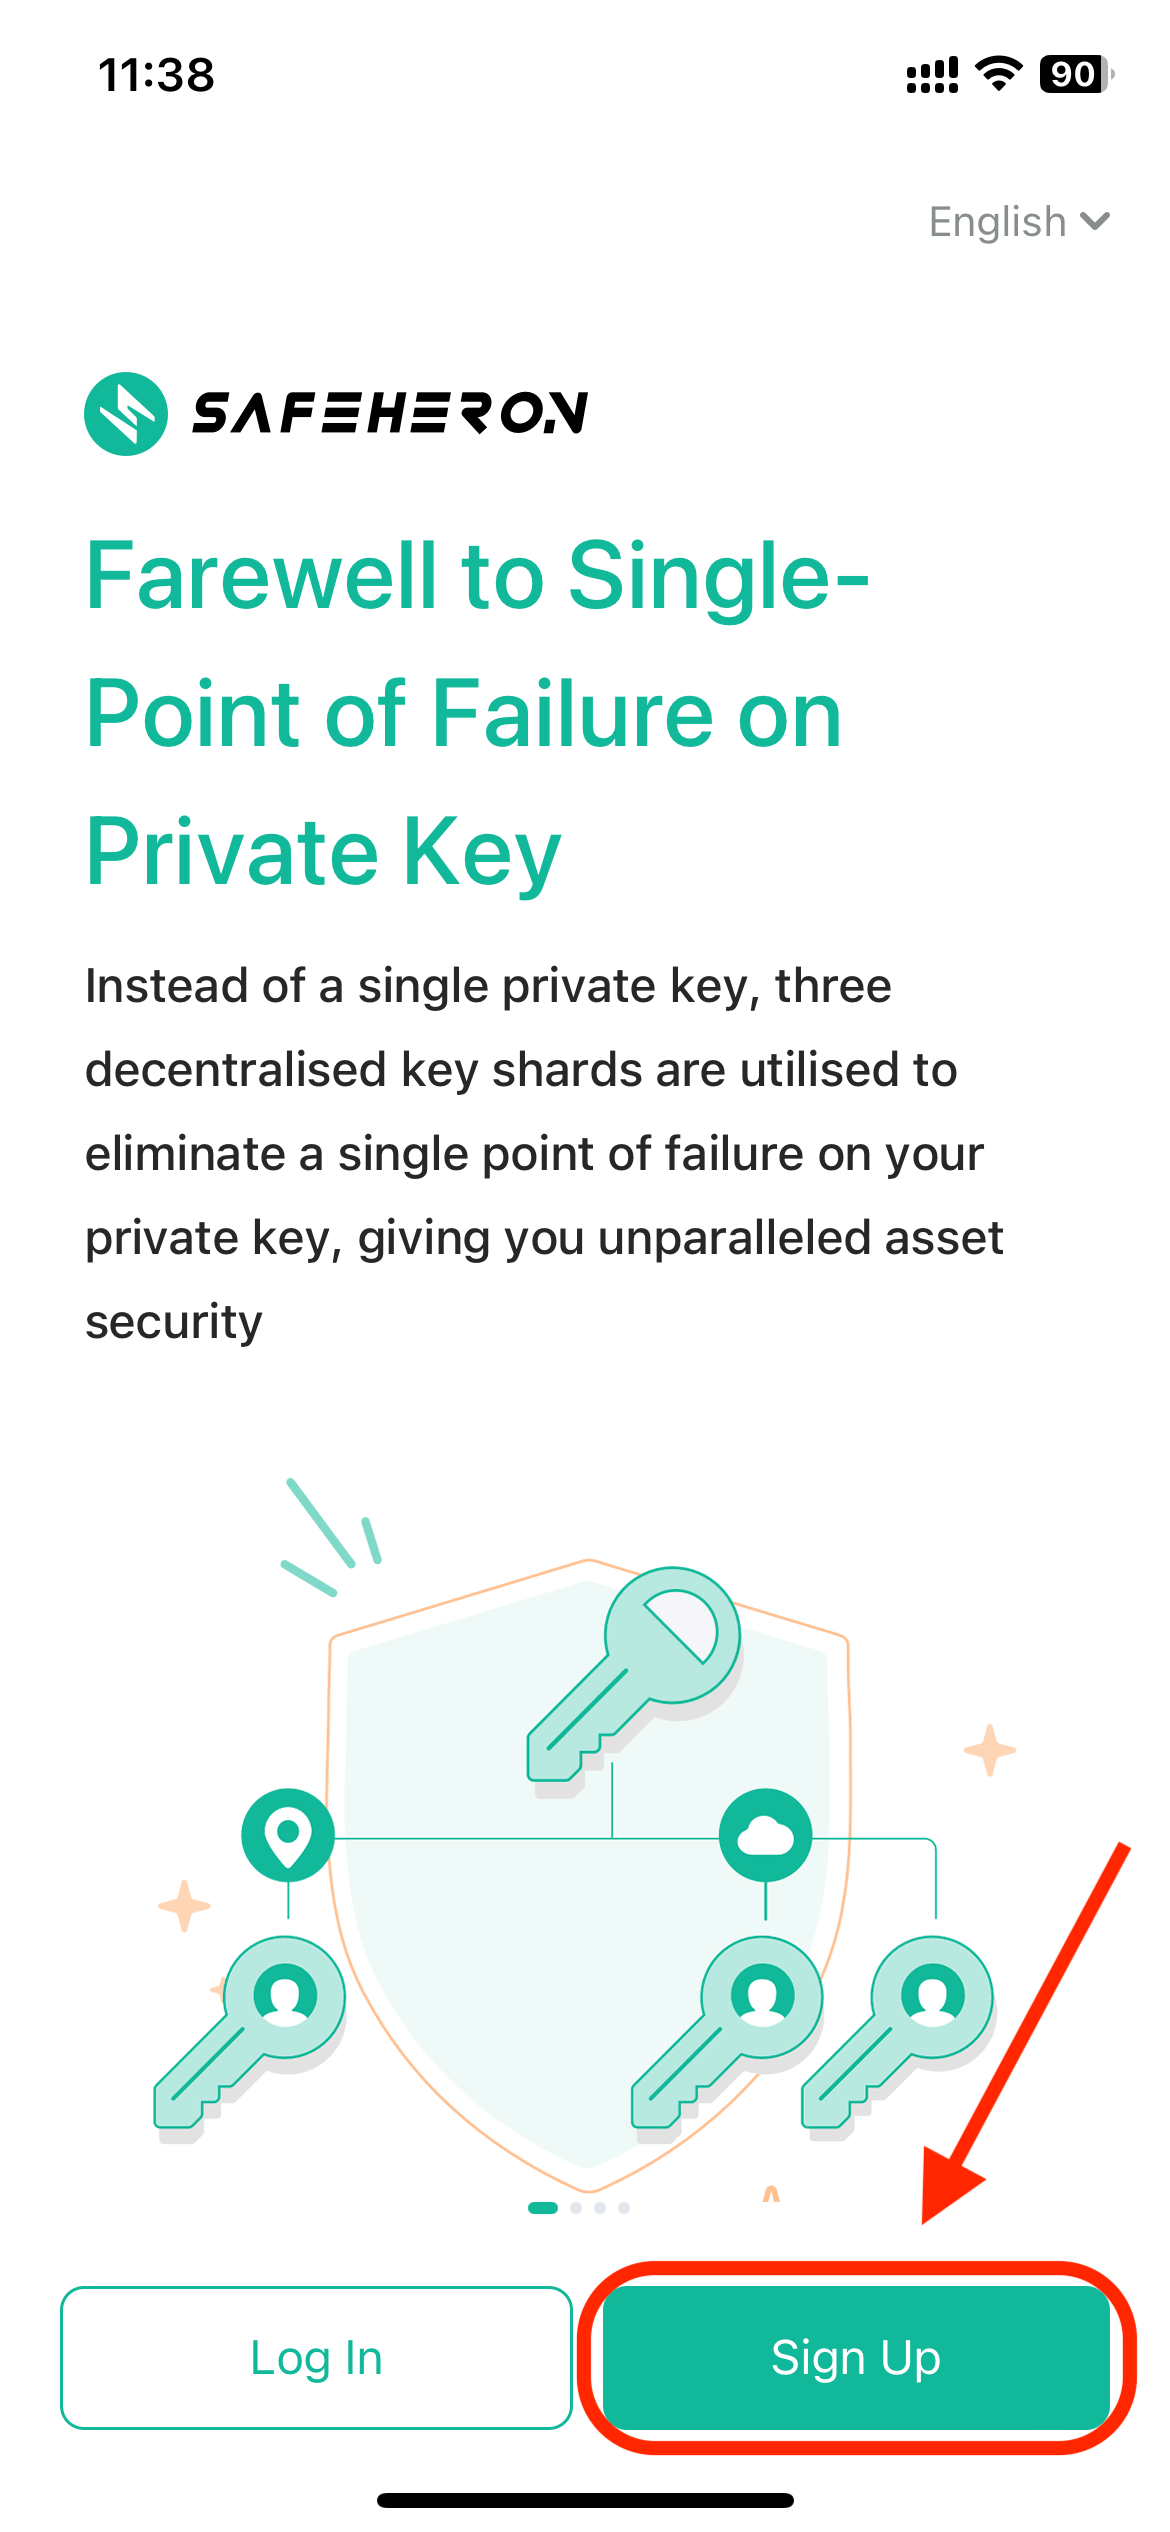
Safeheron App
Signup & Login
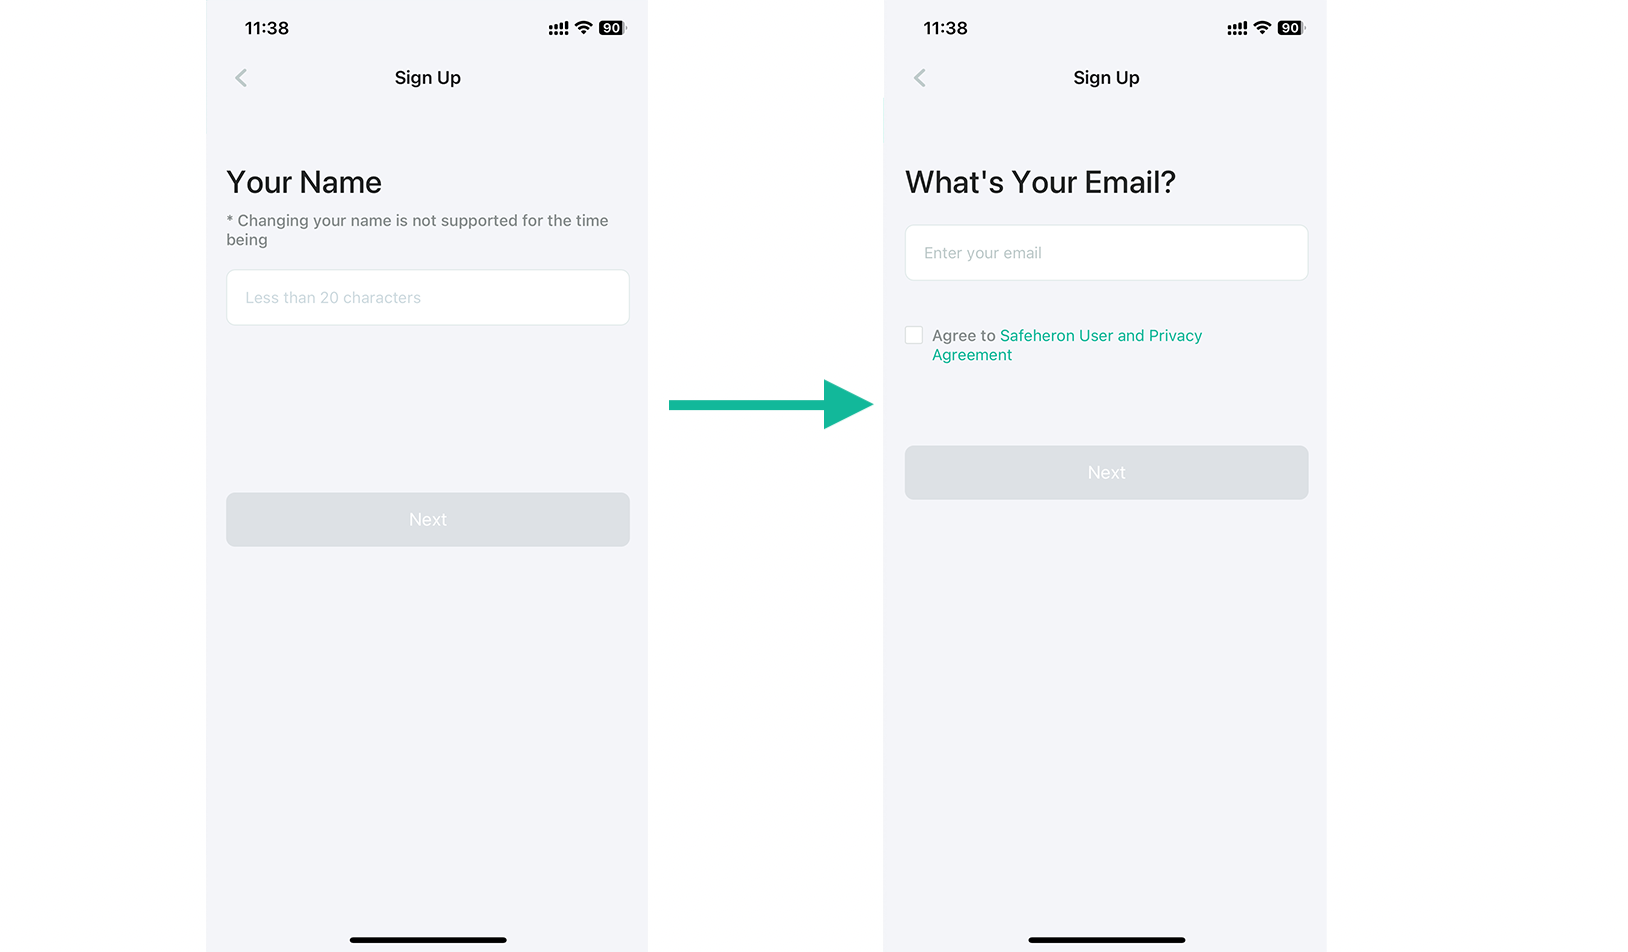
If you are new here, Sign Up is your first step, create your Safeheron account right away!
Enter your name and your signup email address.
The name you enter here will appear in the approval flow and can not be changed for the time being; ensure that your name can be identified by other members too.
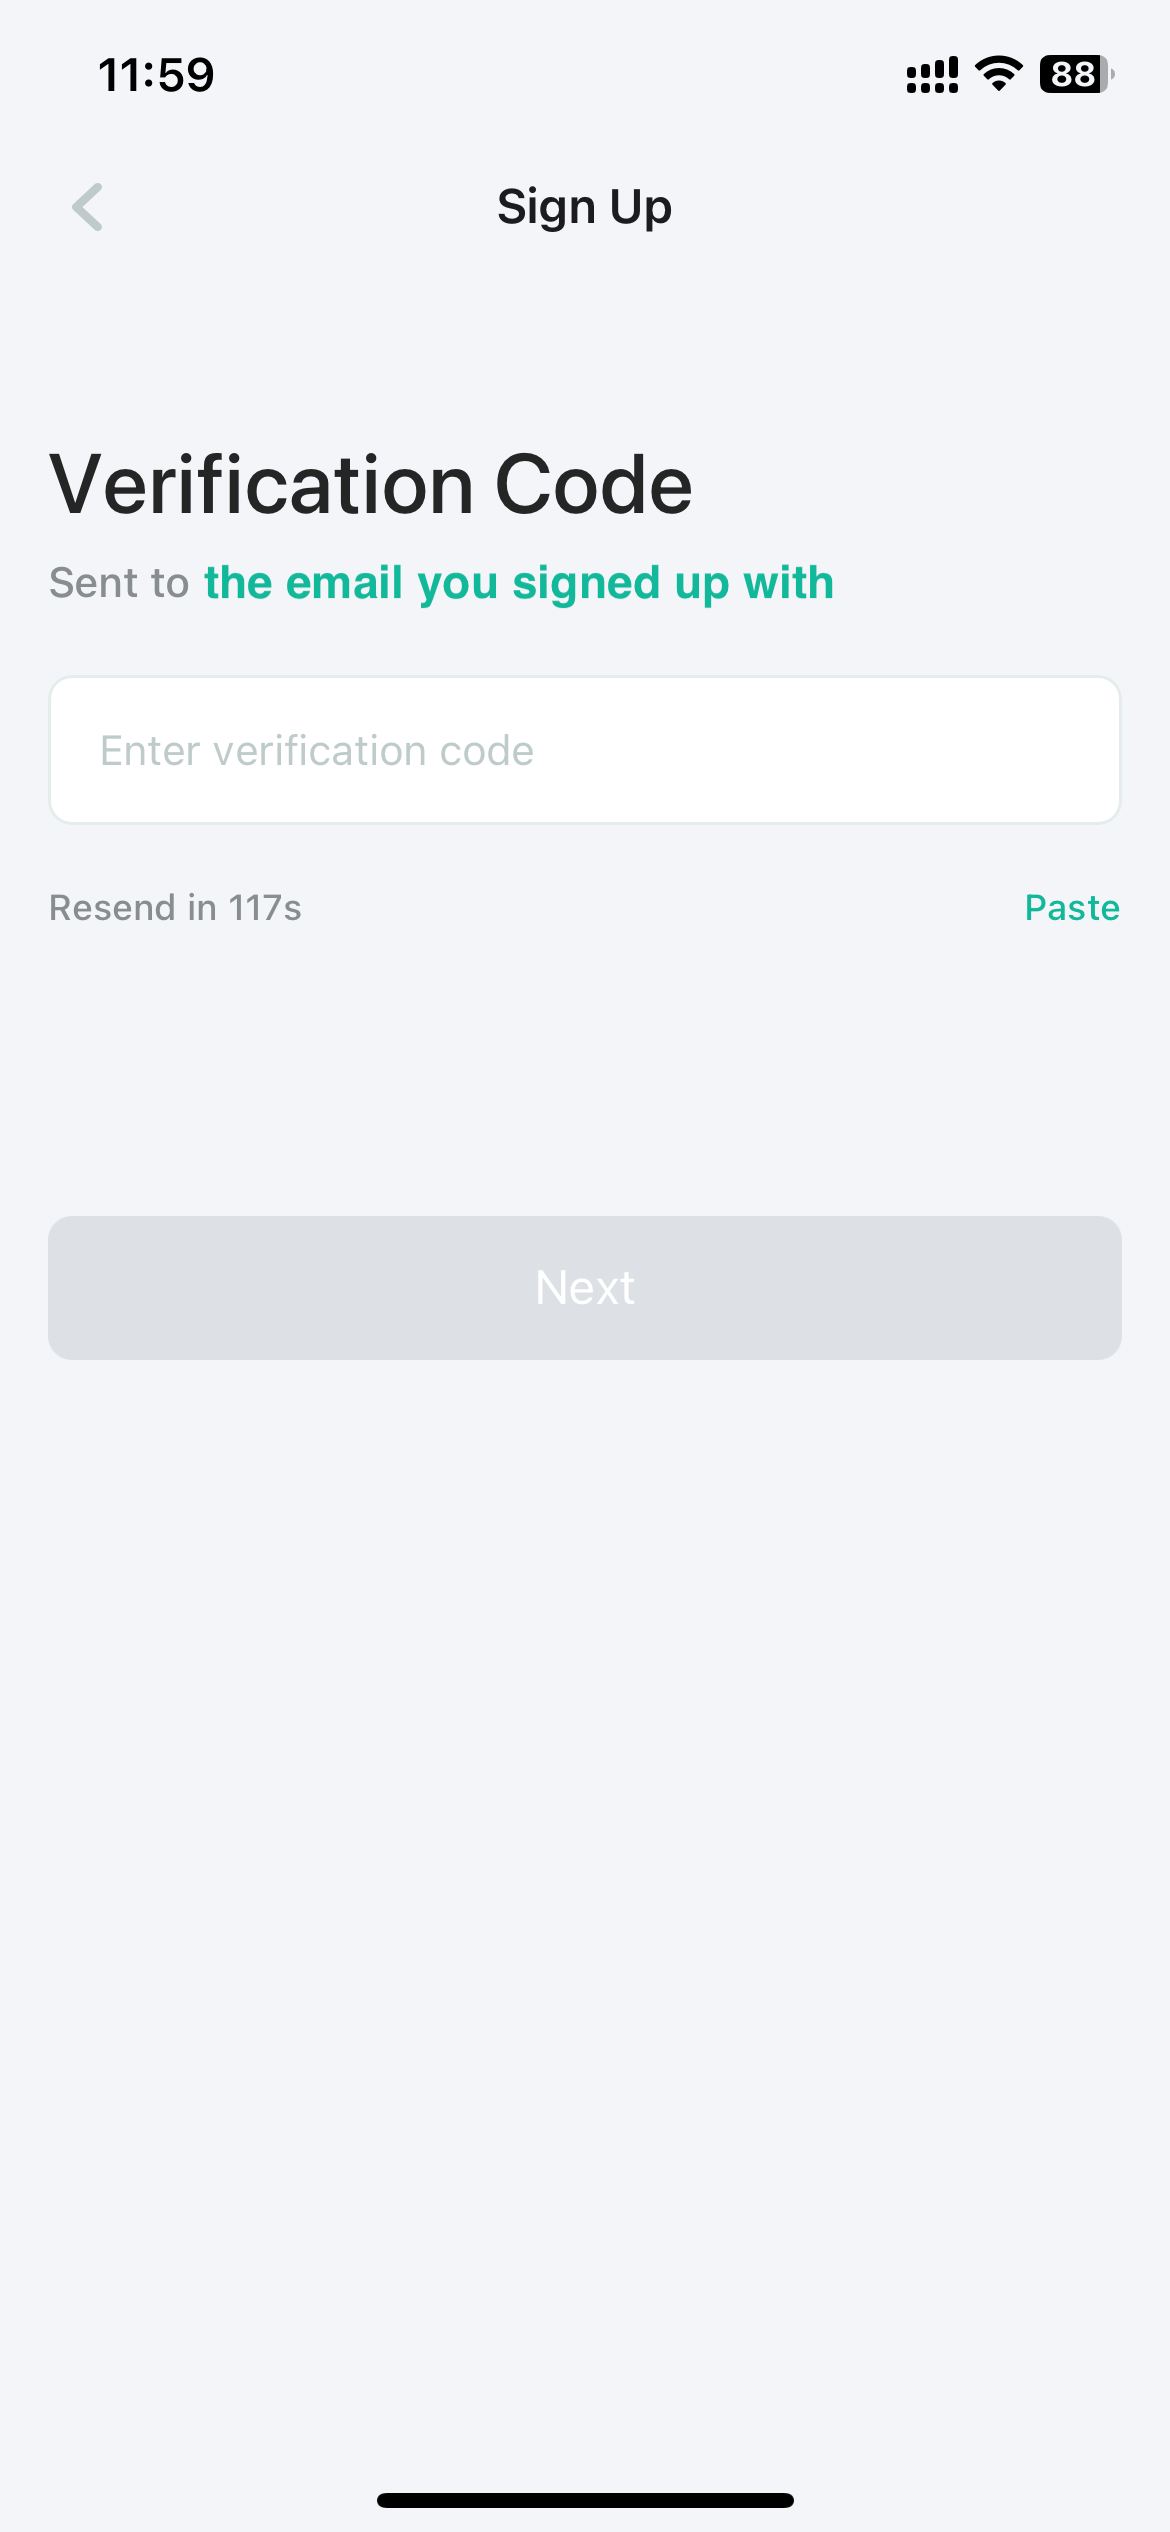
Safeheron will send you one verification code to ensure that you sign up with this email address, which will also be your login email address.
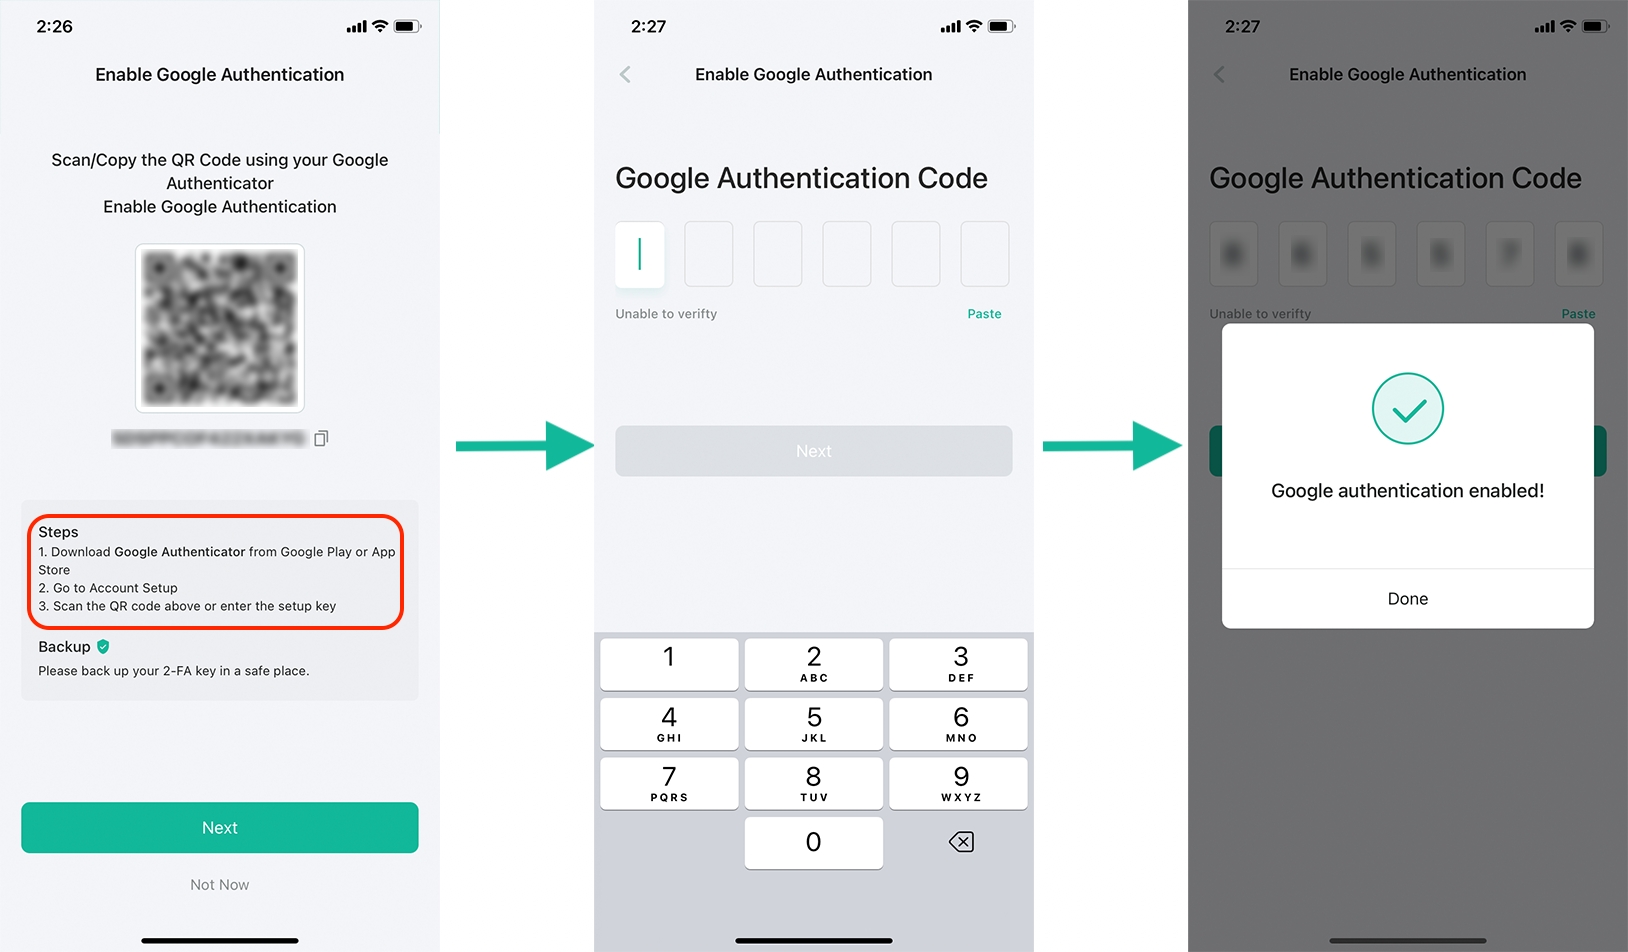
We strongly recommend that you enable 2-Factor Authentication for added security.
Enable Google Authentication
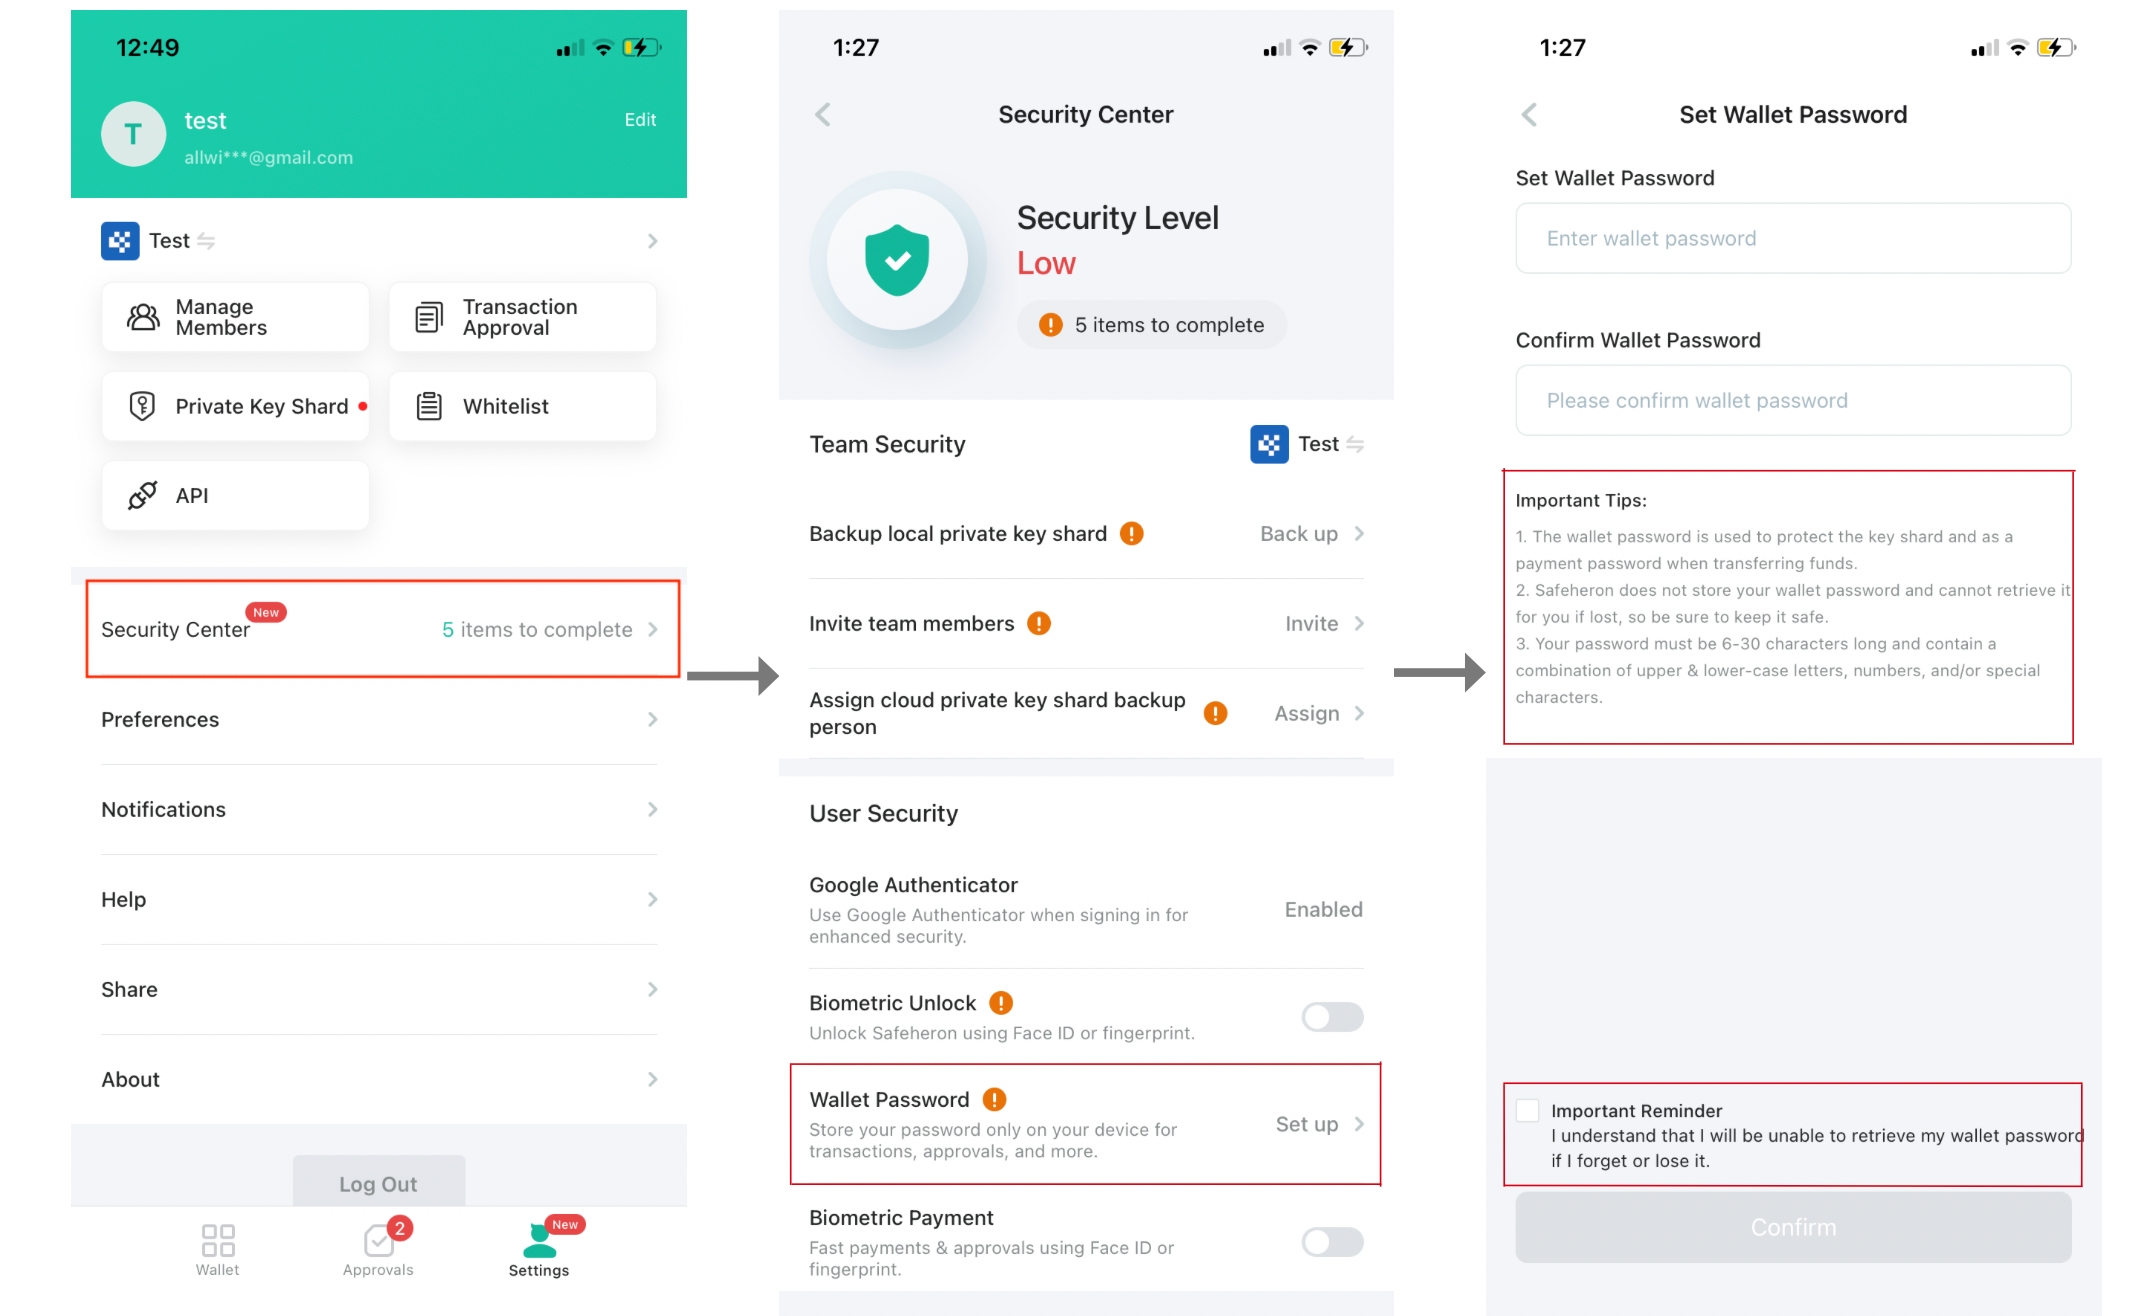
Set up your wallet password
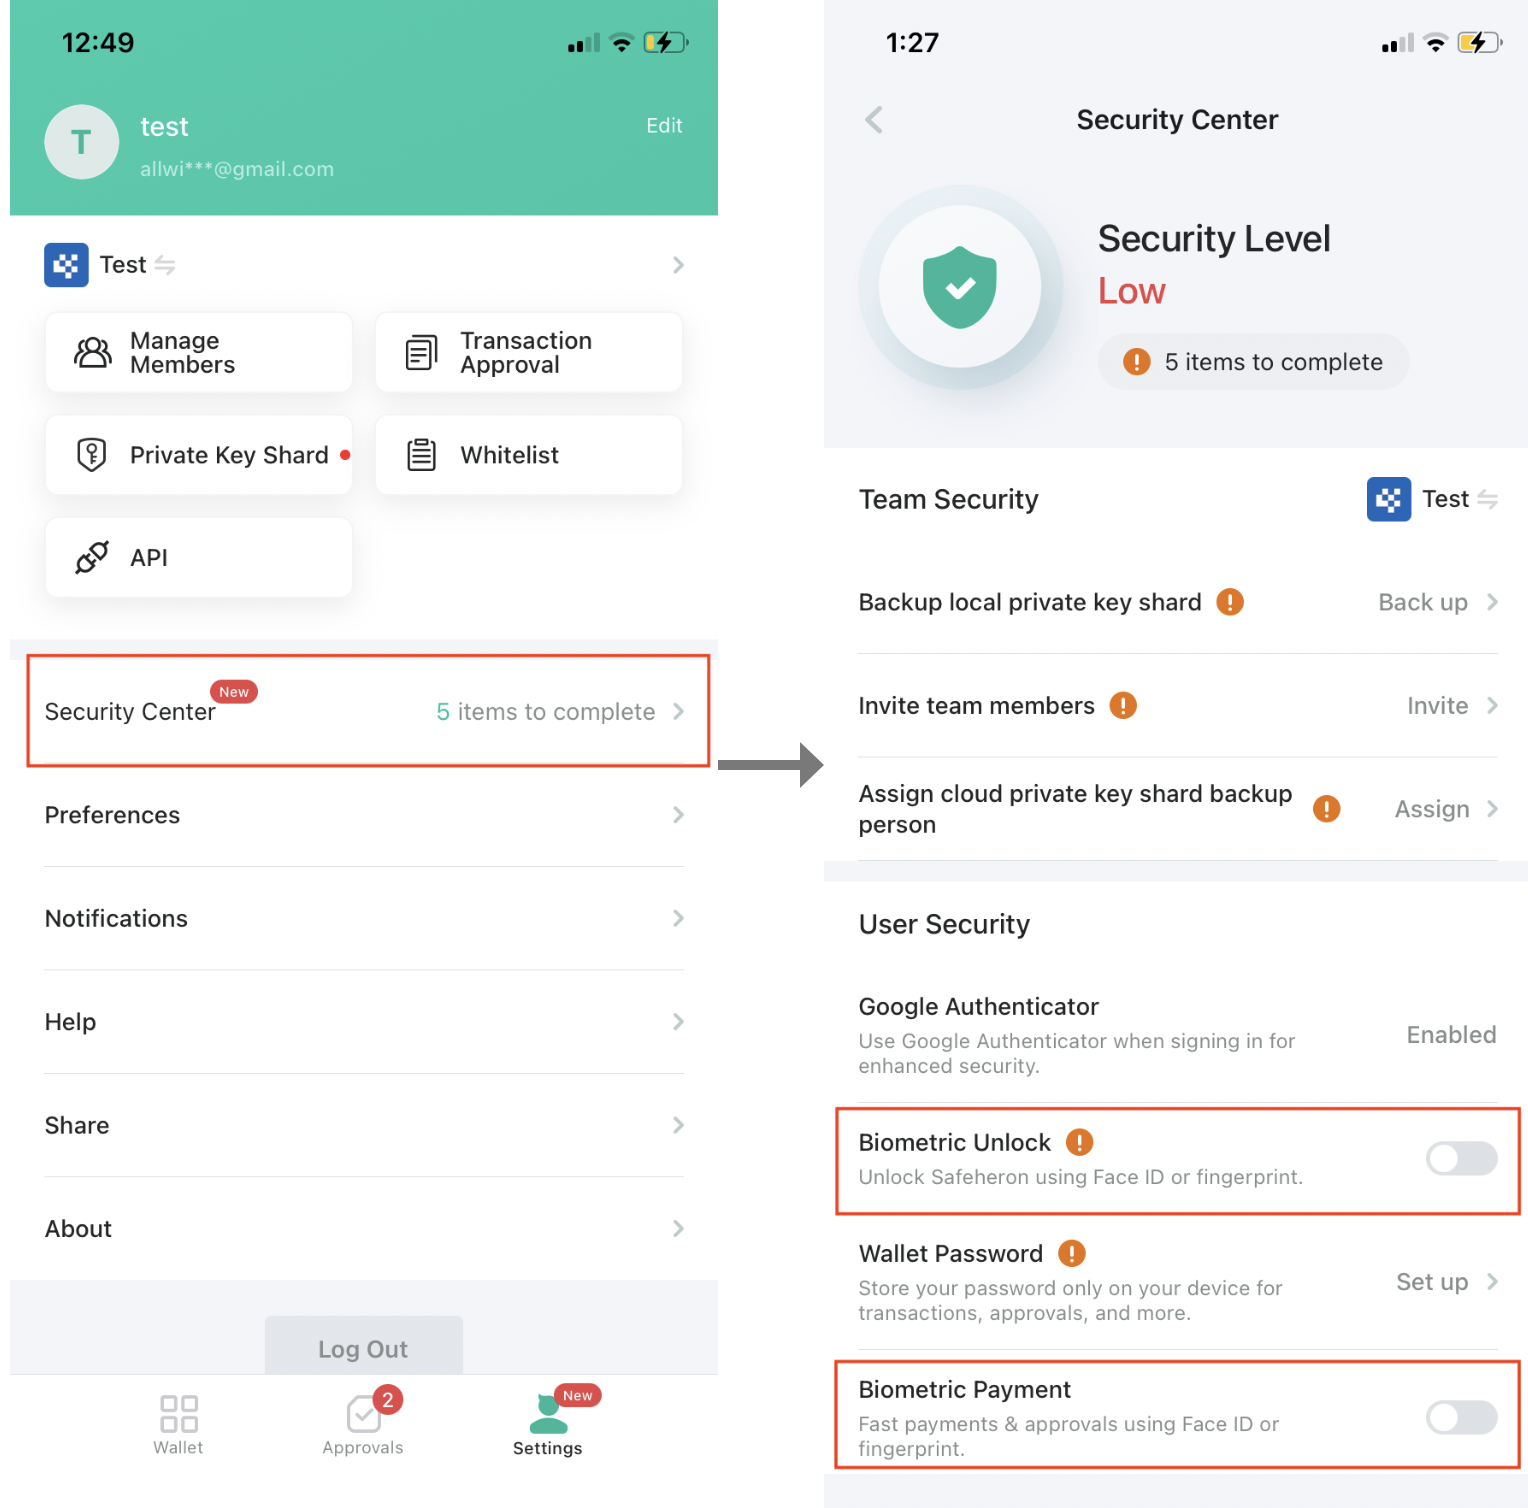
You can change your wallet password at any time. Go to Me ➡ Security Center, choose Wallet Password to change it.
Activate biometric unlock/biometric payment
Before enabling biometric unlock/biometric payment, please set up your wallet password; Once you allow Safeheron App to access your Face ID or fingerprint on your device, then the biometric unlock/biometric payment is enabled.
Note:
If Google Authentication is enabled, you cannot switch it off. Check its status by going to Me -> Security.
Biometric unlock and biometric payment can both be turned on and off.
The wallet password will be active once it's set up. You only can change the password.
Create Your Team
If you want to create a team on your own, select Create Now.
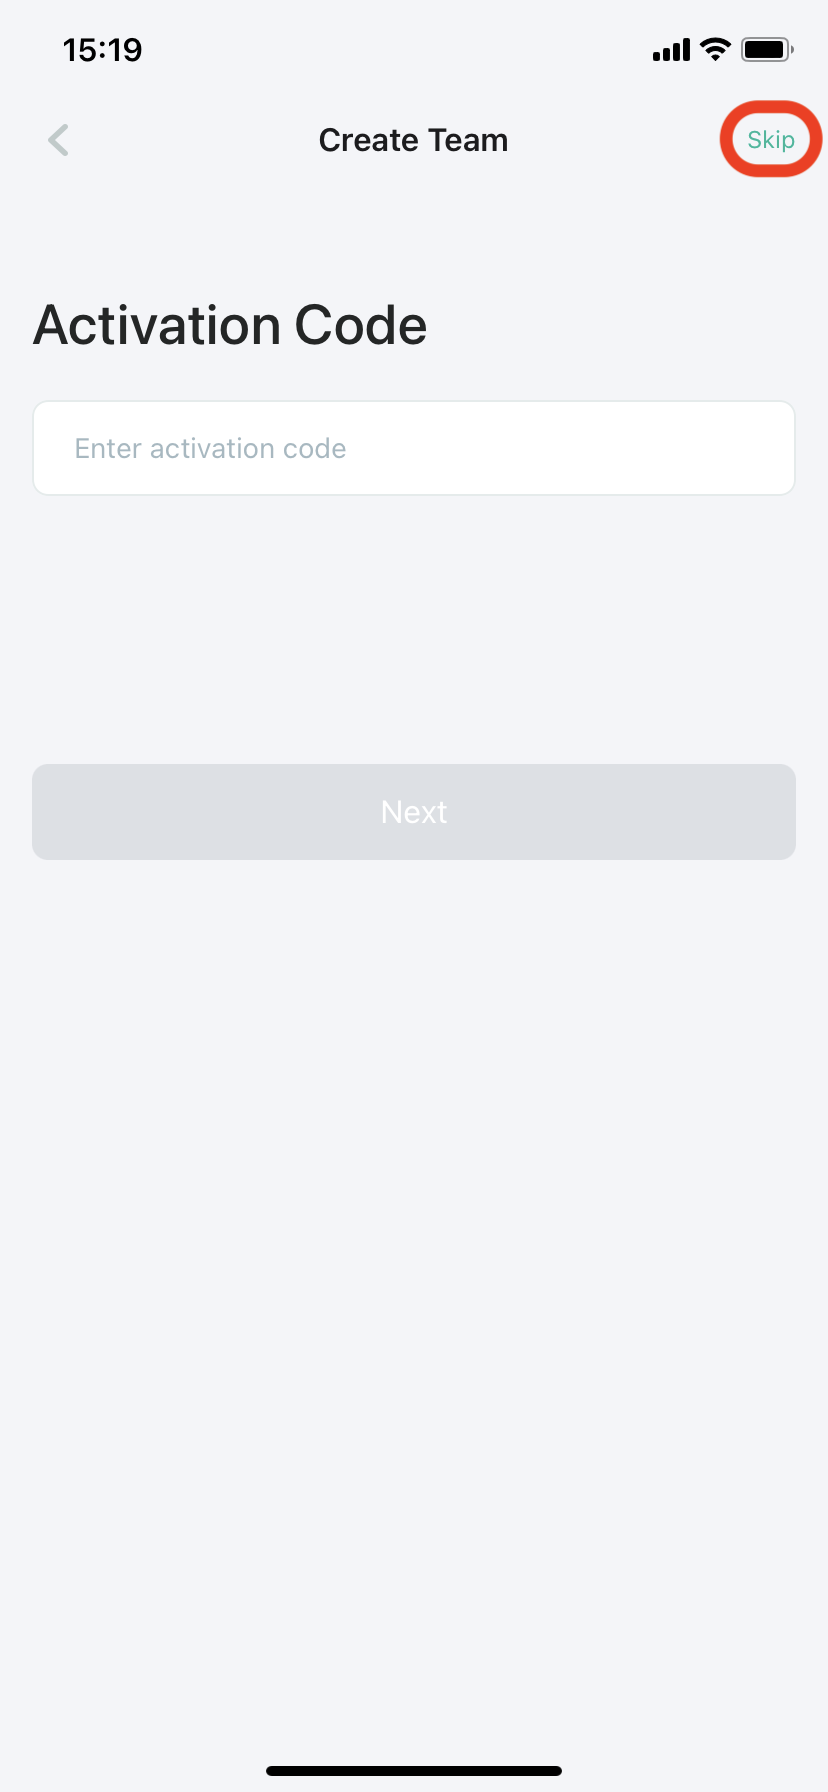
If you have a valid activation code, please enter it here; If you do not have one, you can choose Skip for a 14-day free trial.
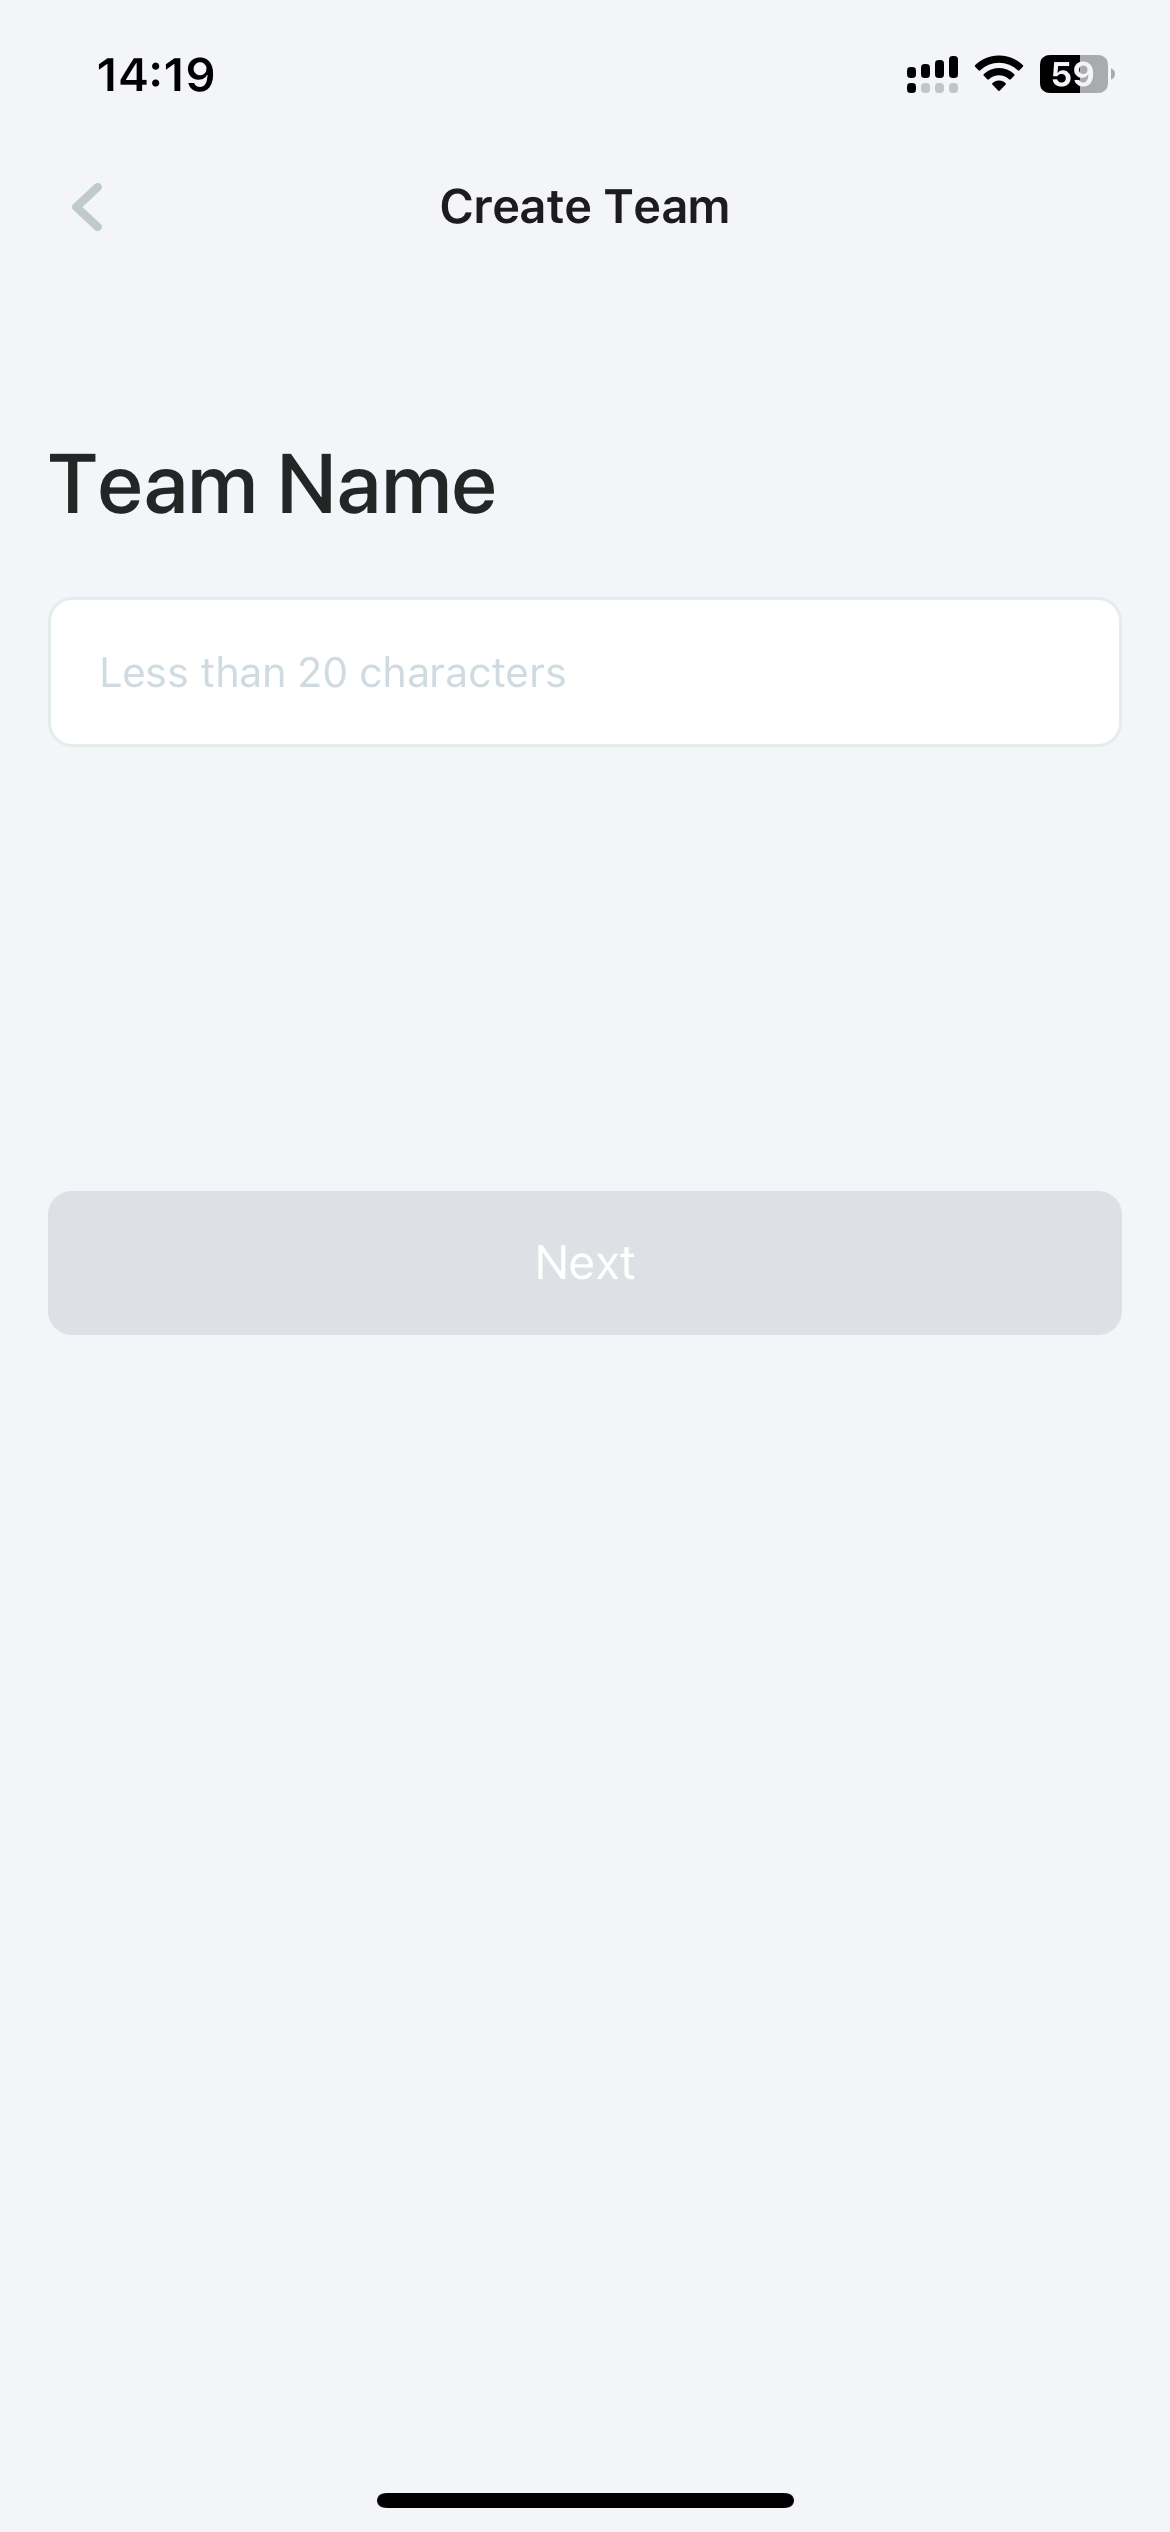
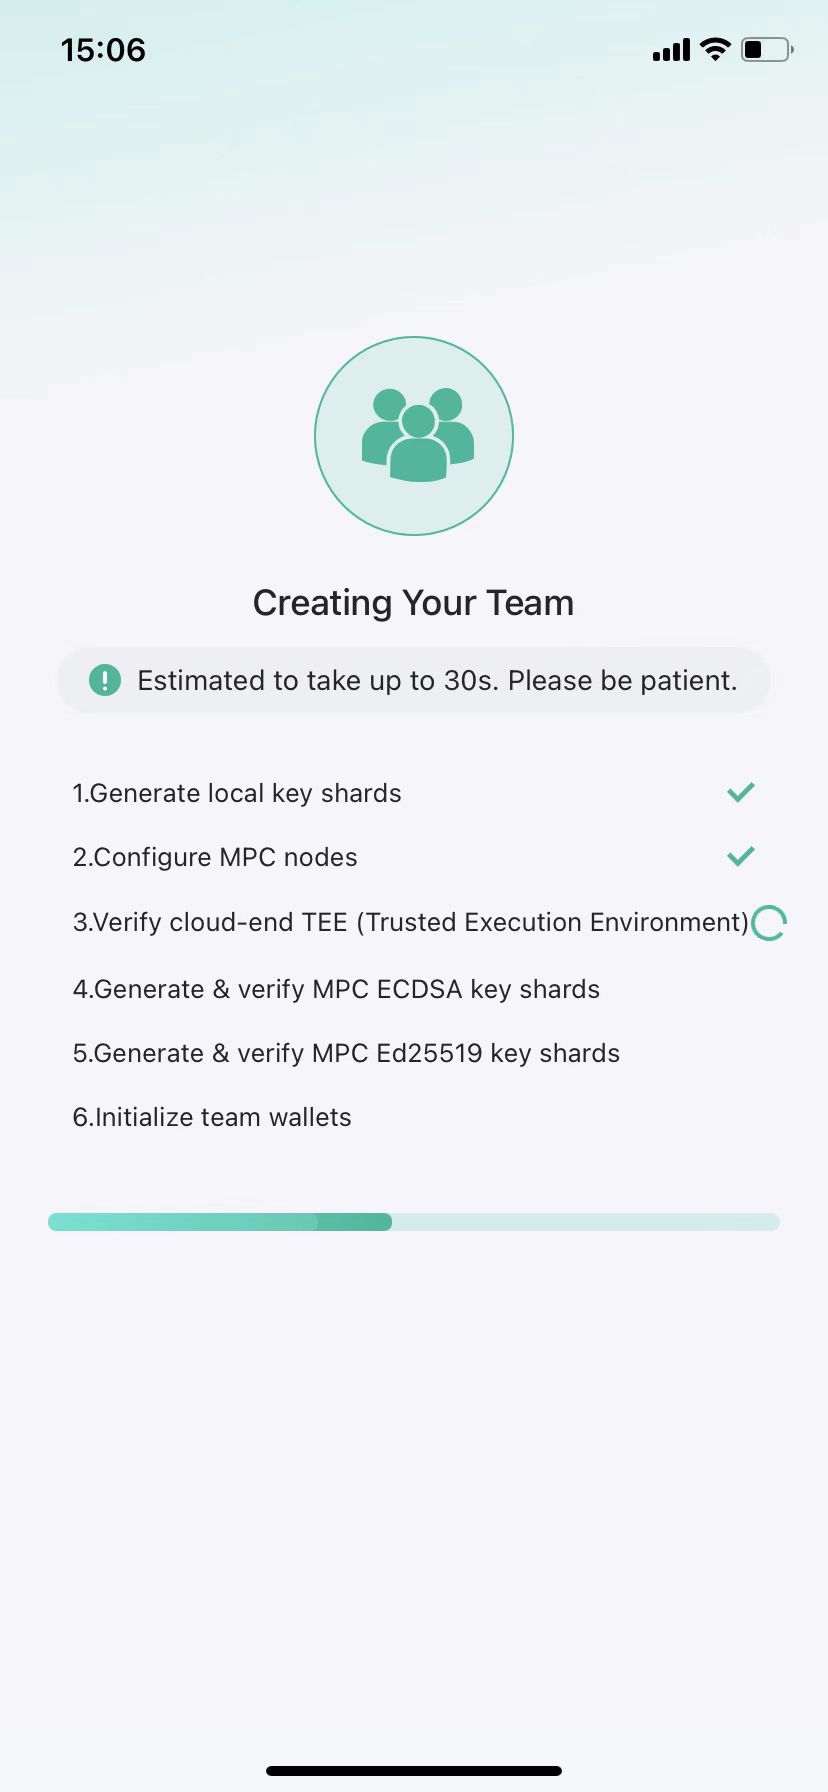
Set your team name as shown below.
For the time being, Team Name cannot be changed once you set it. So, make sure you and your team members understand the purpose of this team.
It may take up to 30s to create one team. You'll be able to view the progress of key shard generation, MPC Node configuration, TEE verification, and MPC key shard generation as shown in the image above.
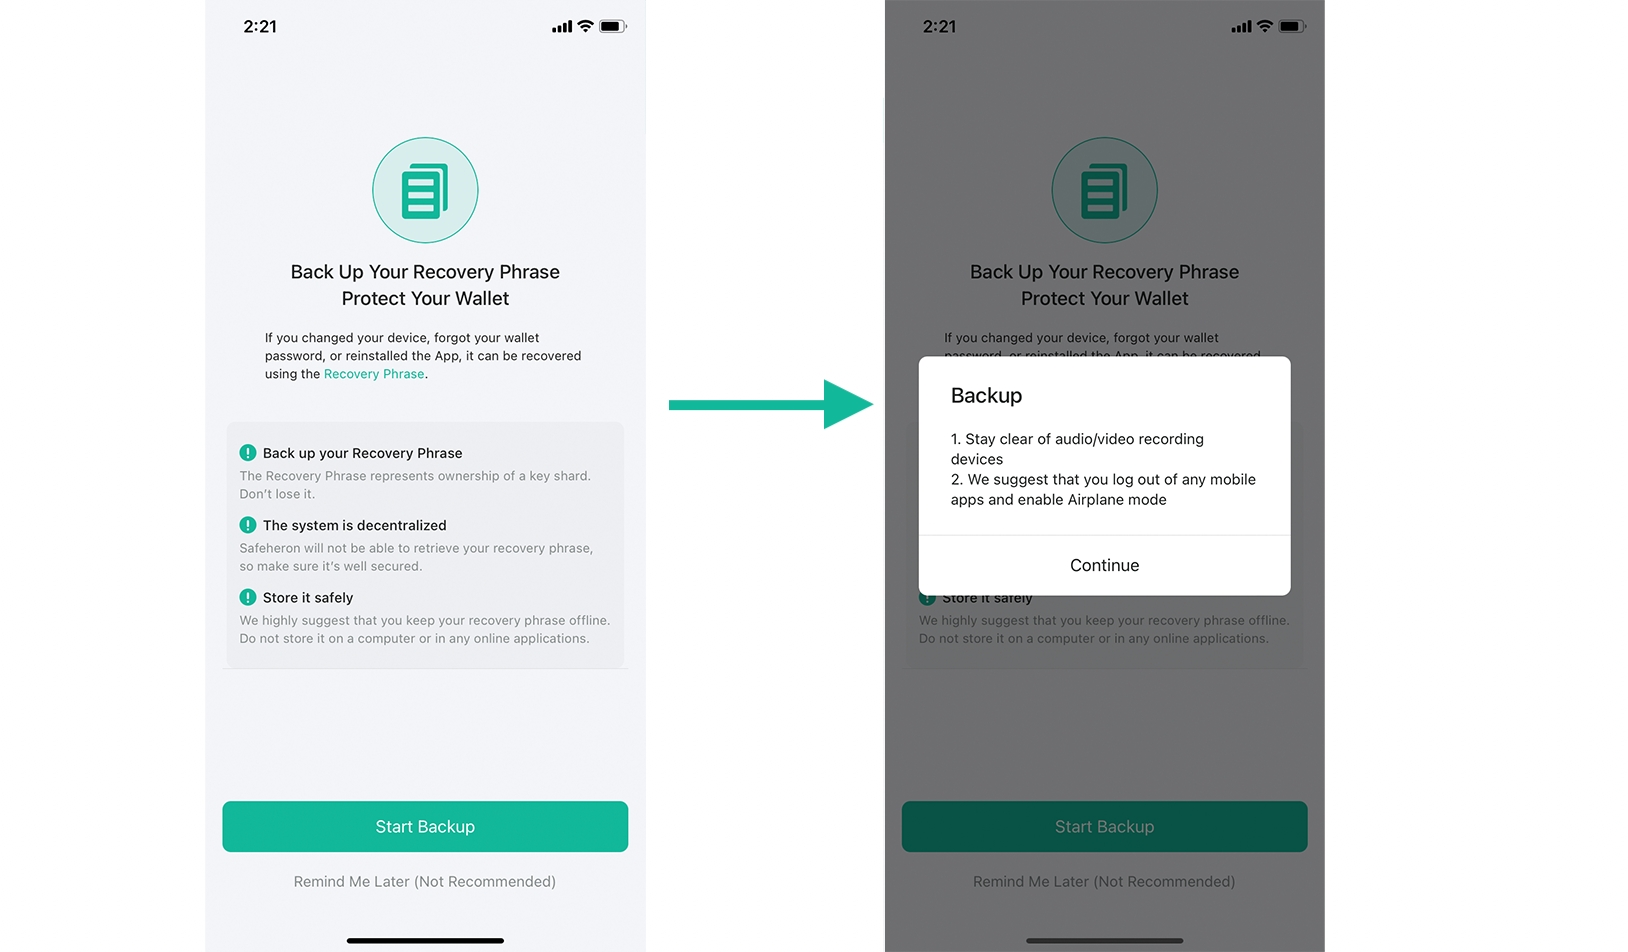
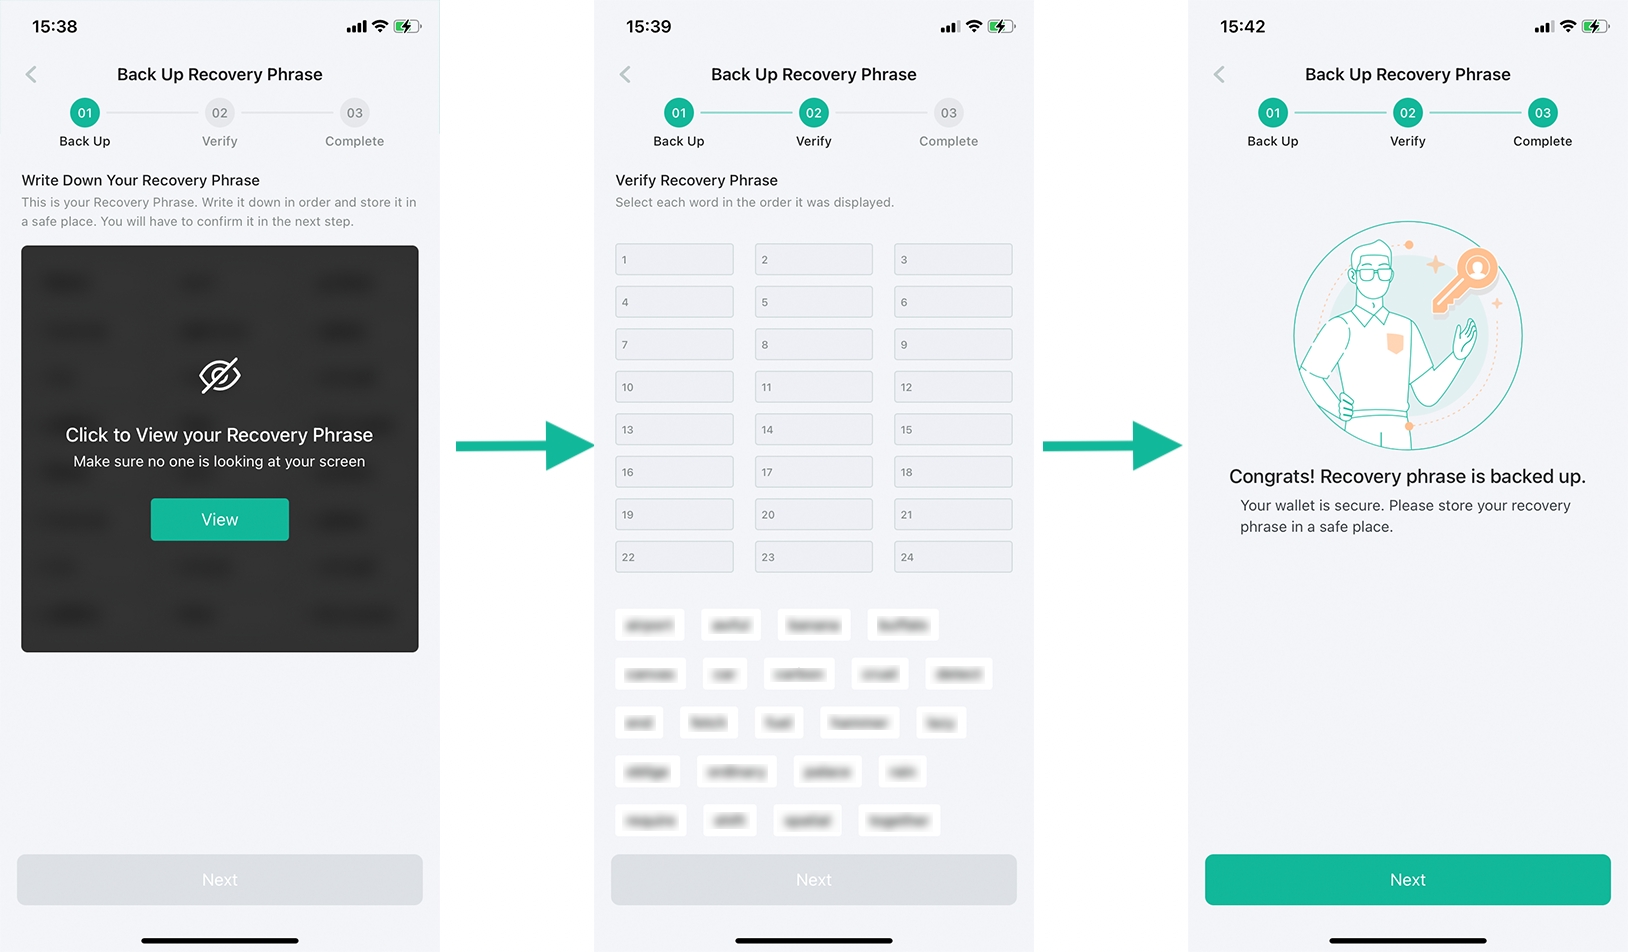
Back Up Recovery Phrase
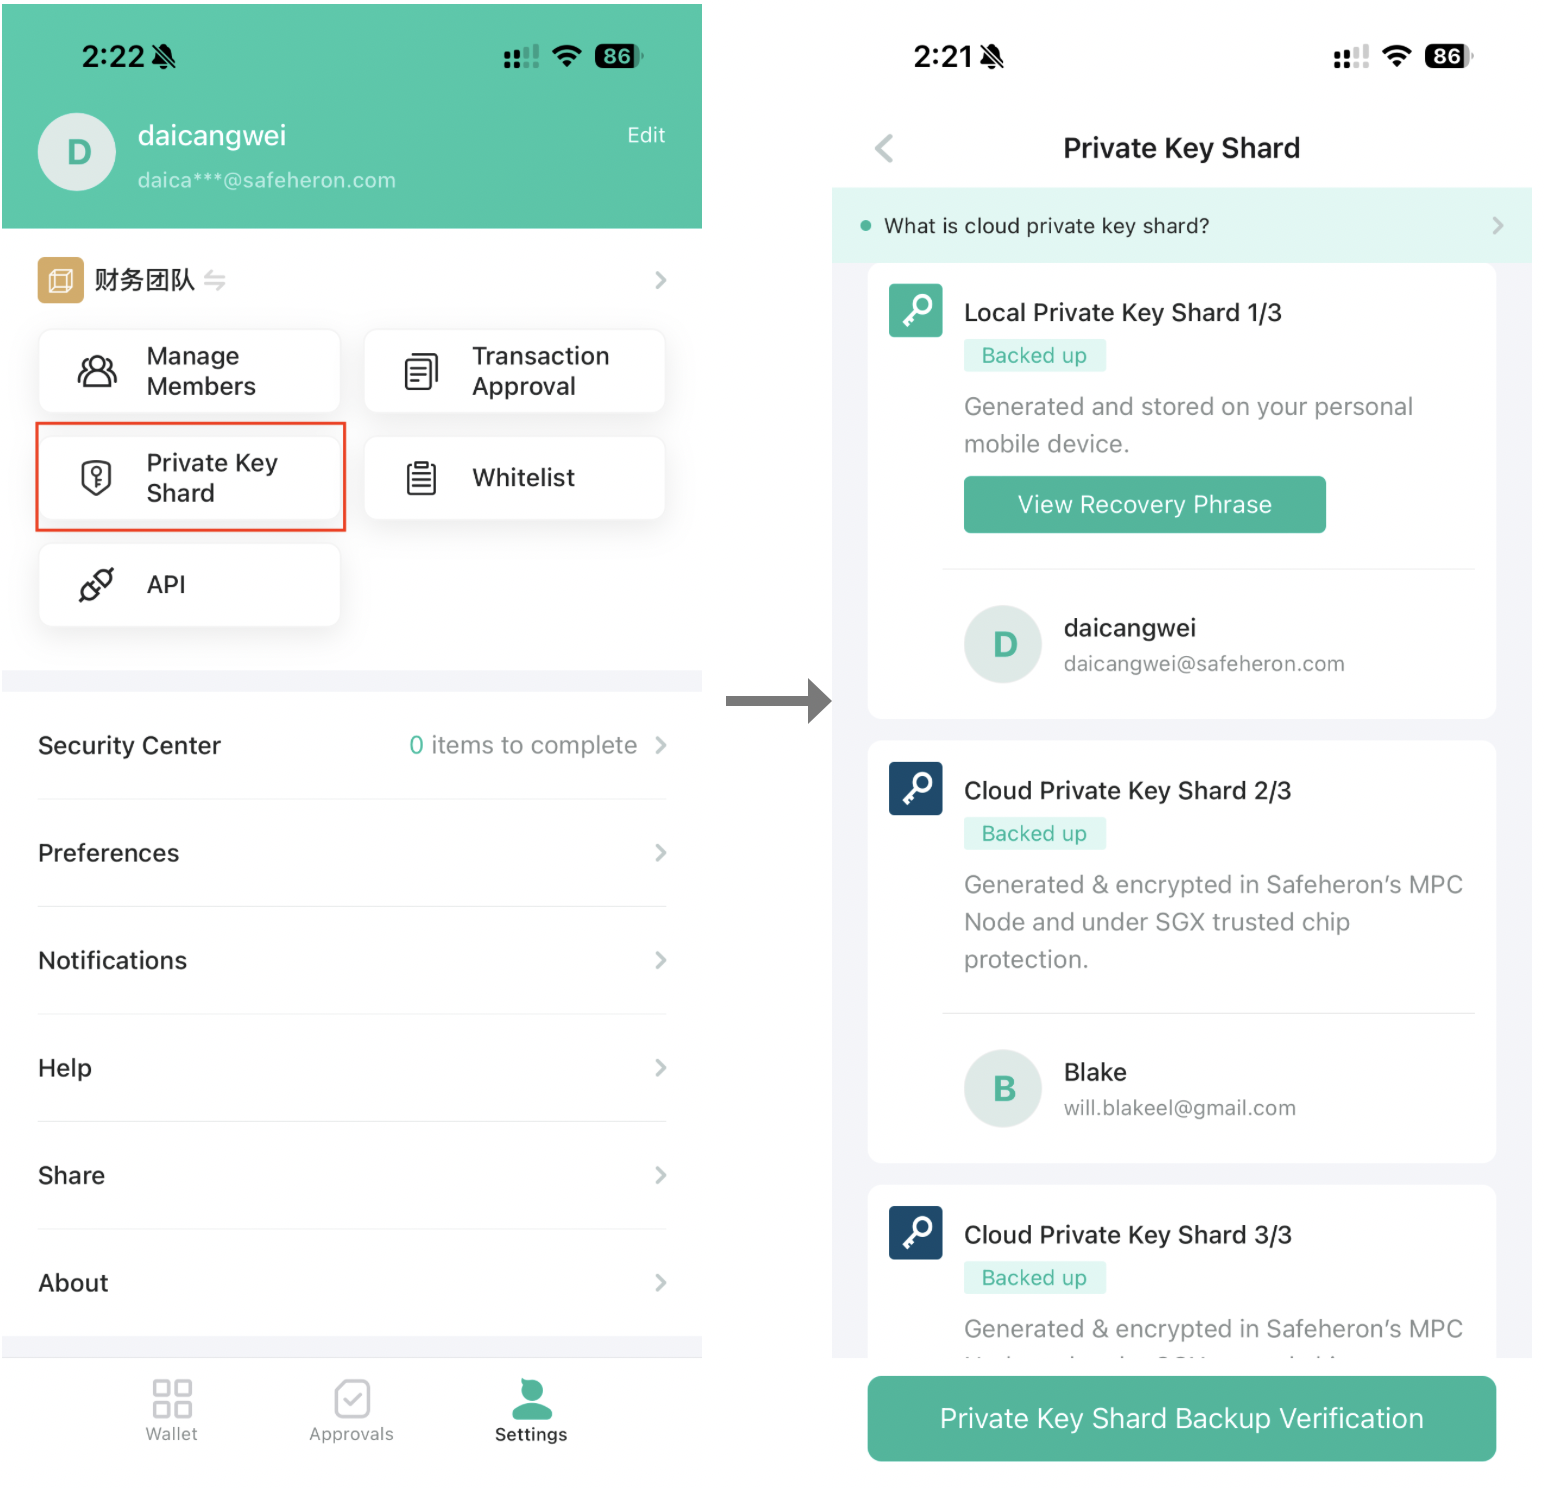
In Safeheron, we have two kinds of key shards to be backed up. One is the local private key shard, which will be stored on your device. Another one is the cloud private key shard, which is encrypted in Safeheron MPC Node under SGX protection.
The only way to recover your wallet is by using the recovery phrase. When backing up, please avoid any audio or visual recording devices, log out of other apps, and turn on airplane mode to ensure that you are the only one who has access to the phrase.
Local Key Shard Backup by Team Creator
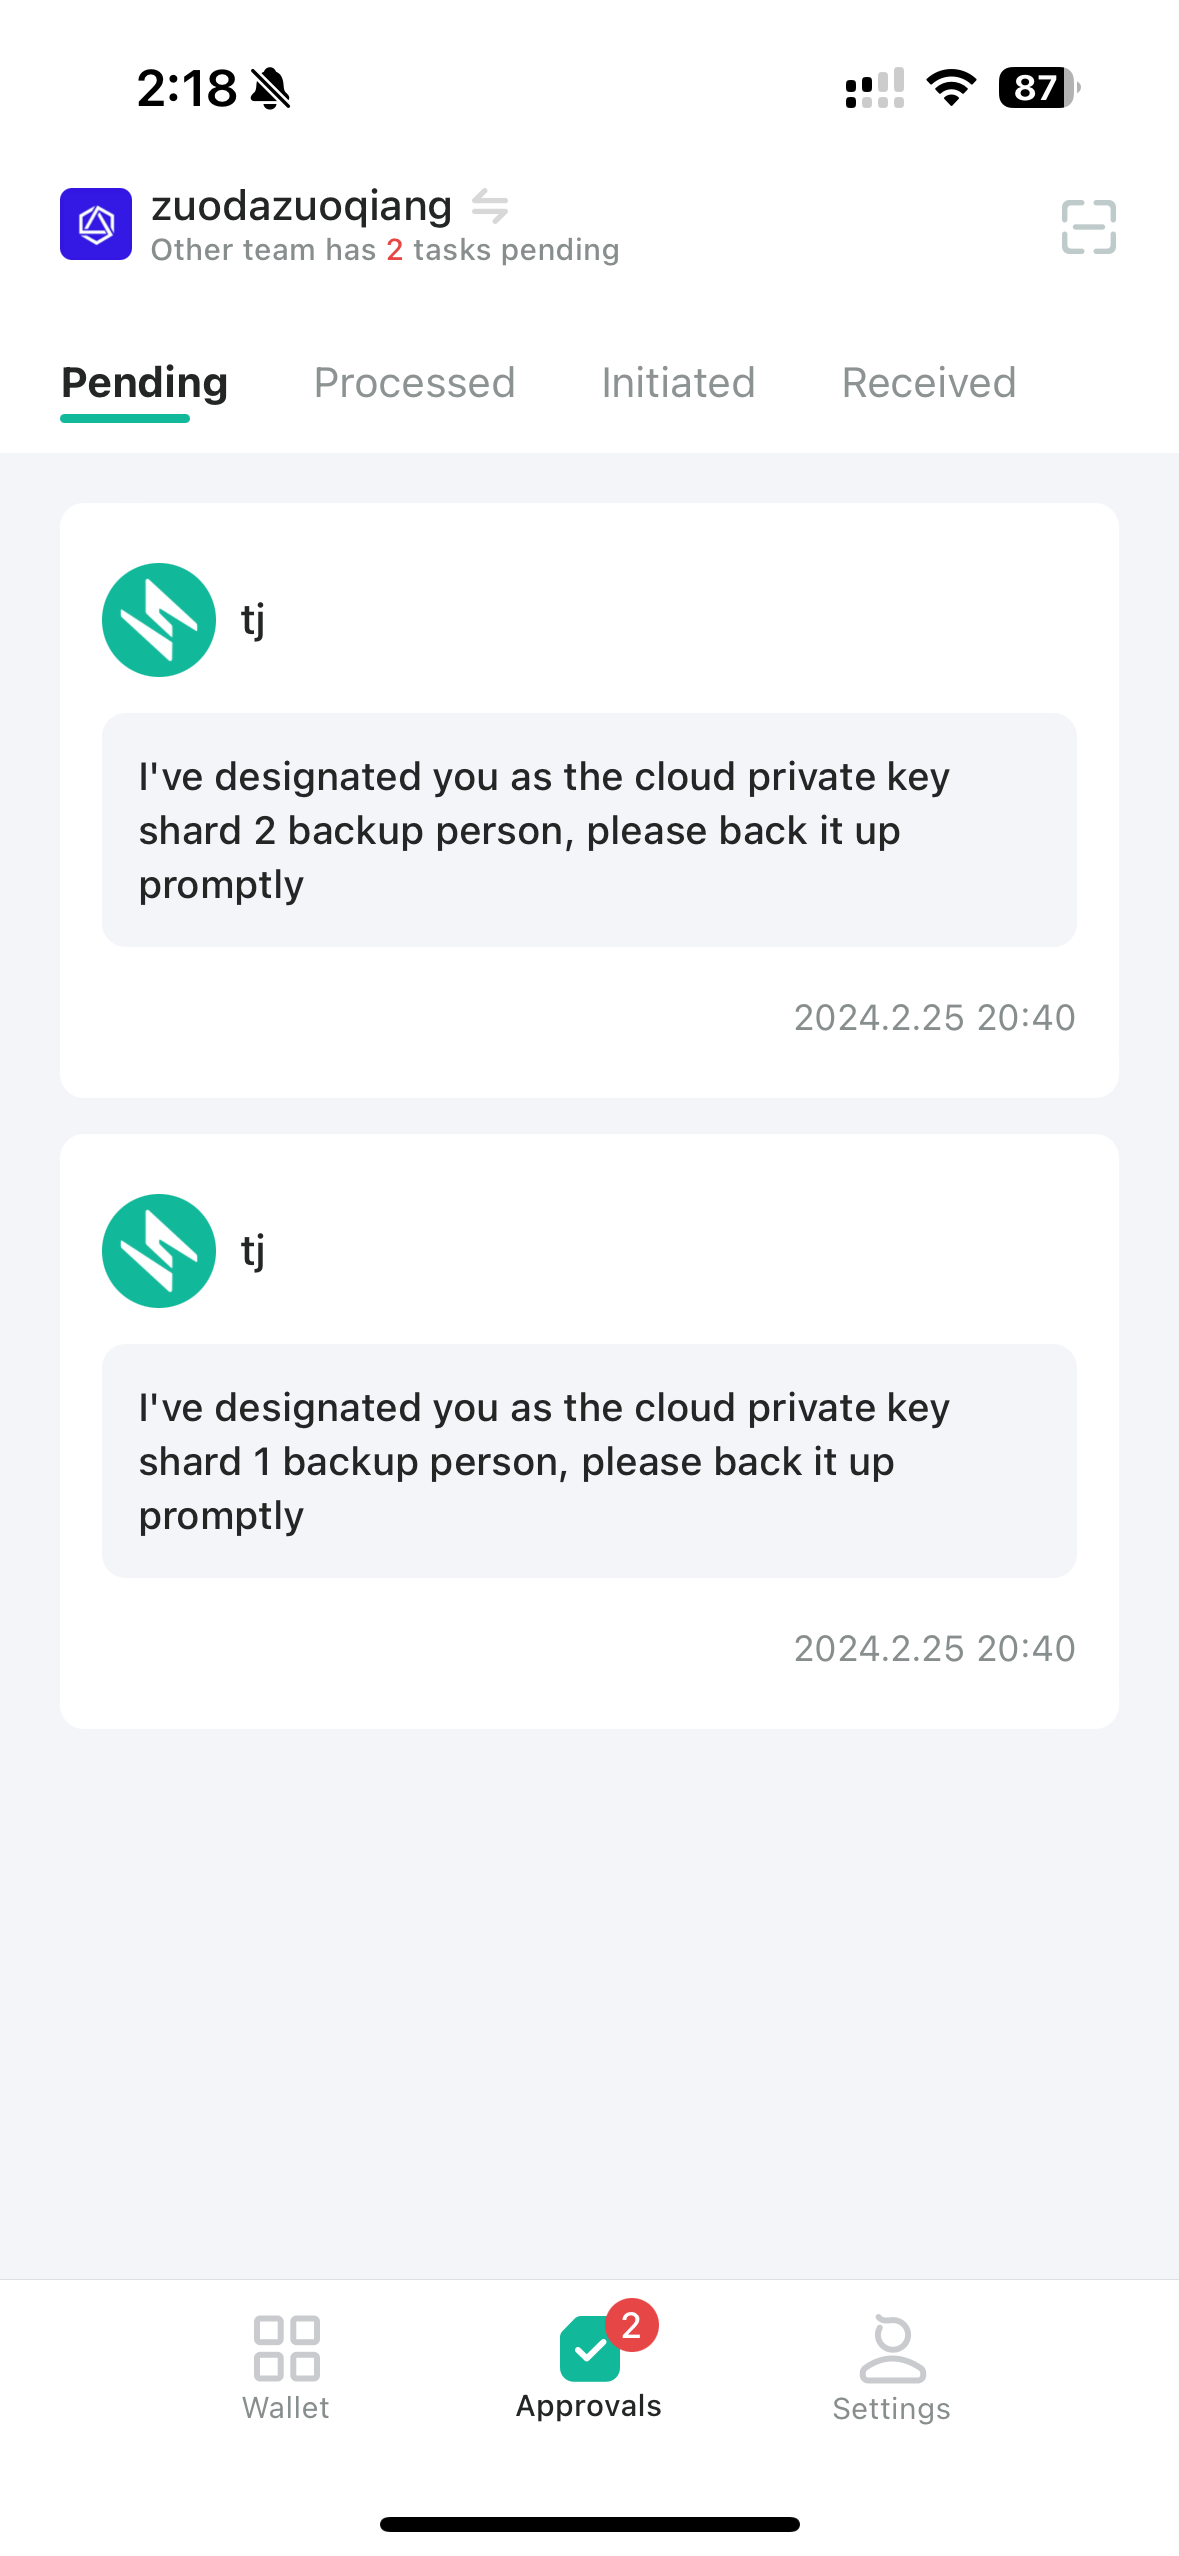
Cloud Key Shard Backup By Appointed Backup Person
The backup individual designated by the team creator will receive the relative pending notification.
The procedure is identical to backing up the local private key shard.
All team members can view the status of the backup by navigating to Me -> Private Key Shard.
We strongly advise the team creator to appoint different team members to back up cloud key shards so that they are backed up in a distributed manner with enhanced security.
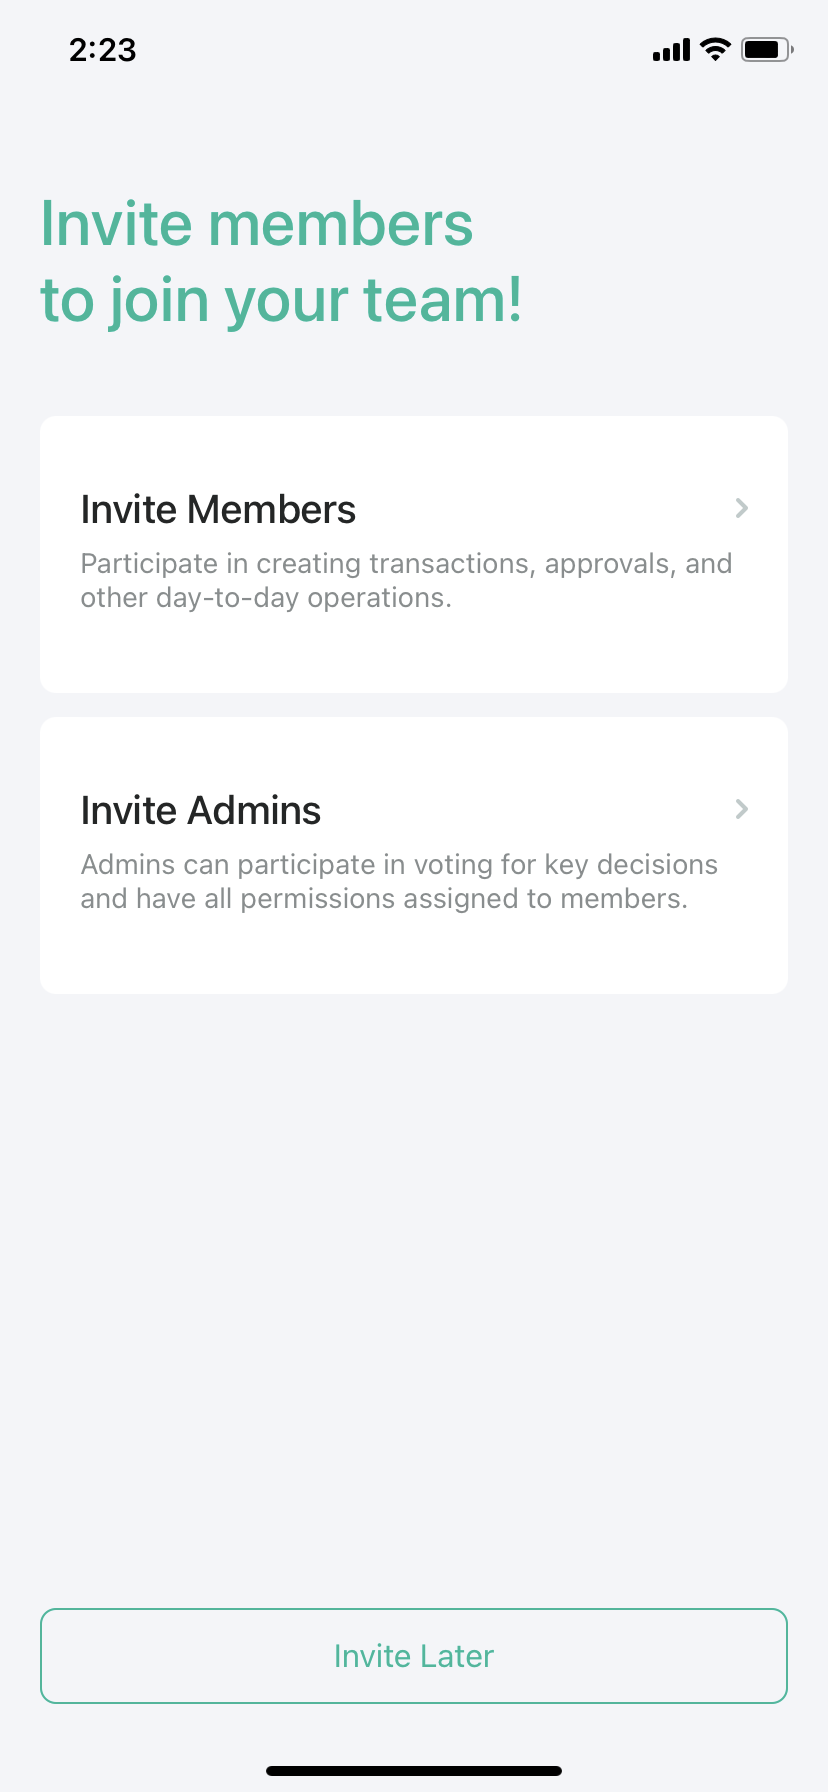
Invite Your Member
The team creator can invite team members as well as admins; A team member with permission Manage Members can invite team members.
The team creator will verify the security certificates of the invited members and admins.
After creating the team, the team creator can select members right away as below.
If the team creator wants to invite members or admins later, he/she can go to Me -> Manage Members to invite.
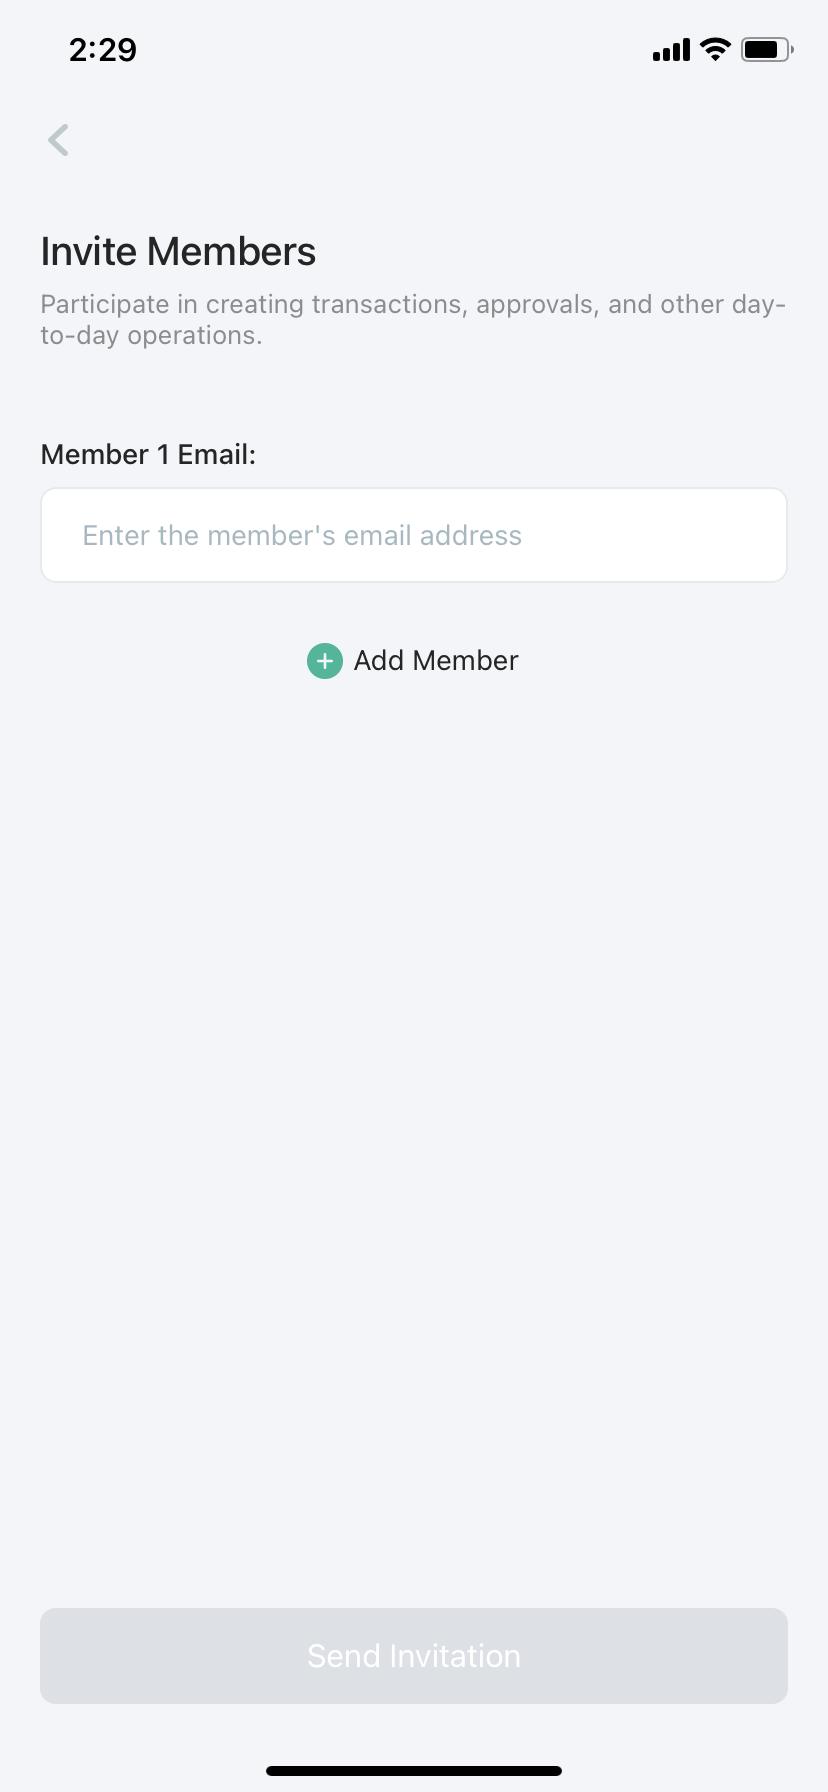
Invite Members
Enter the member's email address and click Send Invitation.
Invite Admins
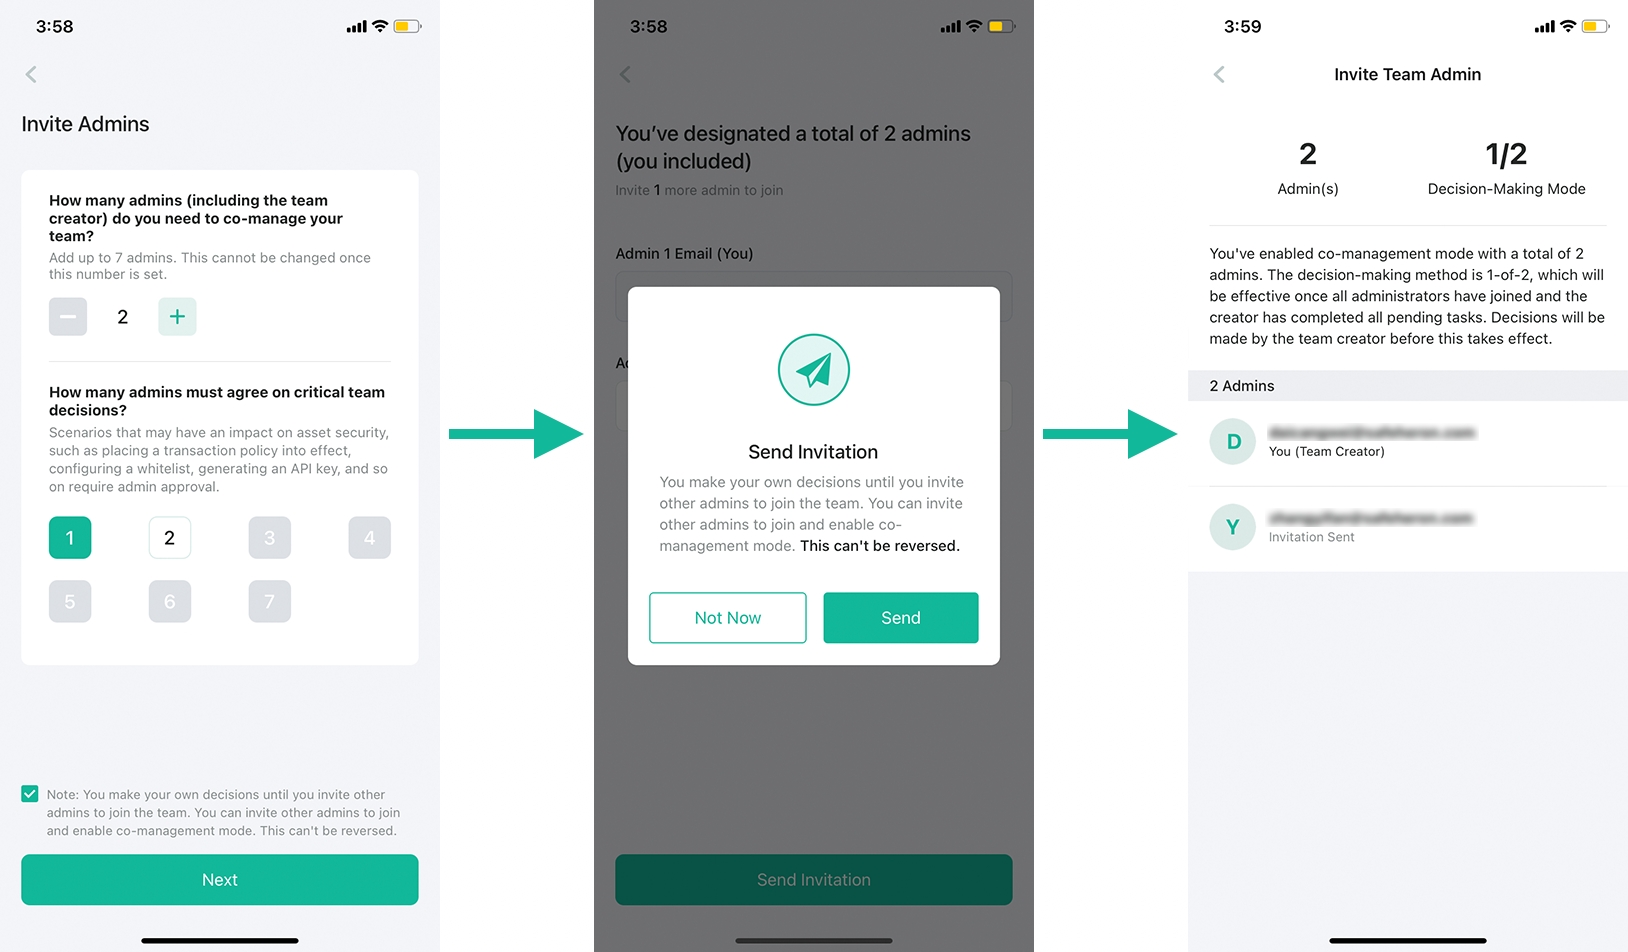
Admins can only be invited by the team creator. Since the team creator is also an admin, all the other admins shall be invited at the same time.
Before inviting admins, the team creator should be clear about the following questions:
How many admins (including the team creator) are needed to co-manage your team?
How many admins are required to make critical decisions together?
The above questions are used to determine the decision-making model.
When the decision-making is made, please enter the admins' email addresses. Reconfirm the invited admin list and review the co-management policy. Once all is confirmed, click Send.
You can check the status and history of invitations in Me -> Manage Members.
You can invite team members continually.
Invitee Joins Team
The process of inviting members is the same as inviting admins.
Take the member invitation for example:
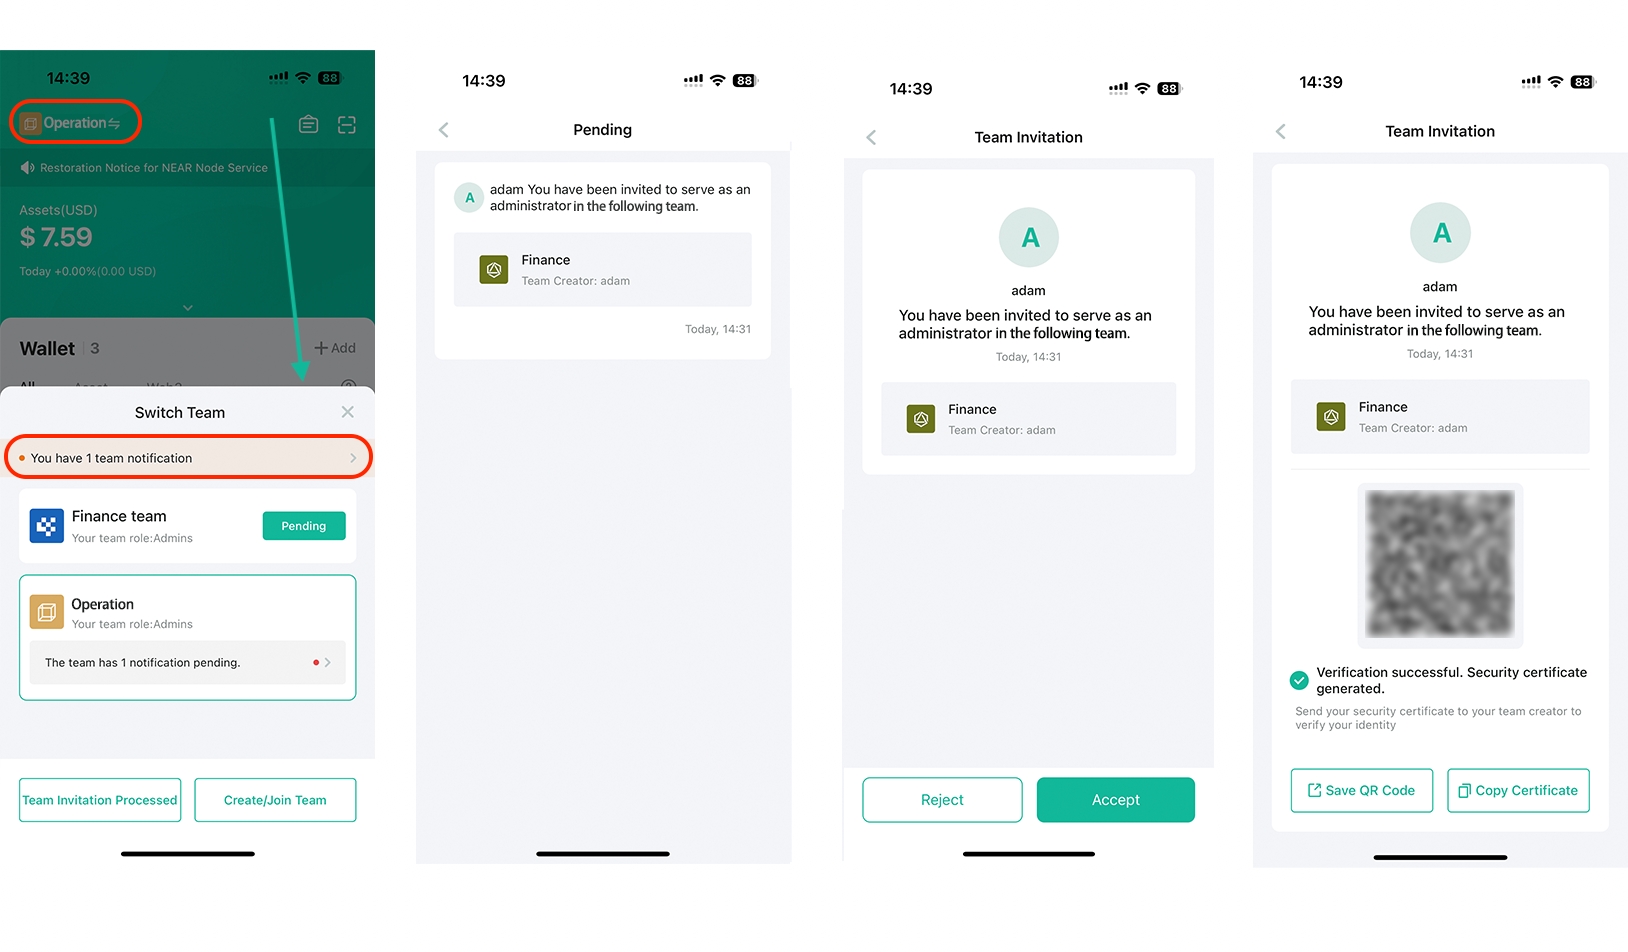
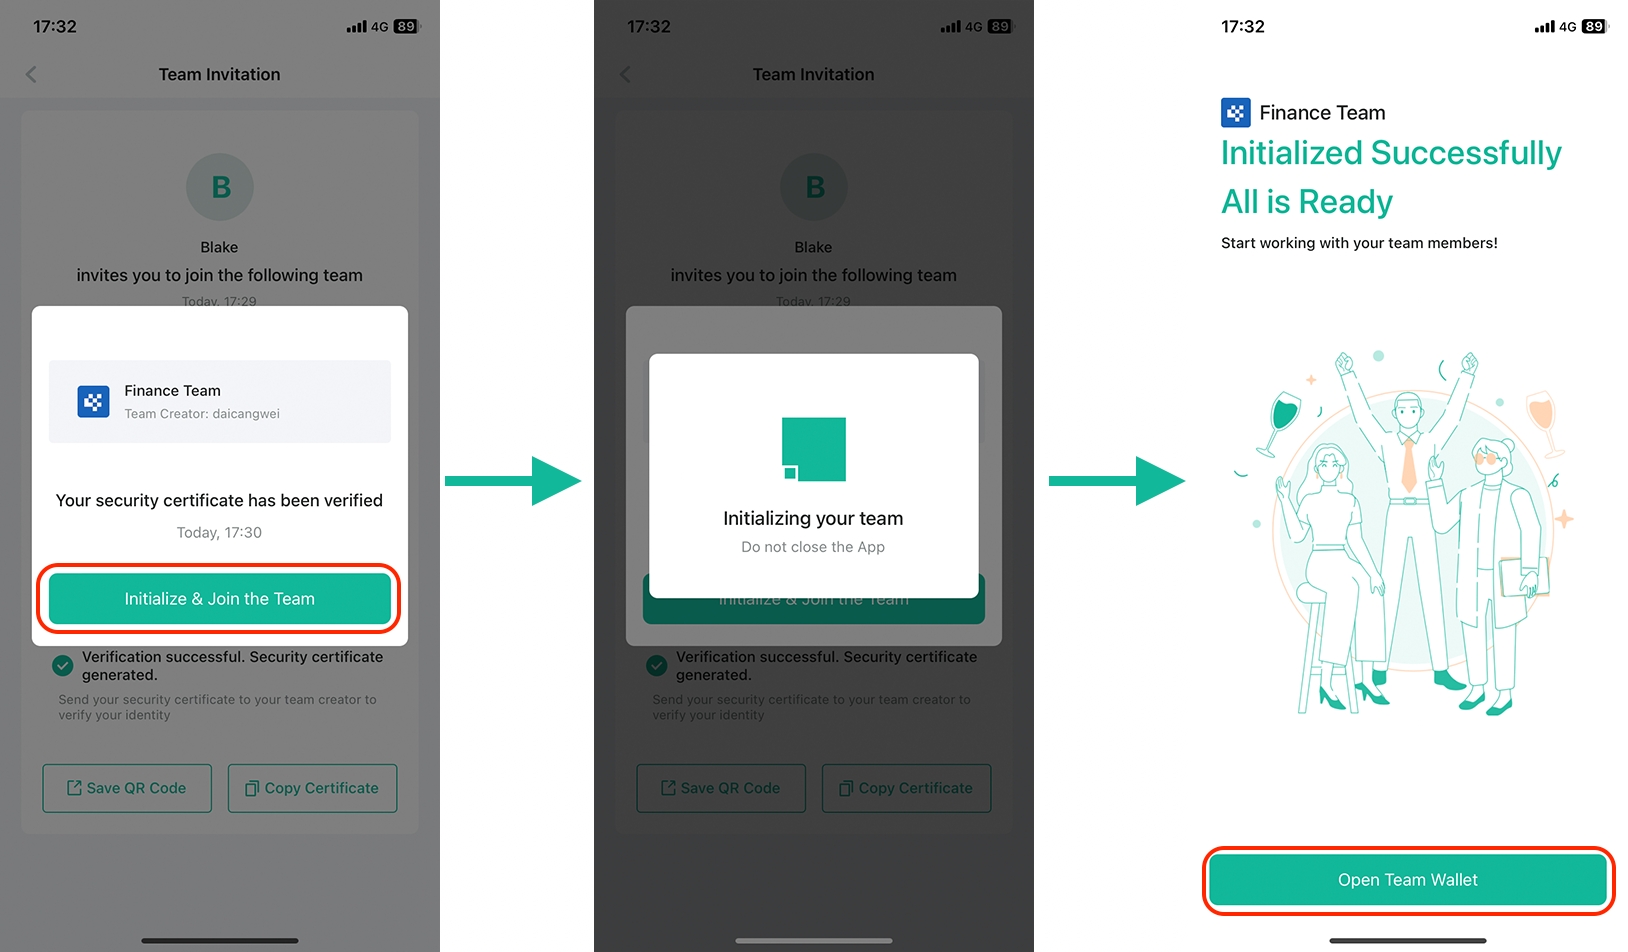
The person who has been invited will get a team invitation on his/her side.
Select the team in the upper left corner of Wallet and review the team invitation. When the invitee clicks Accept, a security certificate for the invitee will be generated.
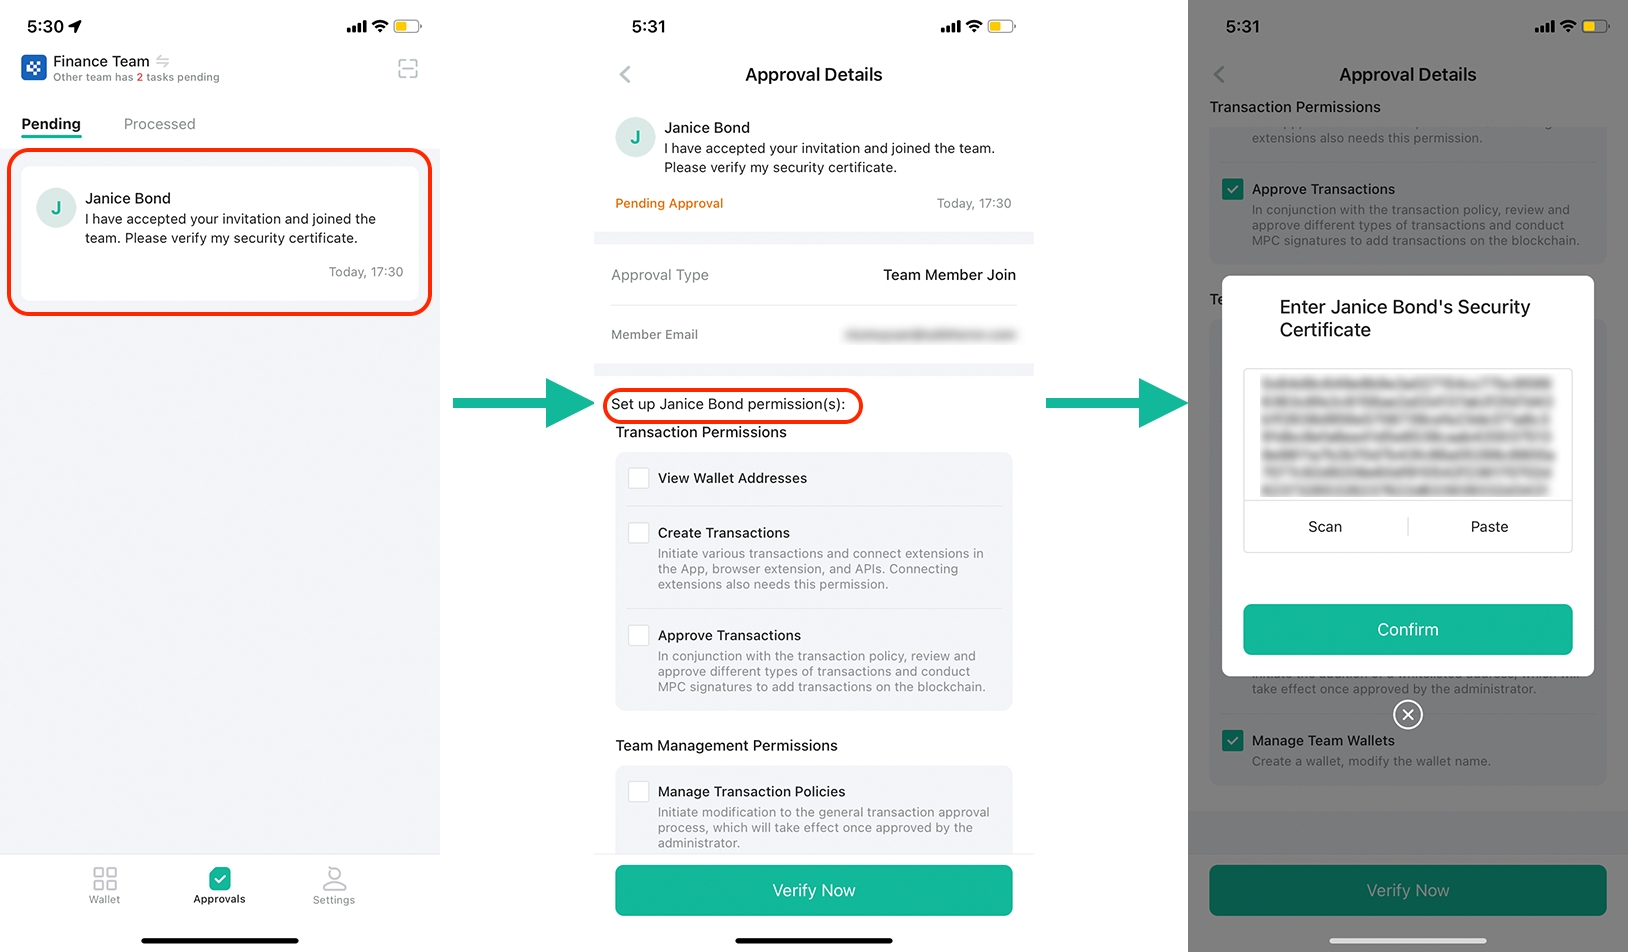
Before officially becoming a member, the security certificate must be verified.
Verify the security certificate
Team Creator-Side
The team creator will have a pending task to verify the invitee’s security certificate by scanning the QR code or pasting the certificate information.
The inviter needs to assign permissions to the invitee who joins as a member; If the invitee joins as an admin, there's no need to assign permissions as all admins have the highest permissions.
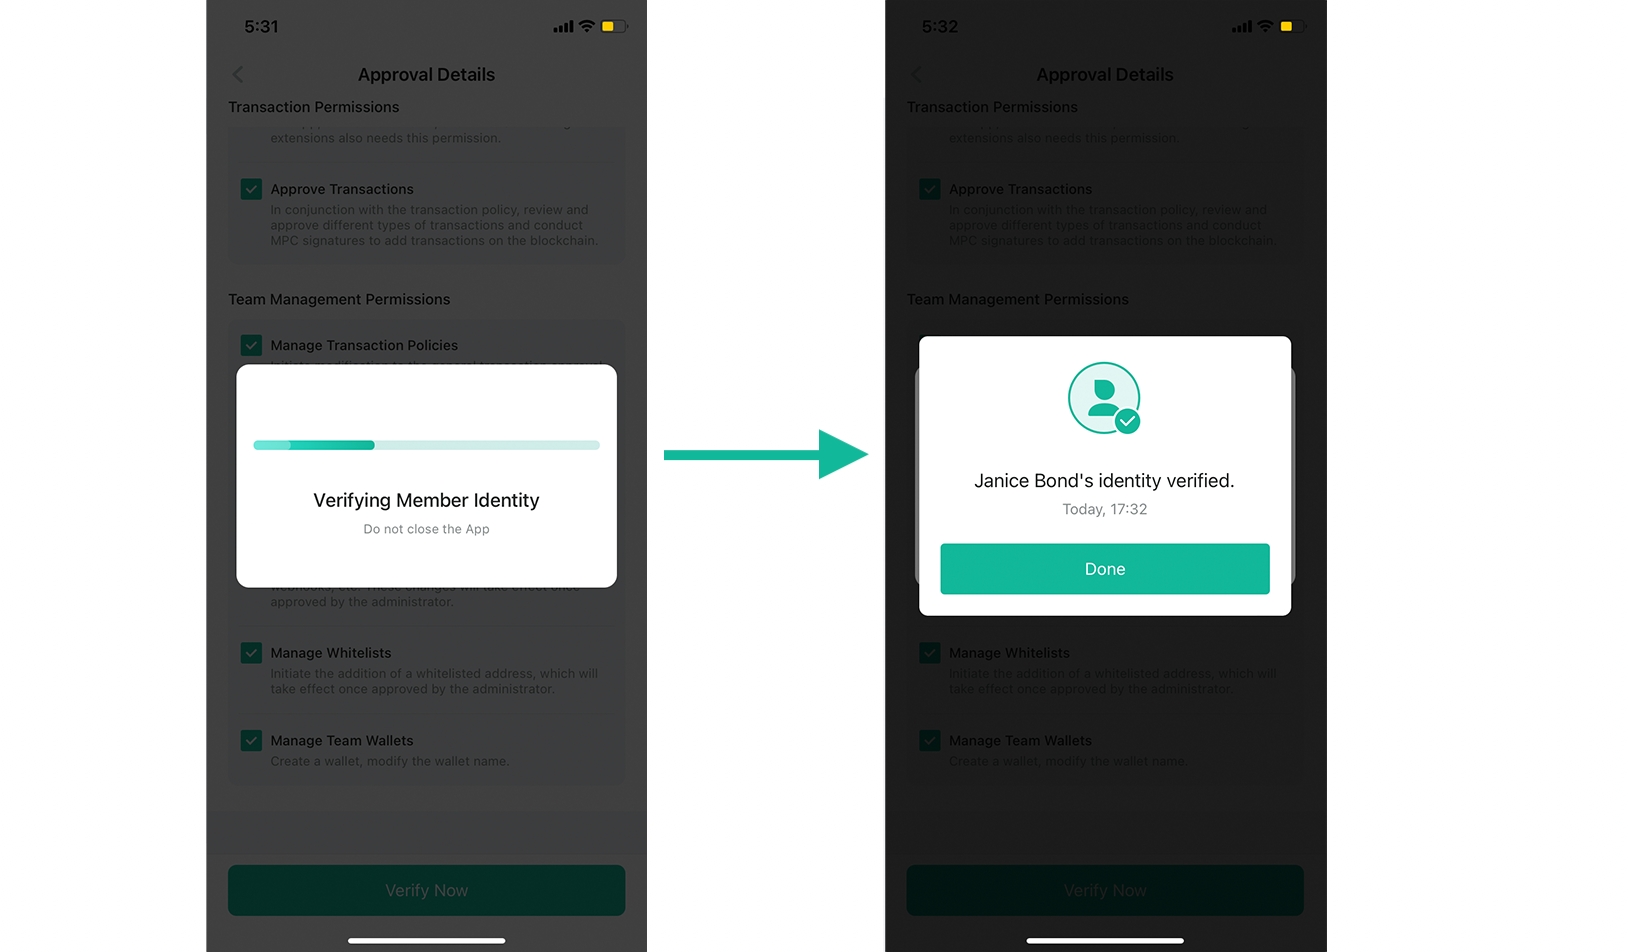
After being verified
Invitee-Side
Once the security certificate is verified, the invitee can successfully initialize and join the team.
Team members can be deleted and their permissions can be changed. However, admins cannot be deleted nor their permissions be changed.
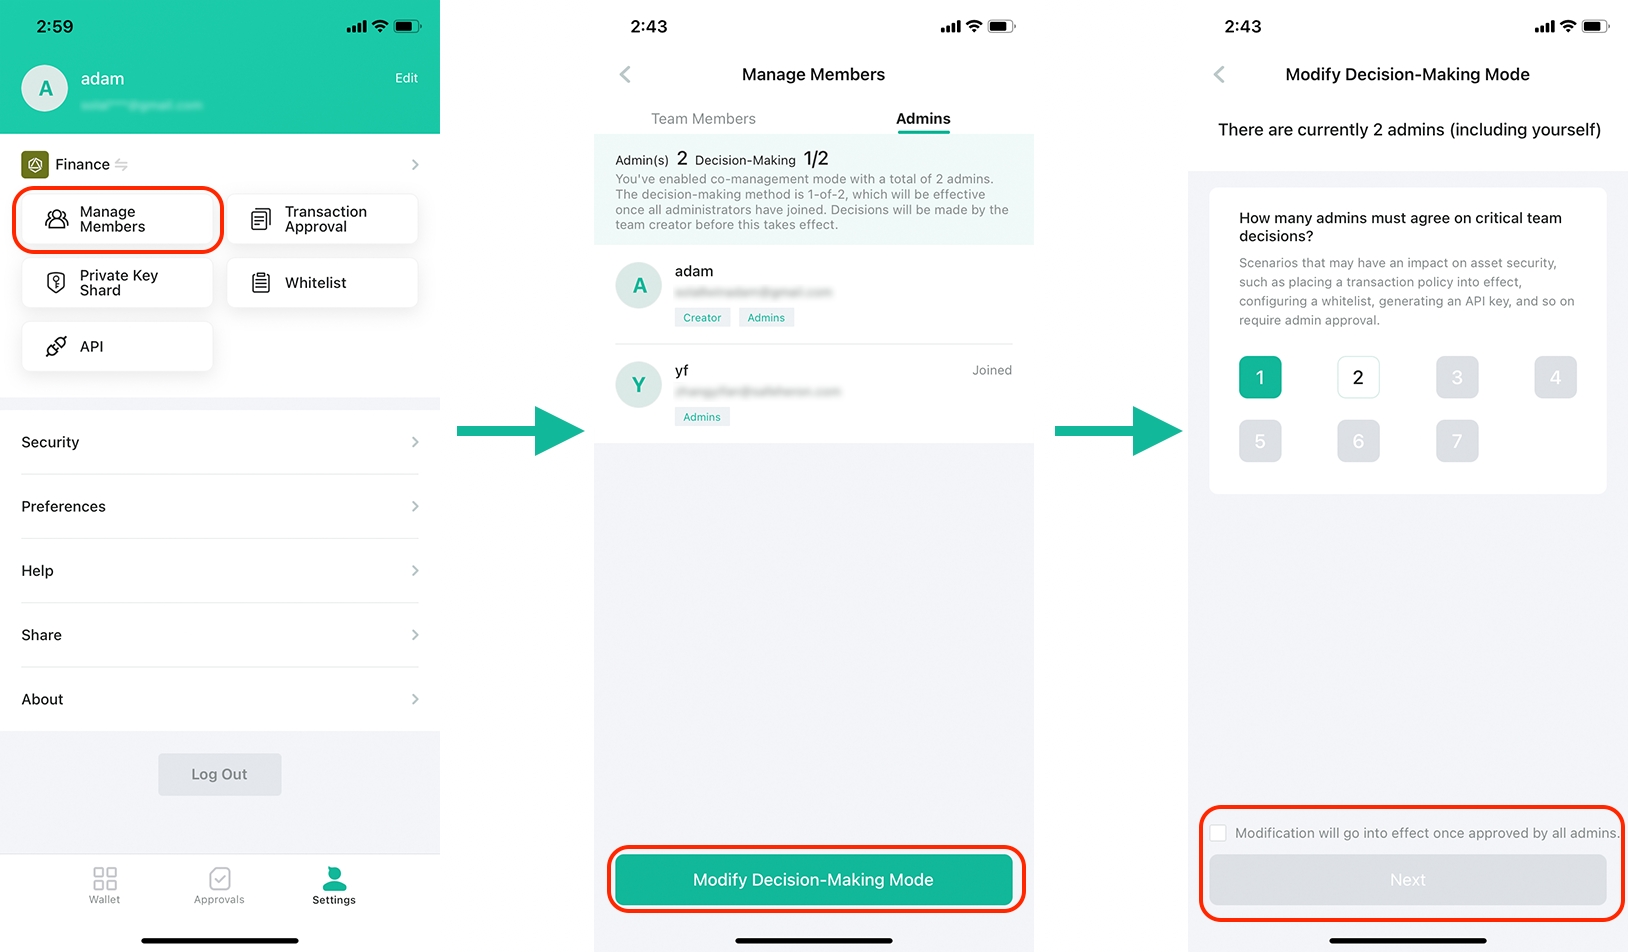
Decision-Making Mode
When the team creator invites admin(s), the decision-making model shall be set up. See Invite Admins for more information.
The team creator shall consider the following two questions:
How many admins do you (the team creator) need to co-manage your team? (It enables co-management)
How many administrators are required to make critical decisions together?
Once all admins have joined, the decision-making mode will be activated immediately.
However, admins can change the existing decision-making model.
Once the decision-making mode is modified, no further changes can be made unless the existing modification is rejected or approved.
You can go to Manage Members -> Admins to View Approval Status.
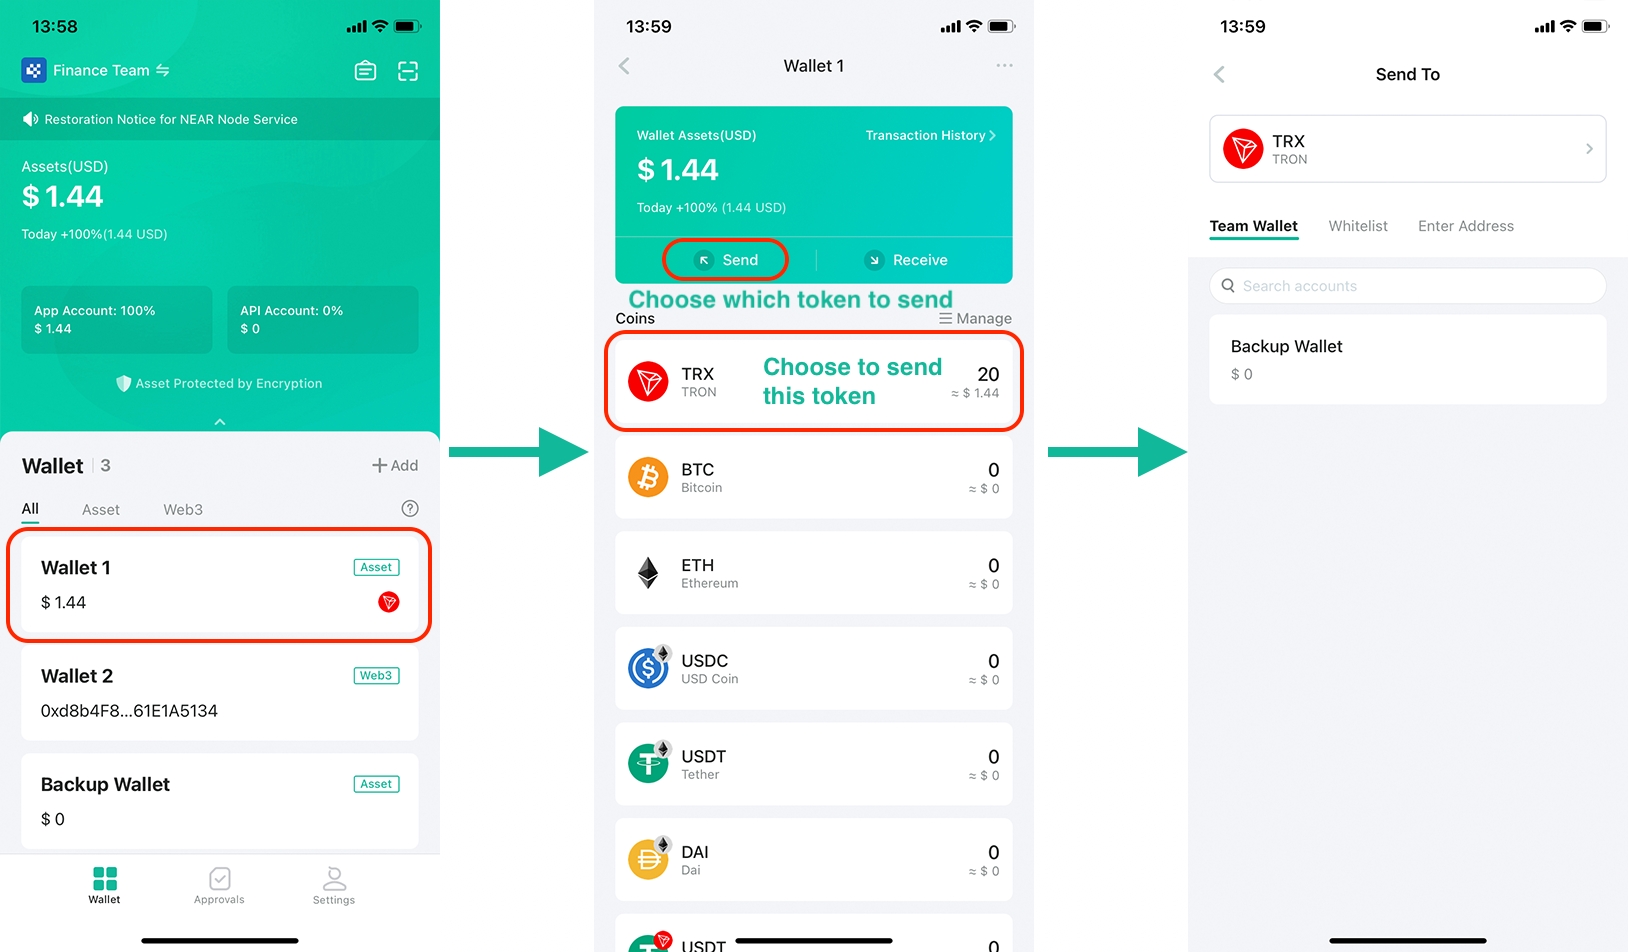
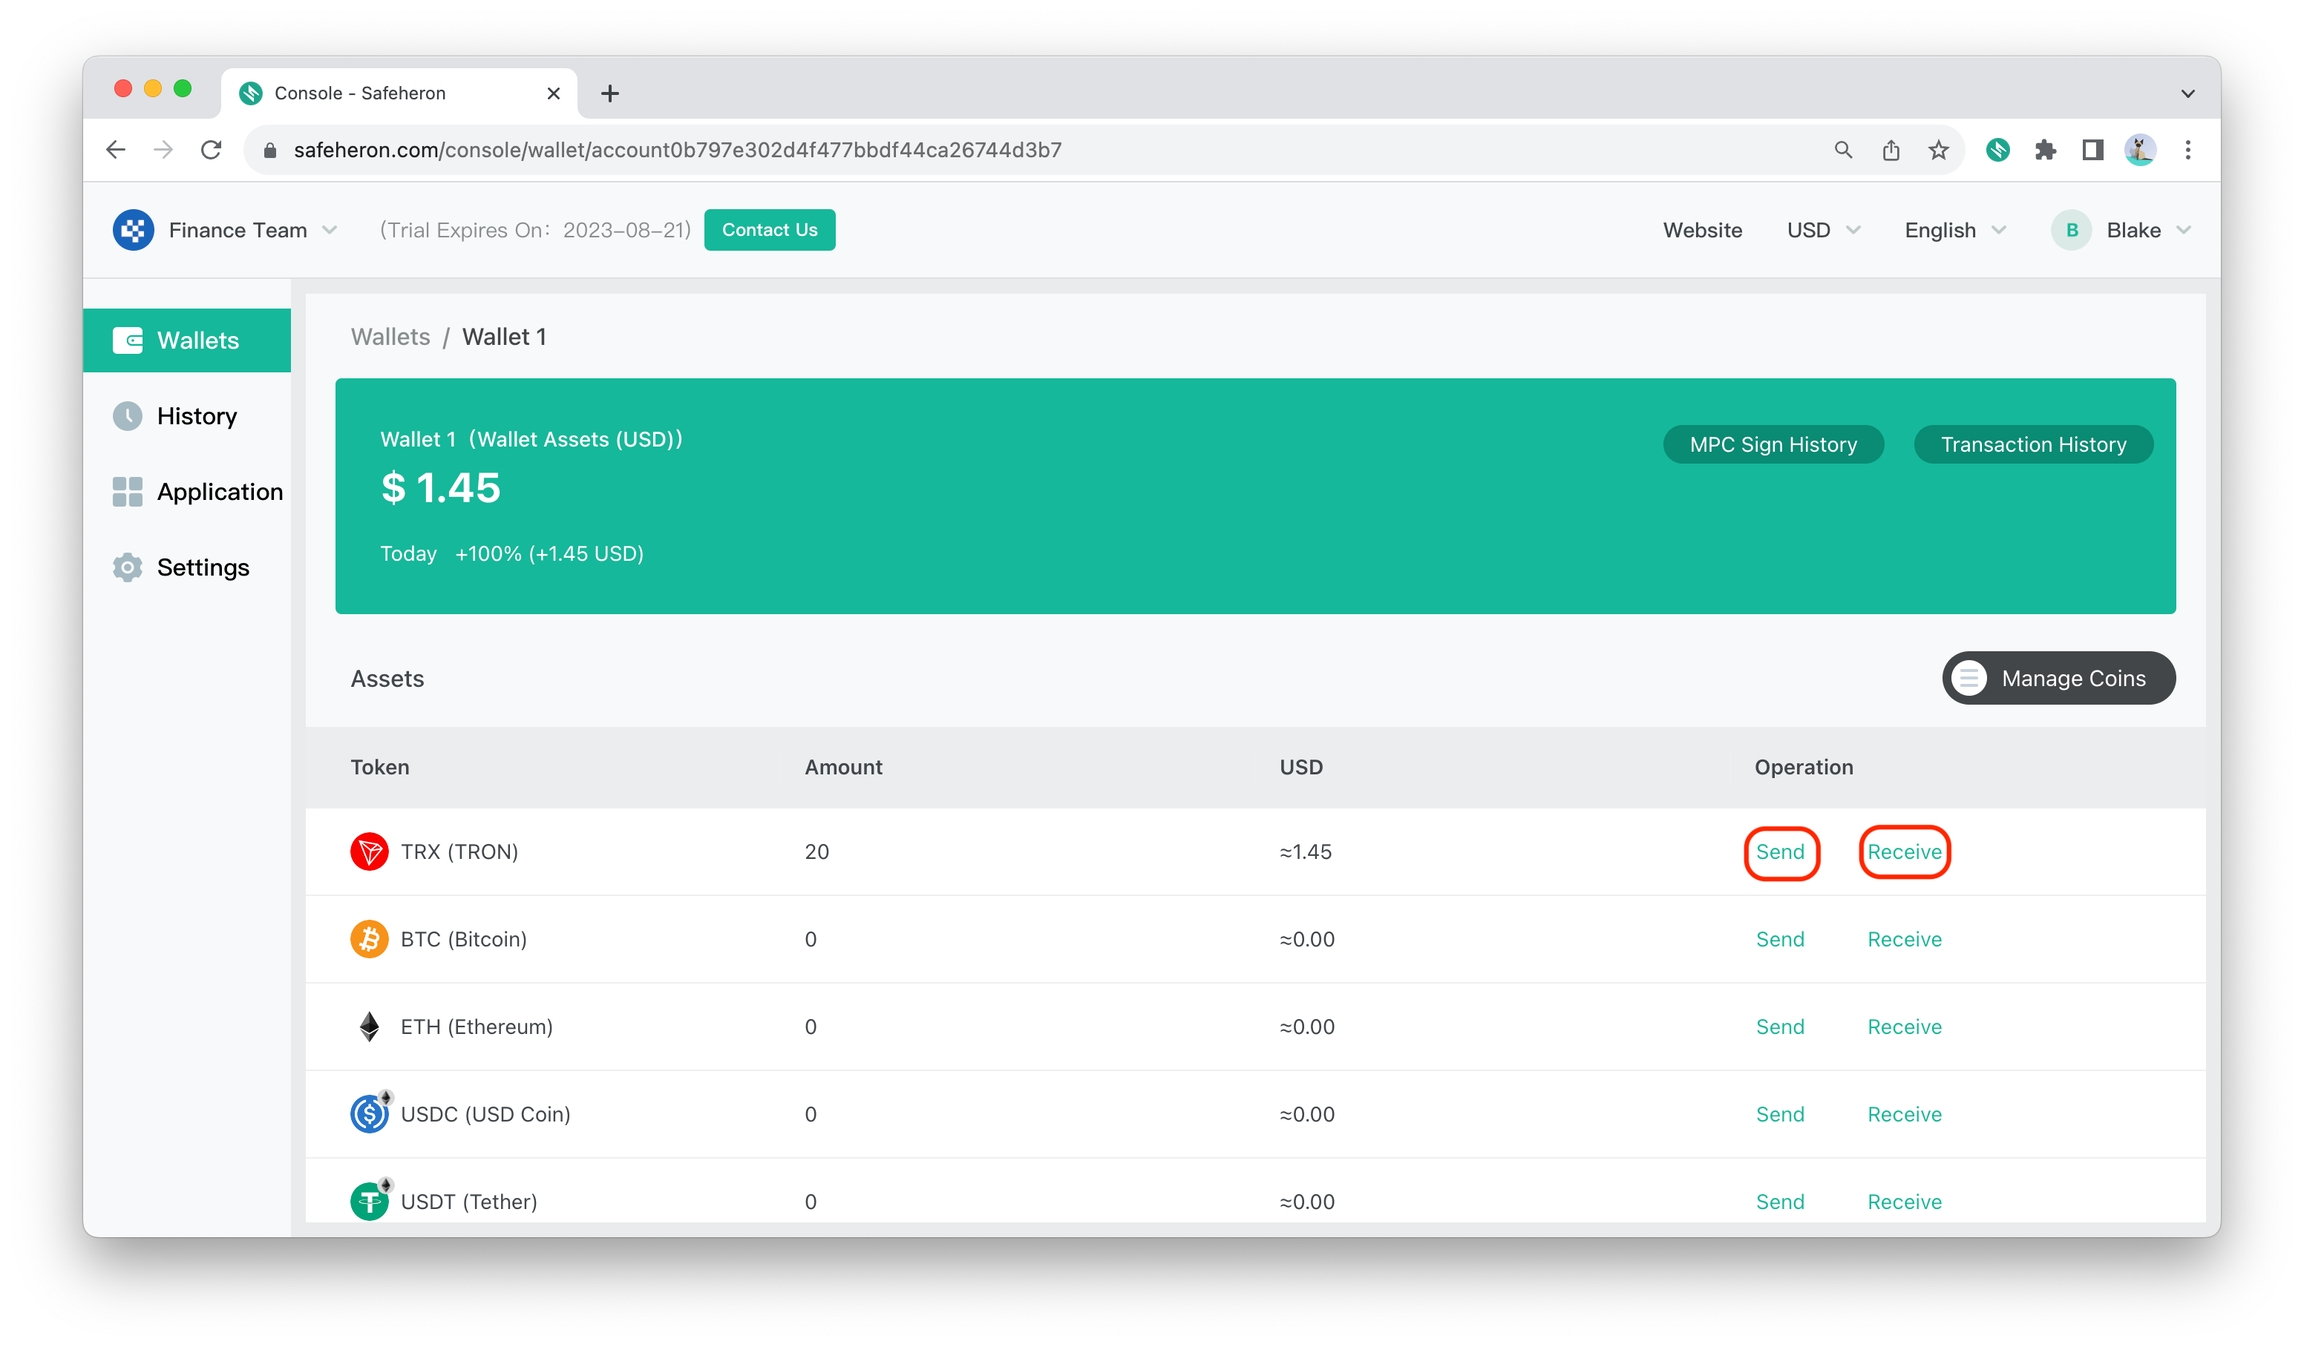
Send & Receive
Safeheron's sending and receiving functions are identical to those popular wallets.
Clear and simple, all in one step.
Receive ETH
You can provide the sender with a QR code or the receiving address.
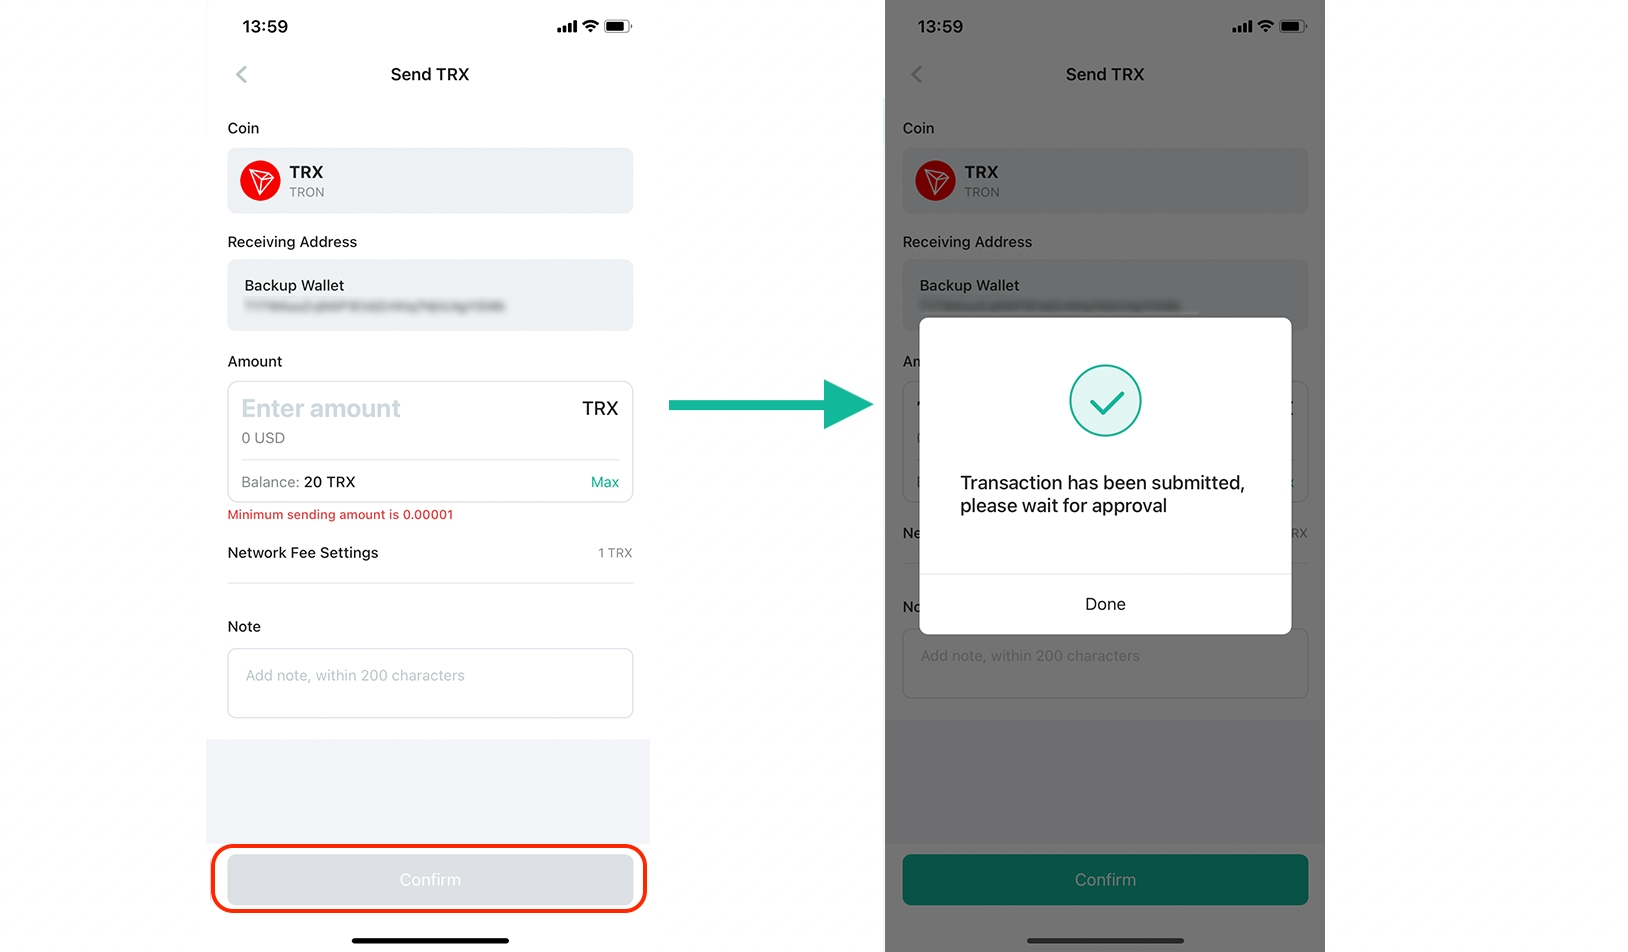
Send TRX
Through Safeheron, you can transfer assets to the team wallets, whitelists (confirmed and approved), as well as receiving addresses.
If co-management is enabled, transactions need to be approved to be signed by MPC.
Safeheron Transaction Policy
Safeheron transaction policies can be configured up to five dimensions: initiator, source, destination, asset types, and amount. Please refer to Transfer Policy for more details.
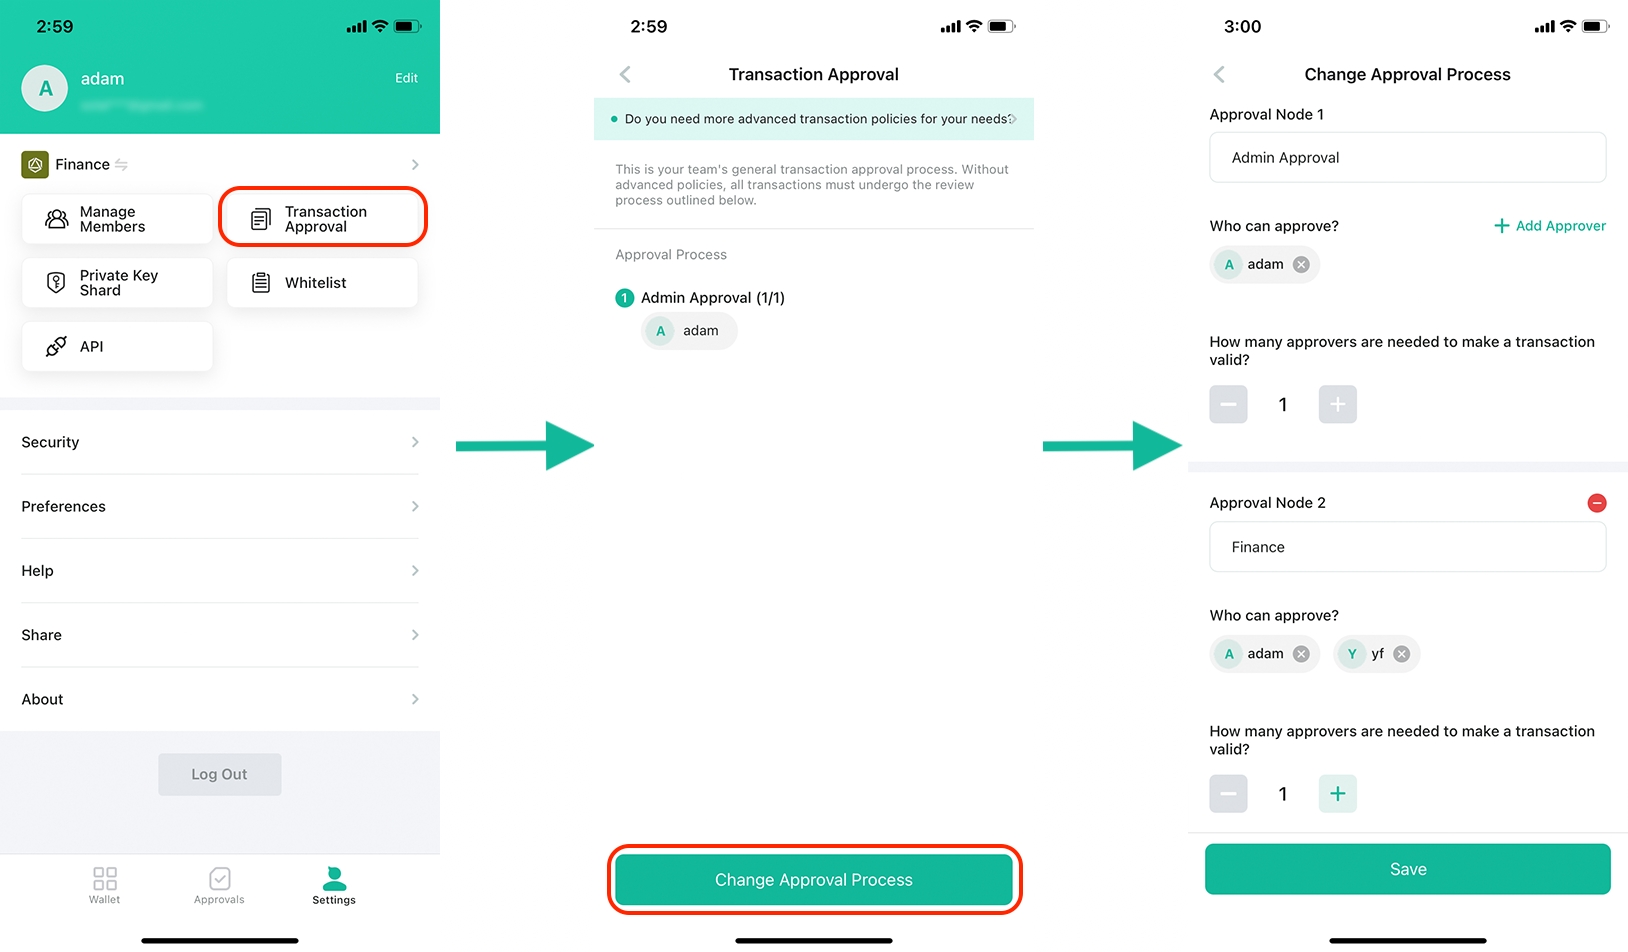
Basic Transaction Policy
Transactions can be created by any team member with Create Transaction permission, without restrictions on sending and receiving addresses, asset types, and amounts.
You can only modify the approval process in the basic transaction policy: the number of needed approval nodes (up to 3), approvers in each node, and the quorum for each node.
Approval Process: Once one person in this node rejects, the whole round is not approved; One one round is not approved, the entire process is forcibly ended.
You need to re-initiate the transaction.
Advanced Transaction Policy
You can customize your own policy, configuring it with five dimensions: initiator, source, destination, asset types, and amount.
Basic Transaction Policy Setup
The Safeheron App allows you to view your basic transaction policy and modify its approval process.
Advanced Transaction Policy Setup
The advanced transaction policy can only be viewed on the Safeheron Web Console.
If you need advanced transaction policies, please email your team ID and requirements to support@safeheron.com.
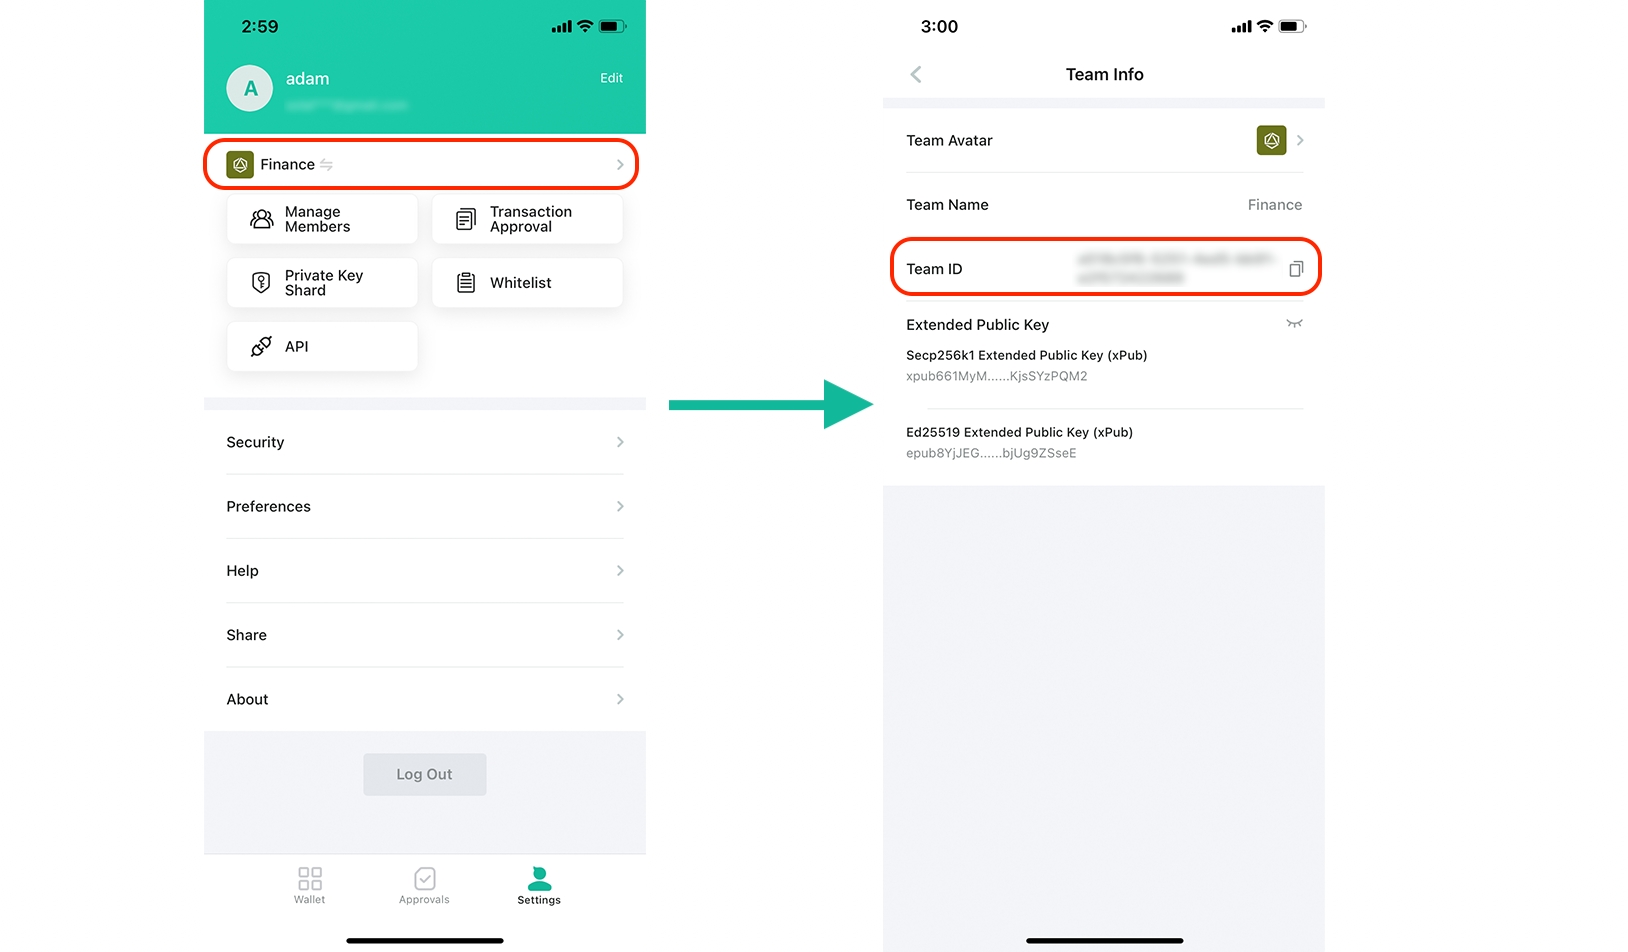
Find your team ID
If you want to view existing advanced policies, please log into Safeheron Web Console and View Advanced Transaction Policy.
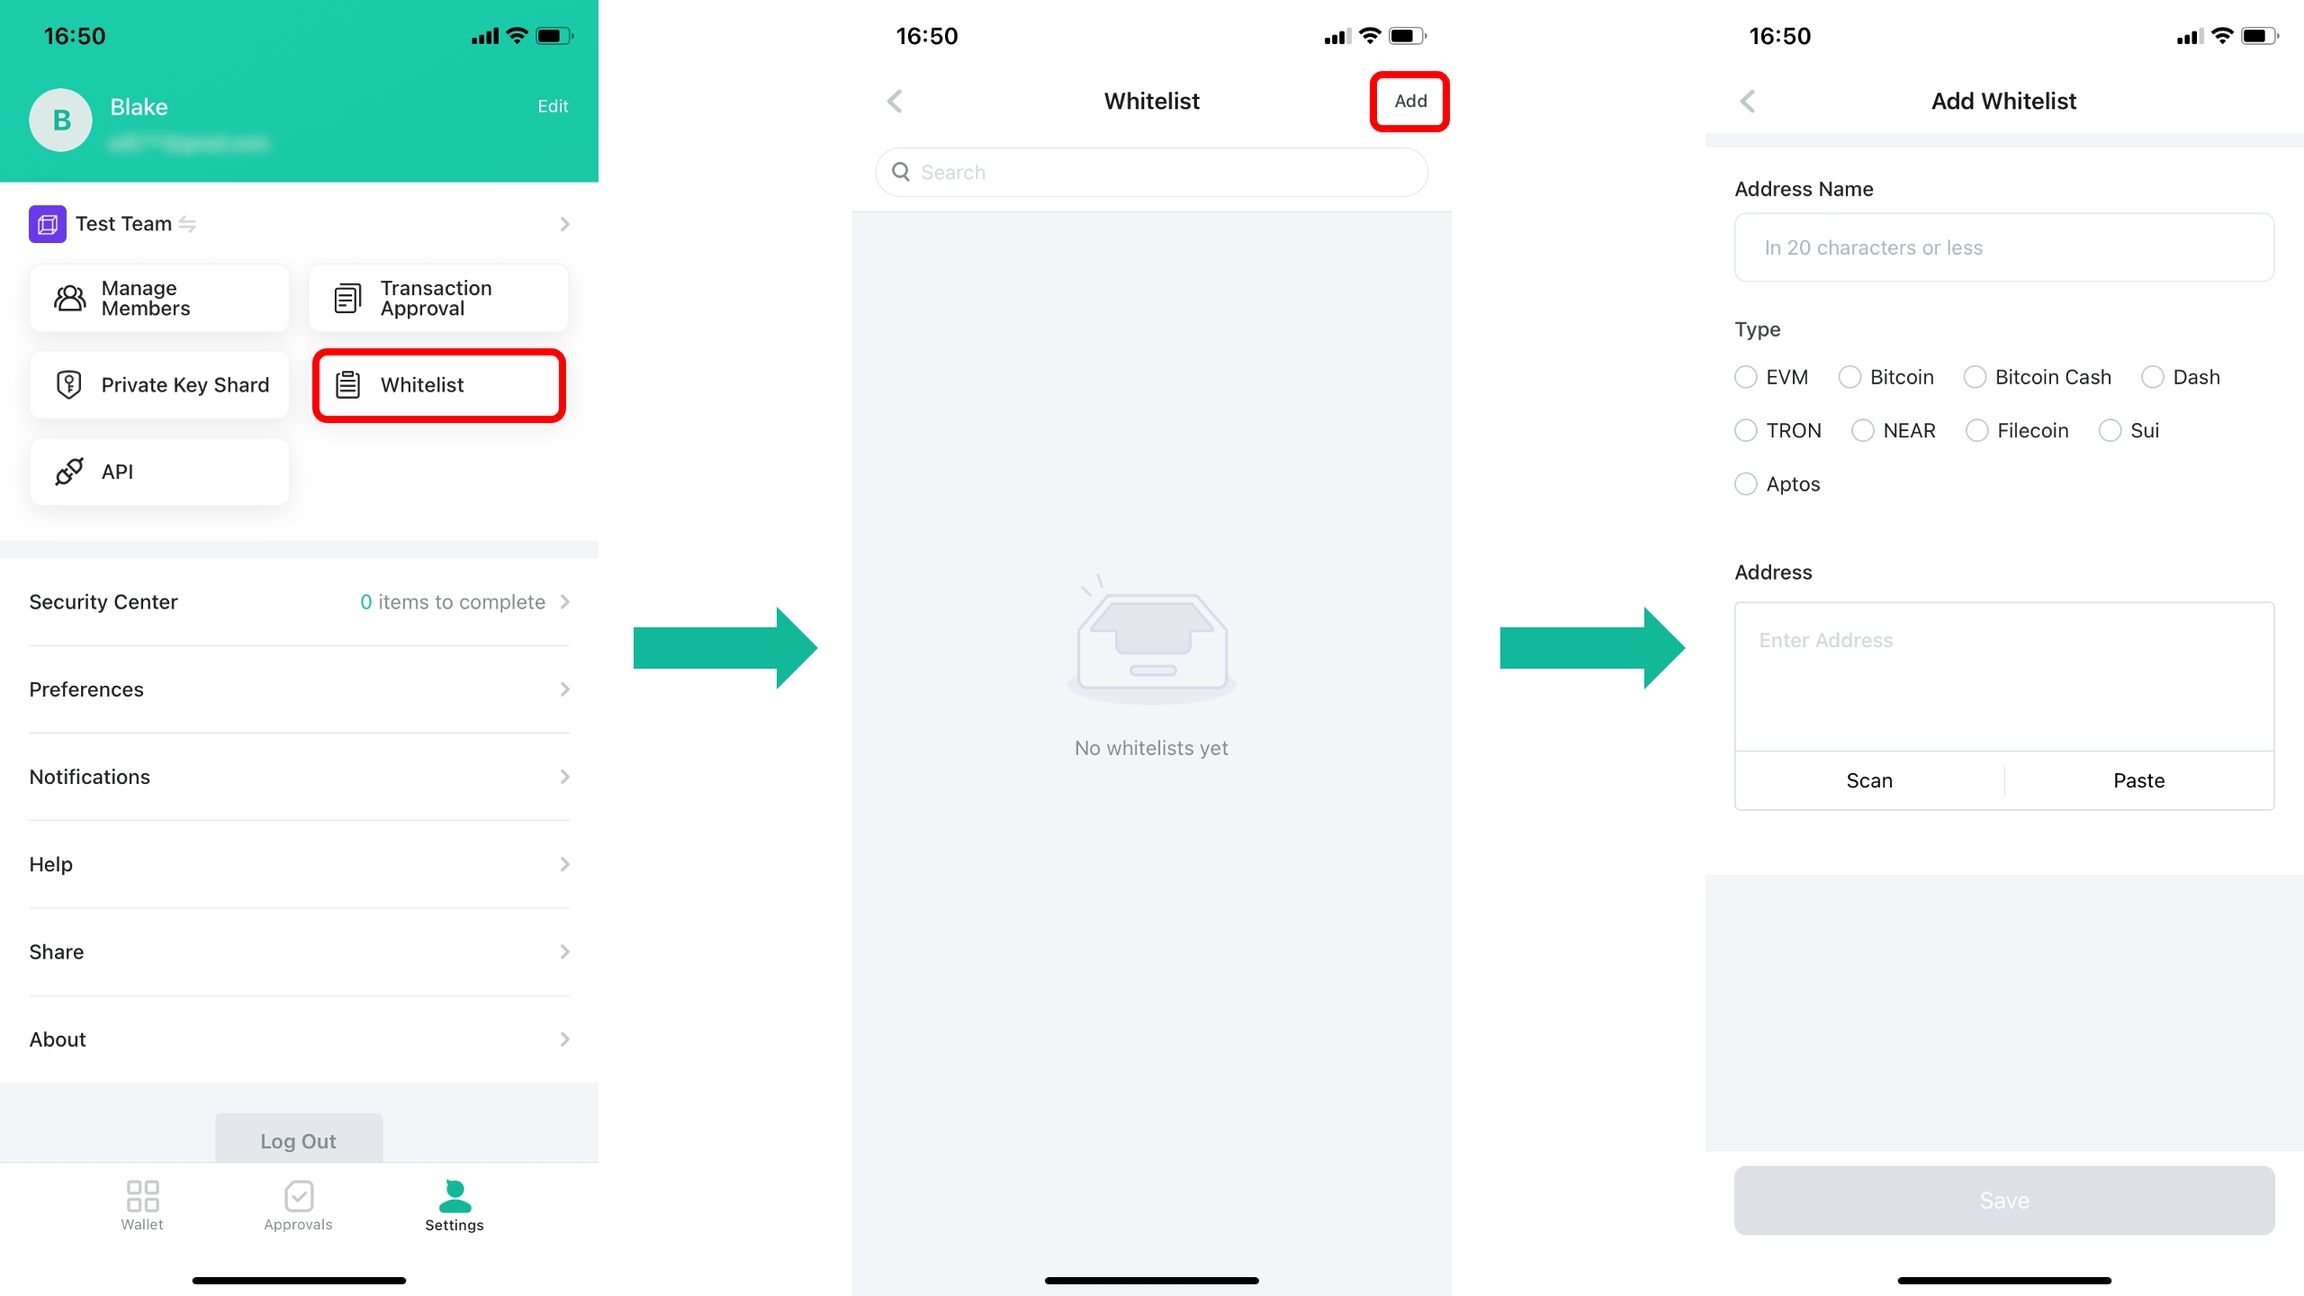
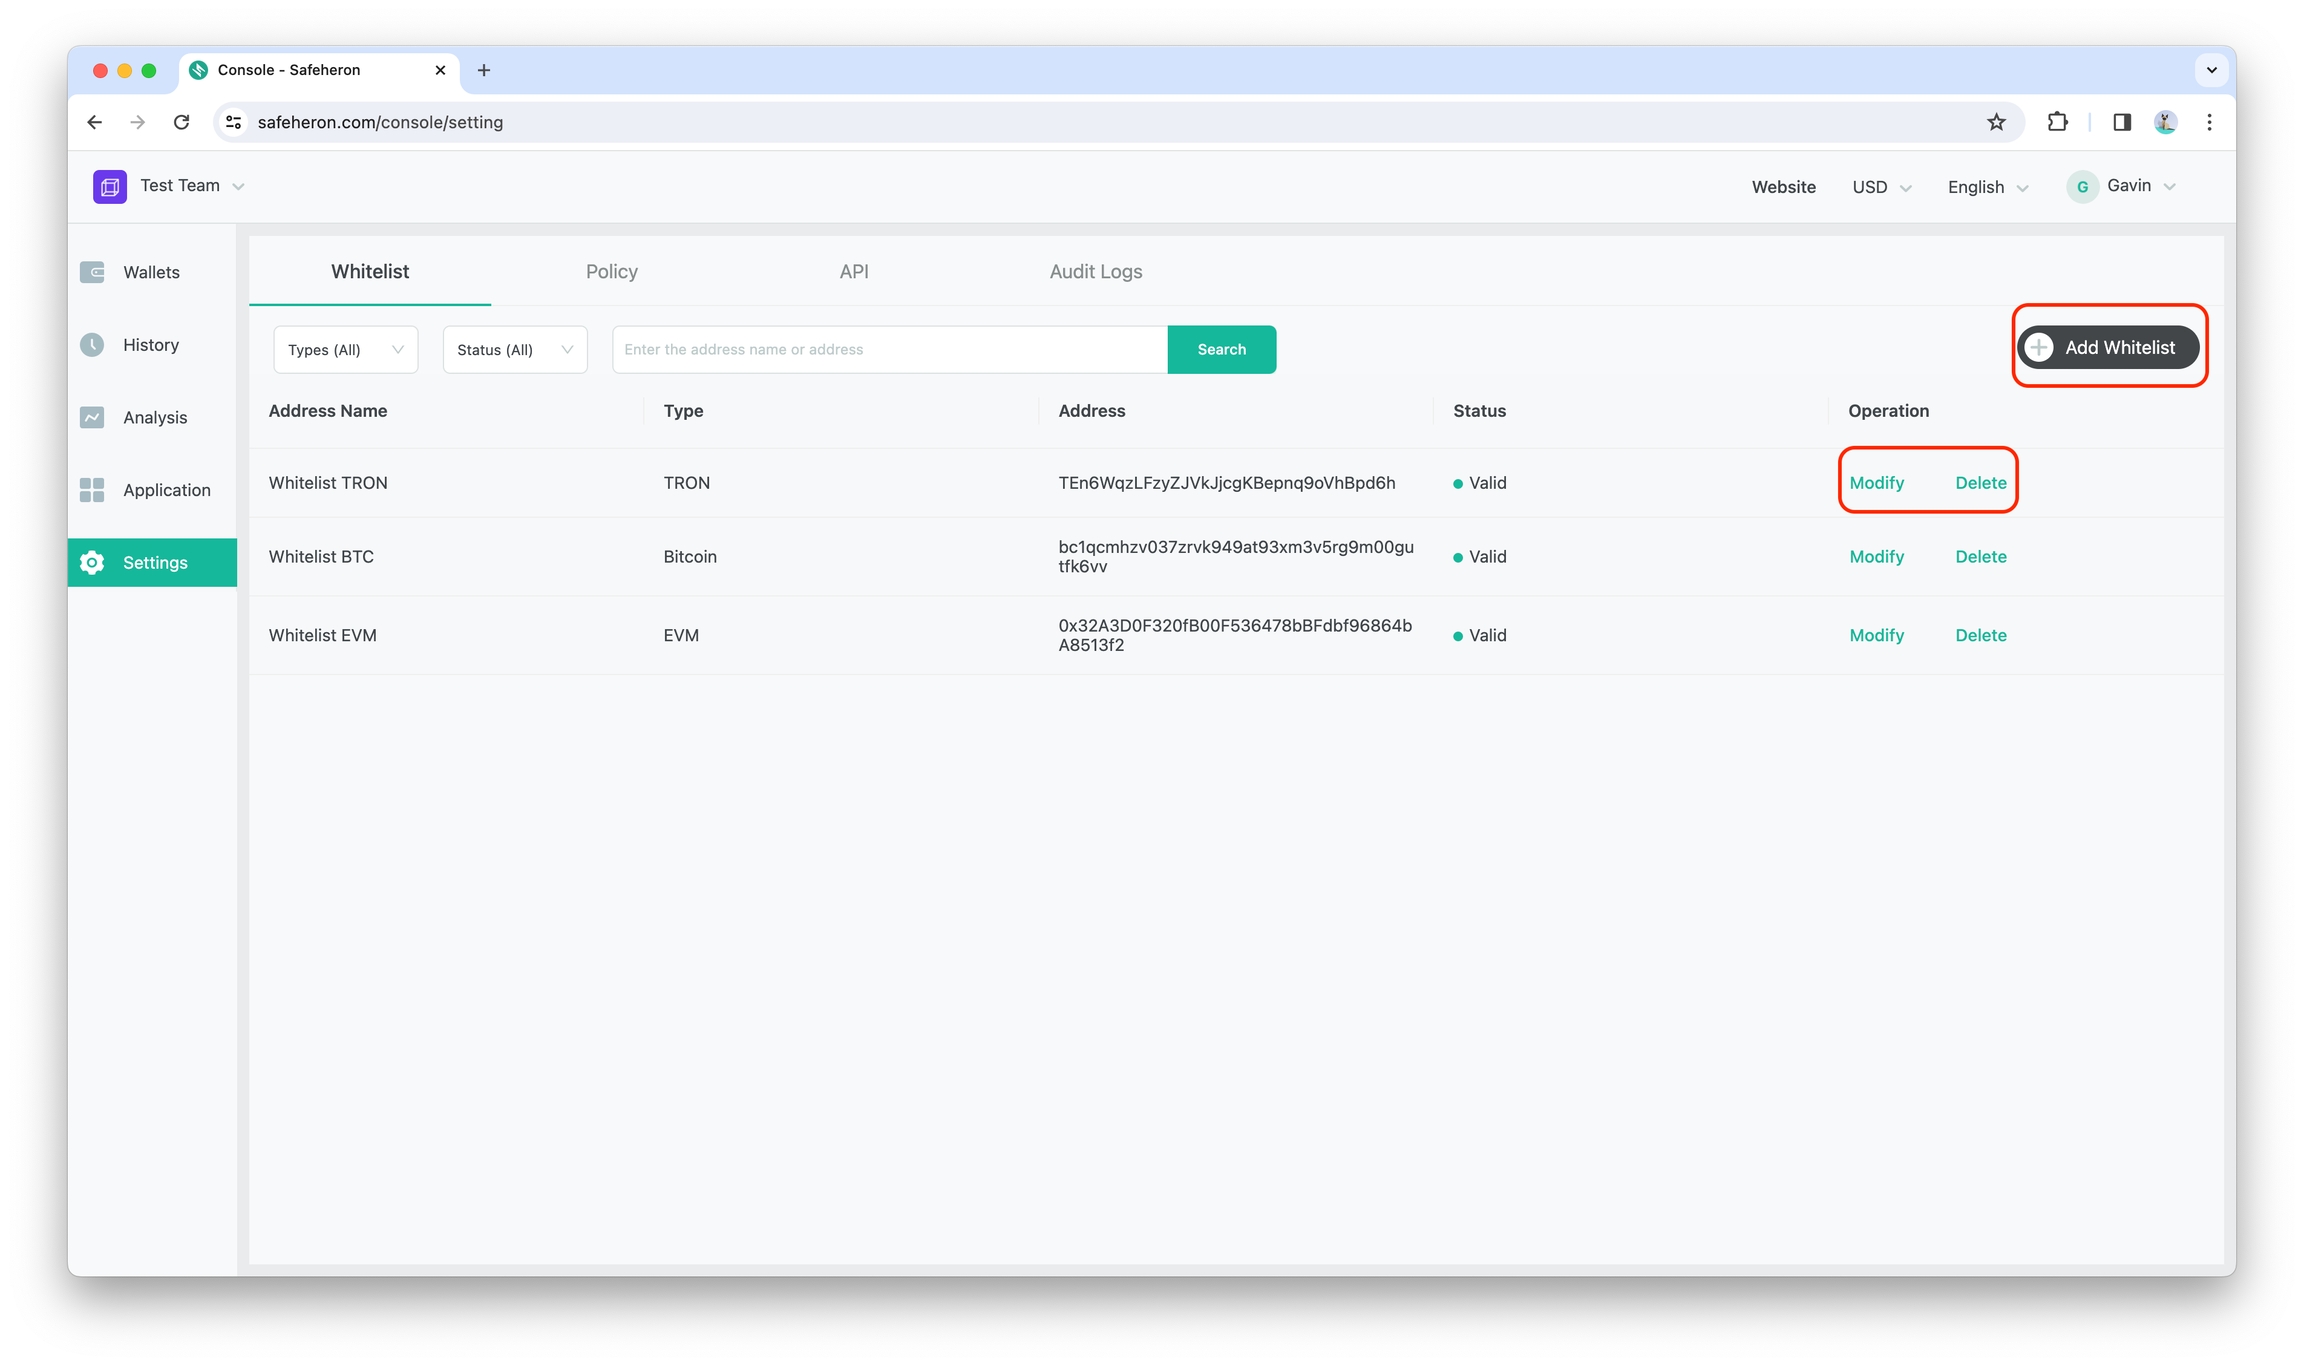
Whitelist Setup
Setting up a whitelist is an efficient way to ensure the security and efficiency of your transactions since all addresses must be confirmed and approved by the team and cannot be tampered with.
Add Whitelist
Set the address name, type, and address. For your security, Safeheron strongly suggests 2-Factor Authentication be enabled.
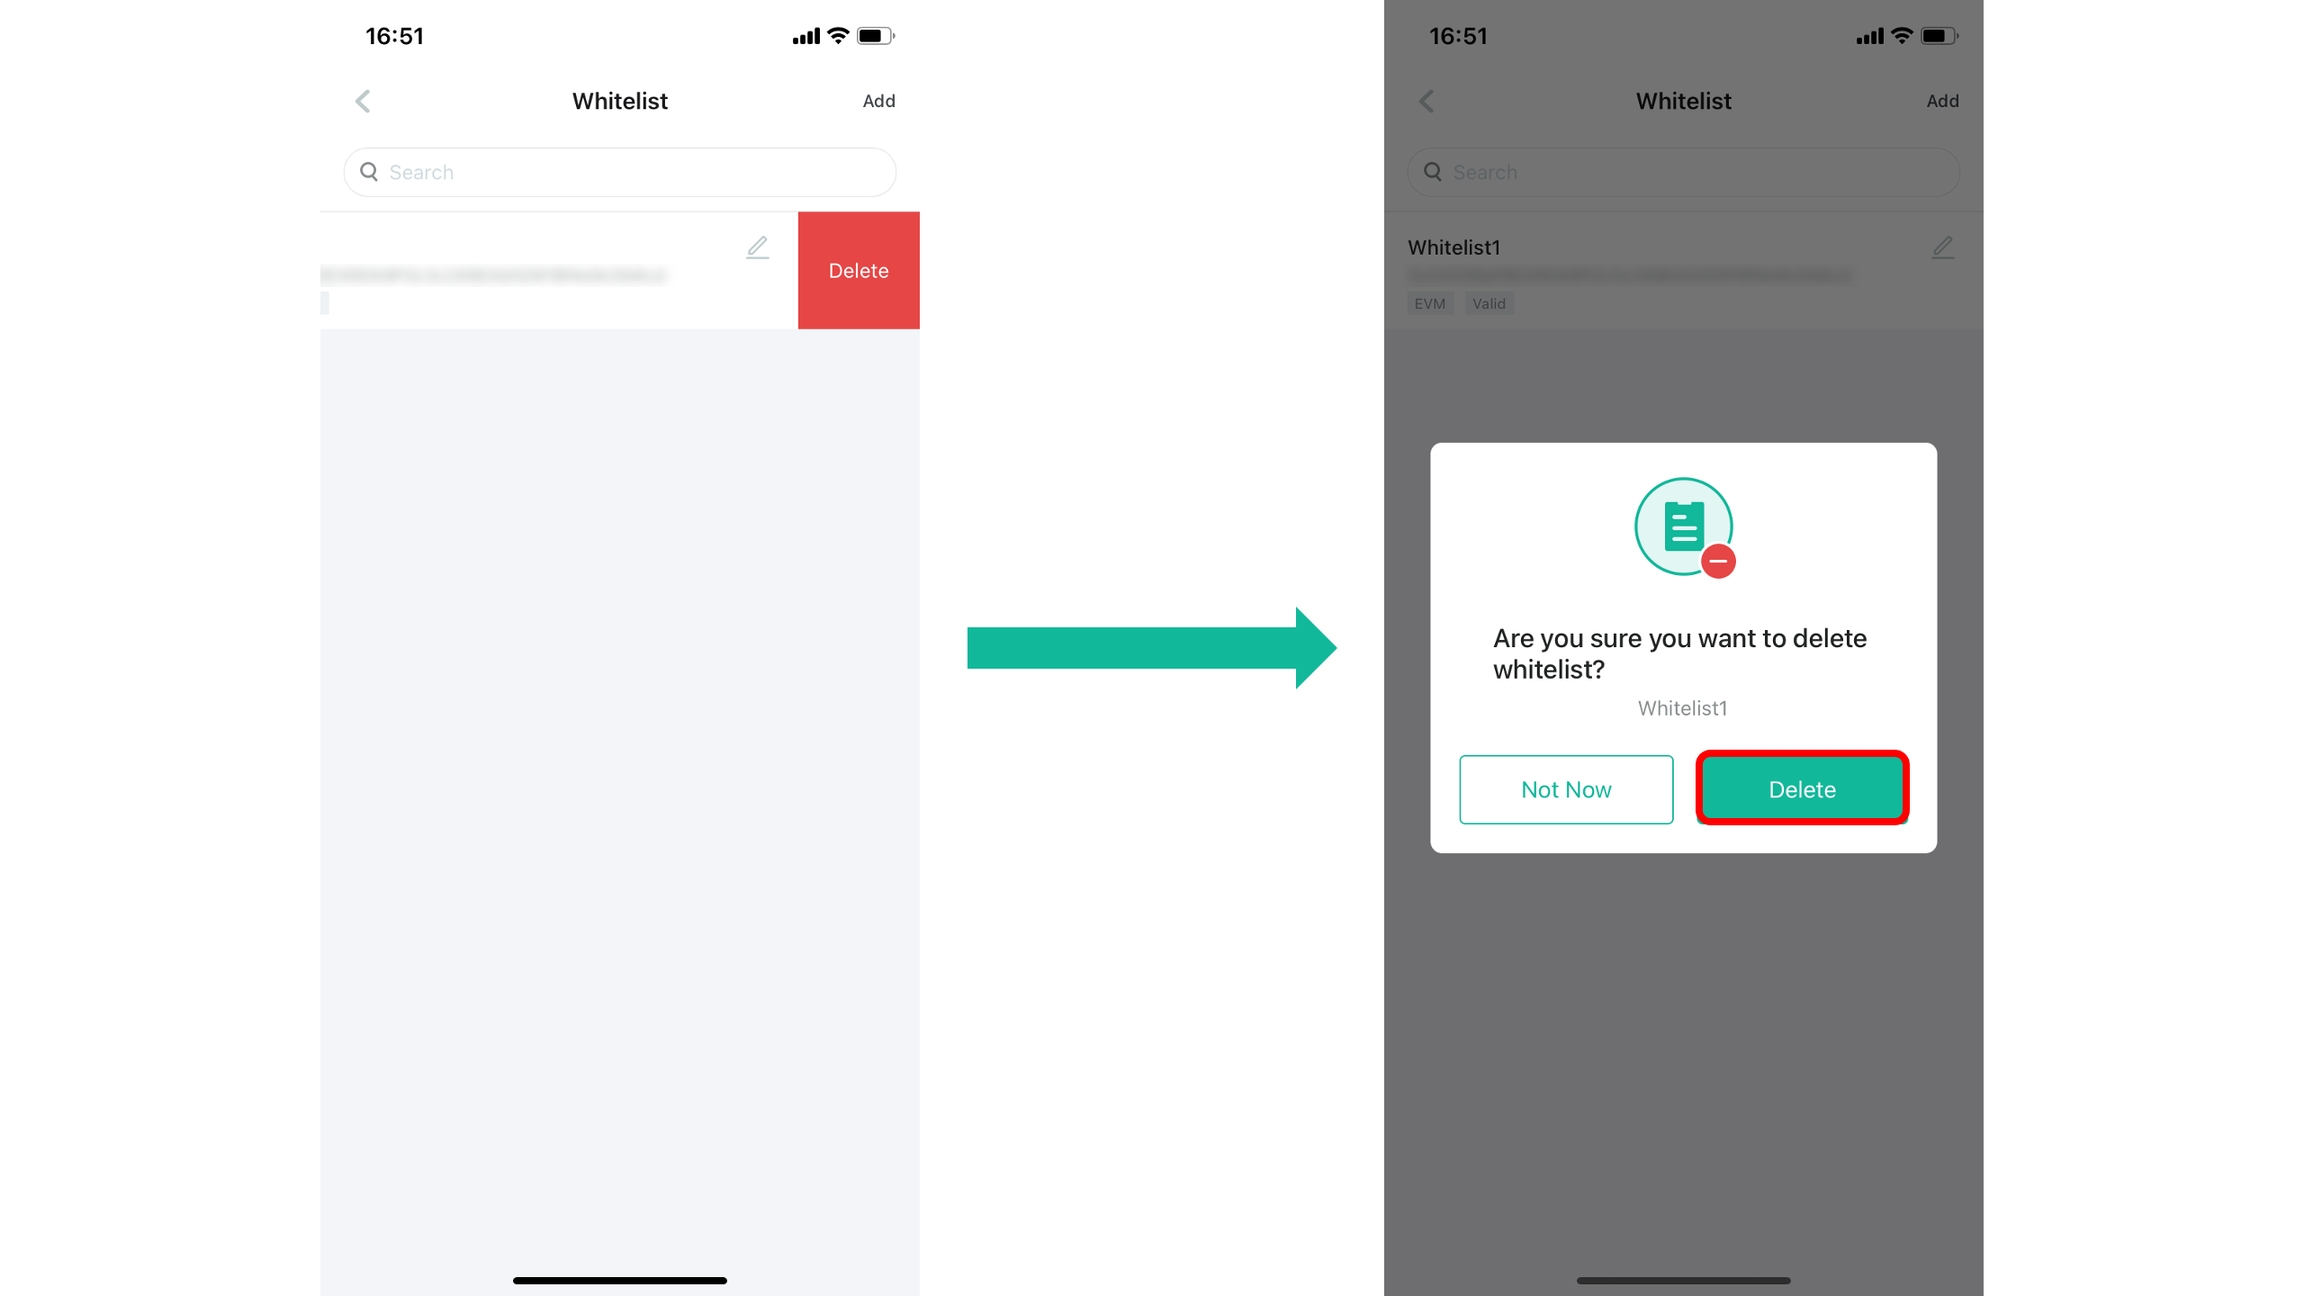
Delete Whitelist
If you want to delete a single whitelist, slide the address to the right, click Delete, and a confirmation page will appear.
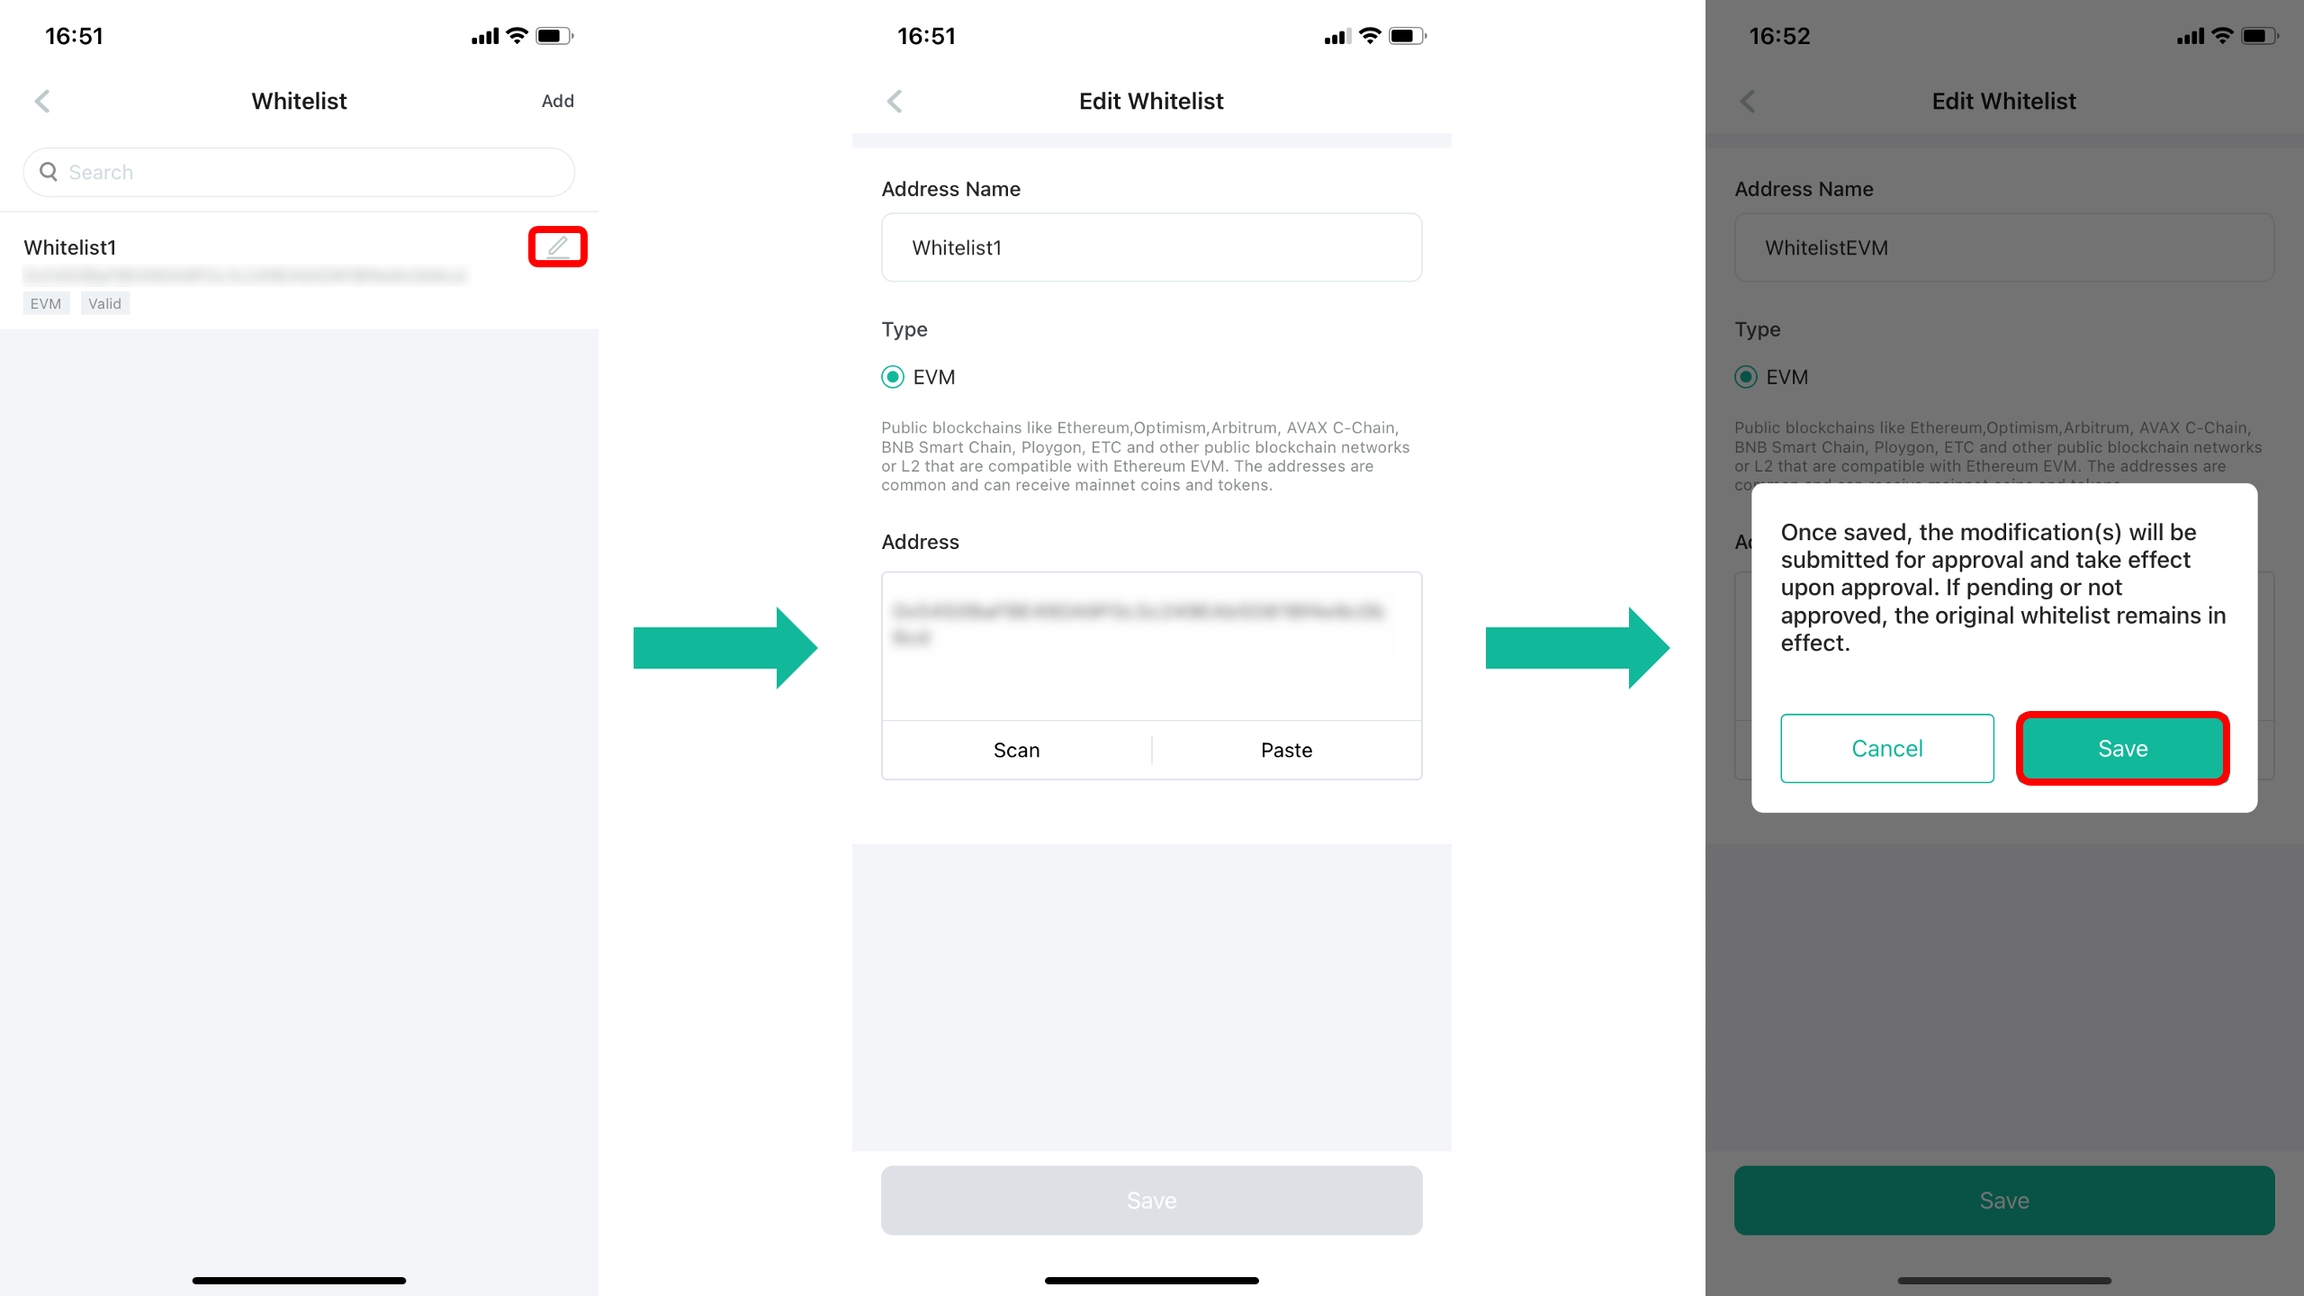
Modify Whitelist
If you want to modify any of your whitelist, just click the icon in the top right corner of the whitelist you want to modify, paste the new whitelist address, and then click the save button.
If your team has enabled co-management, then adding or modifying whitelist addresses will require team approval.
Safeheron Web Console
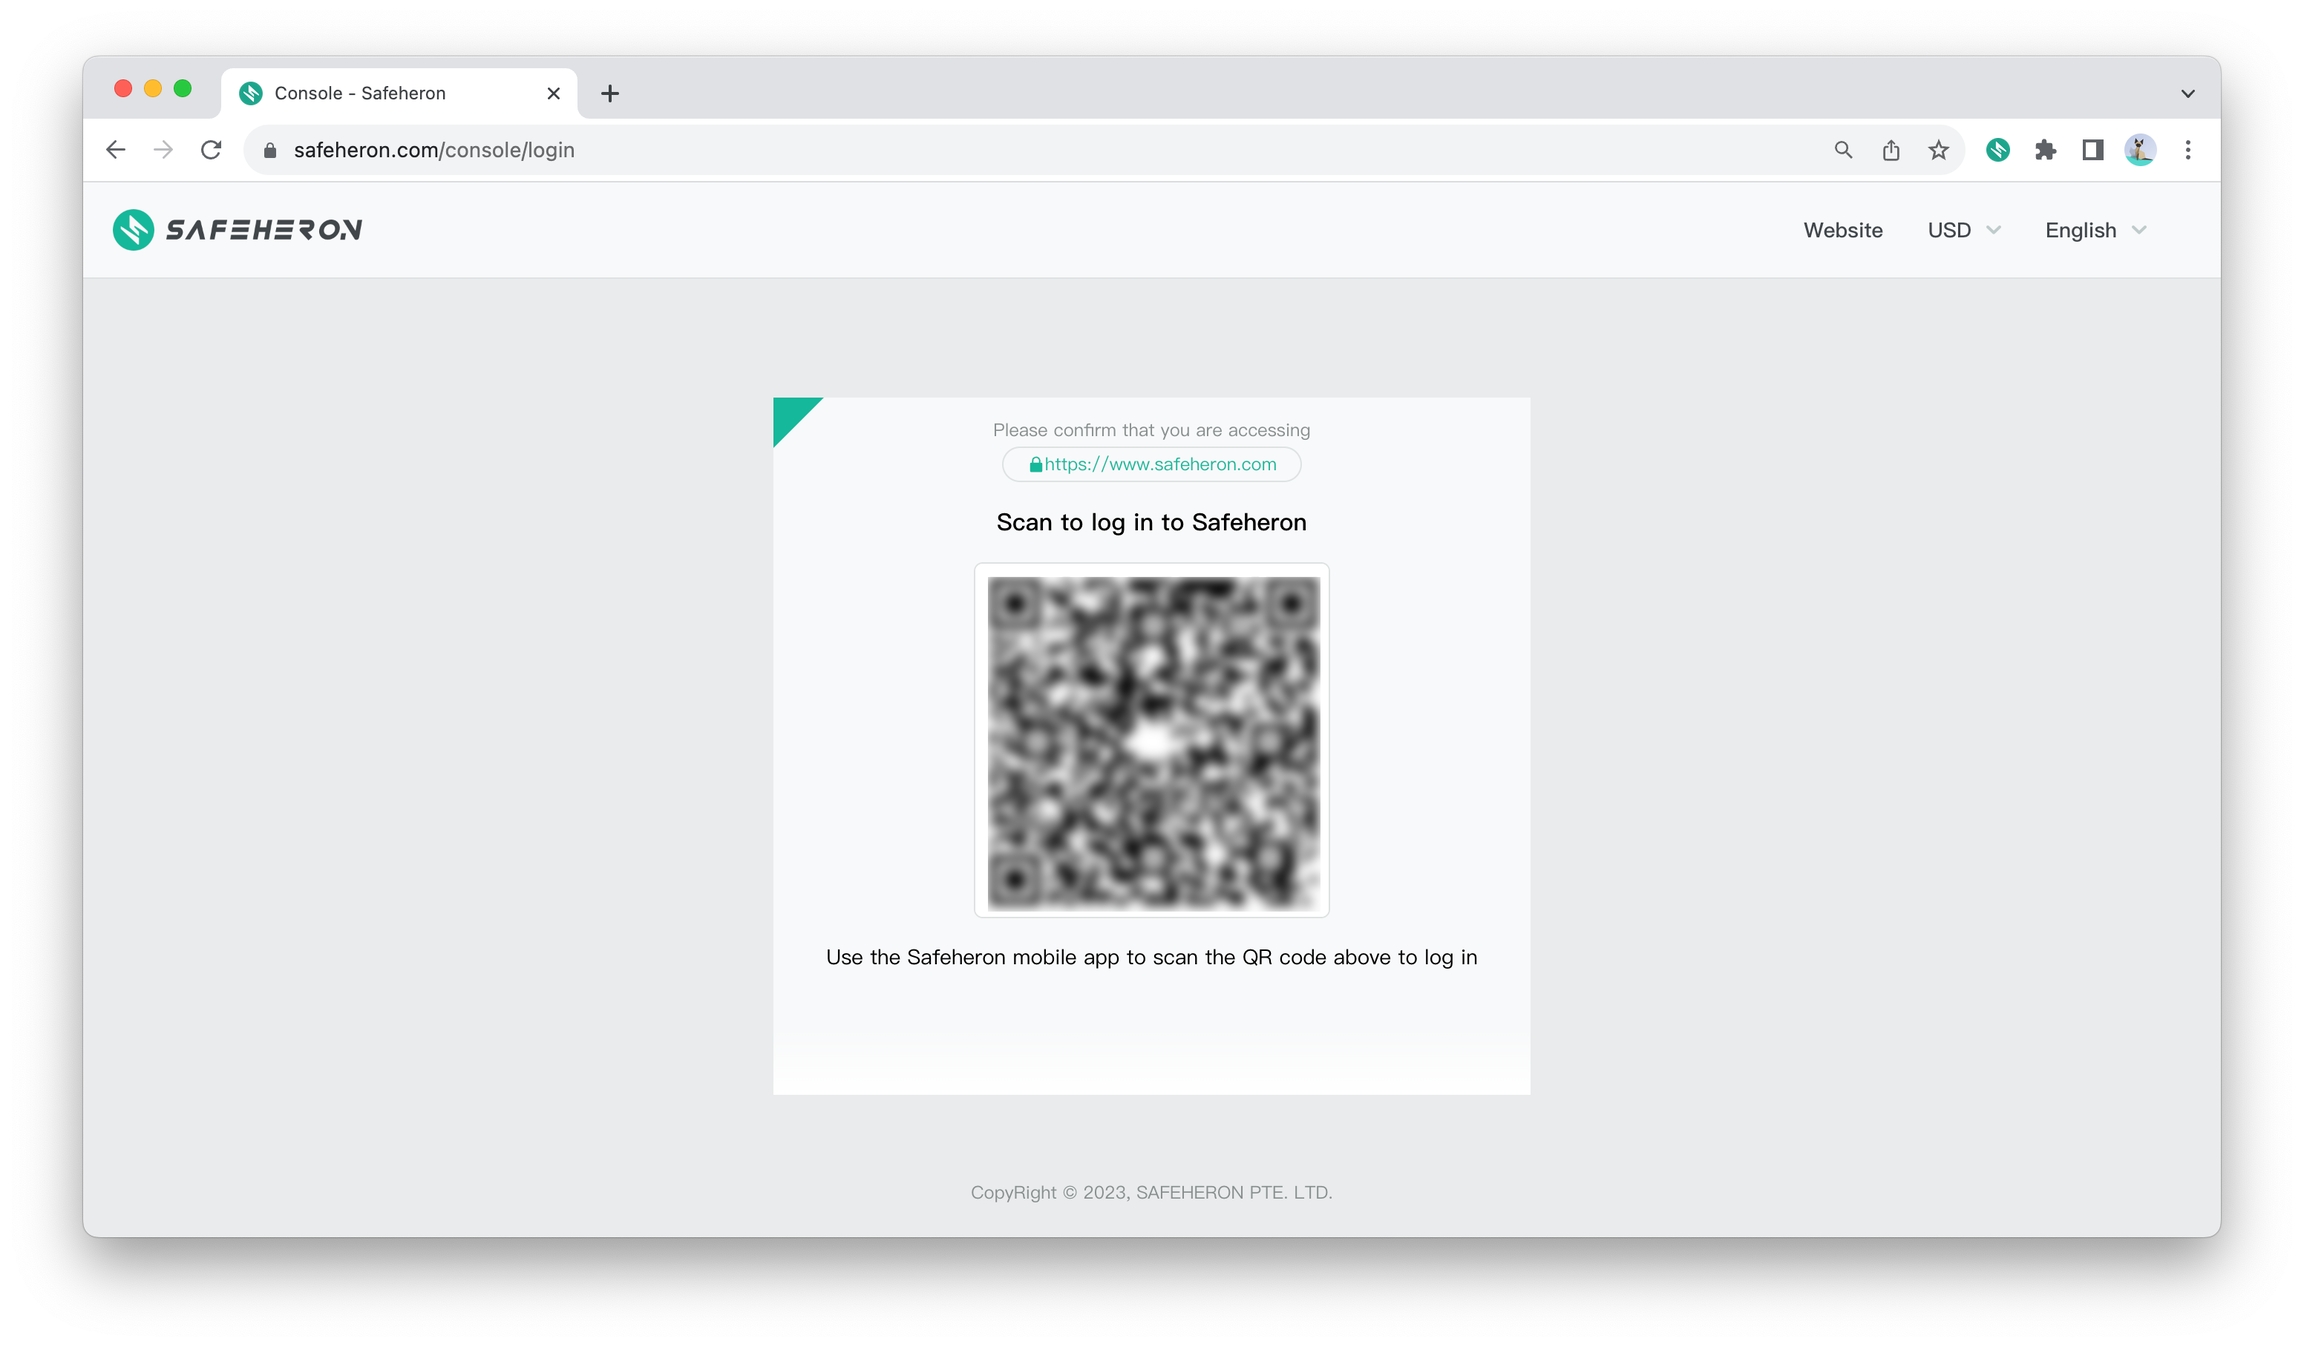
Go to https://www.safeheron.com (Safeheron official website) and click Log In.
Scan the code via the Safeheron App to log into the Safeheron Web Console.
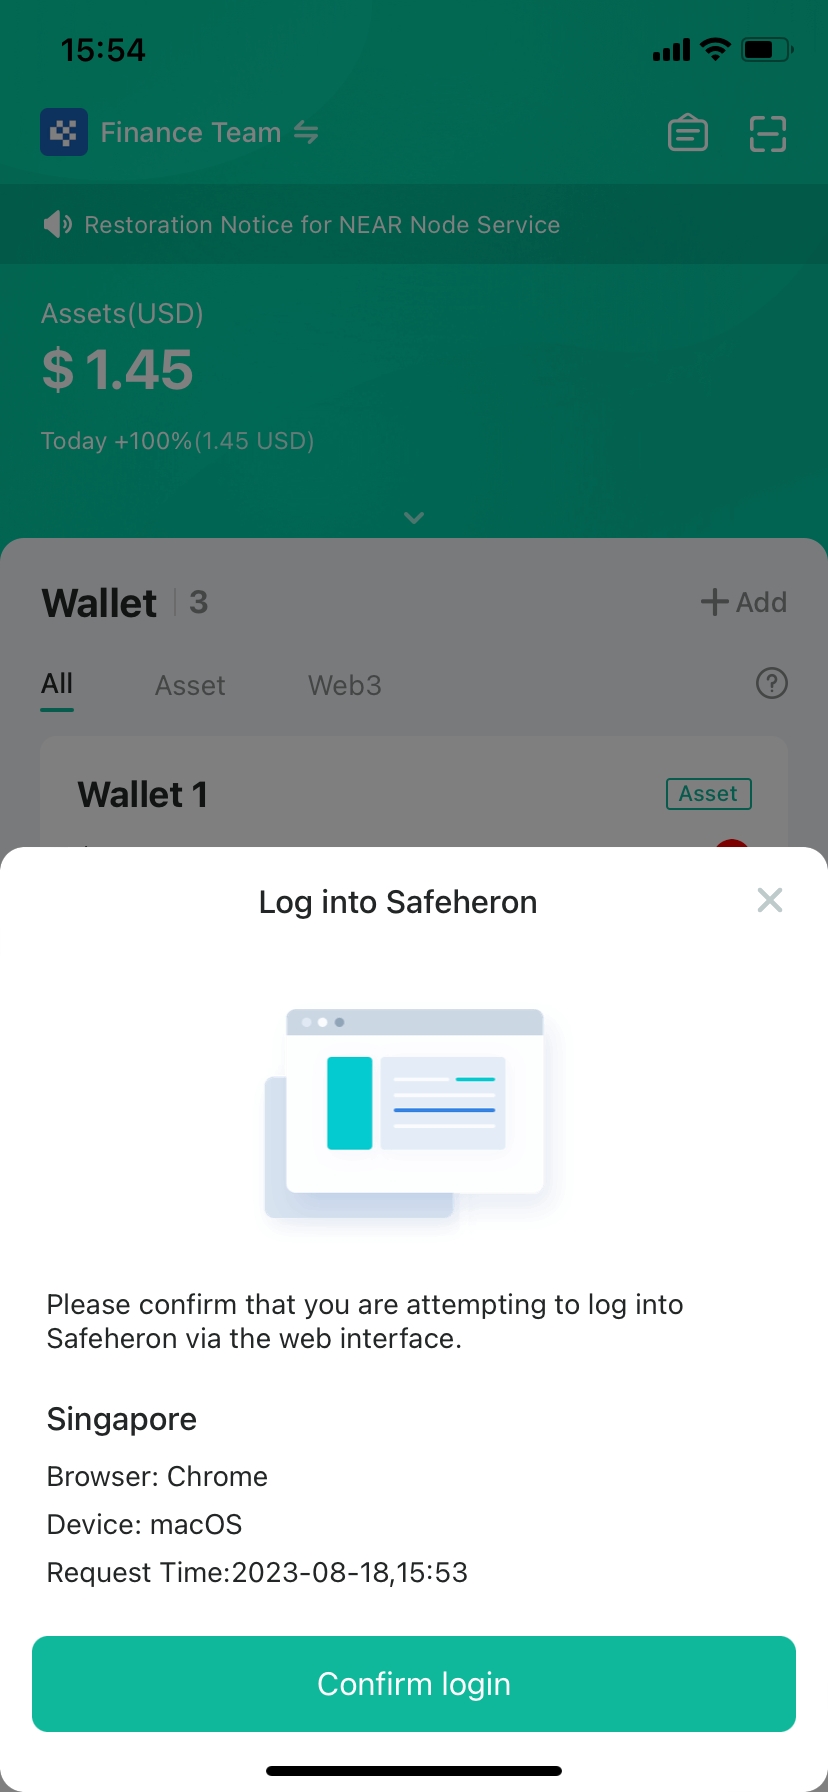
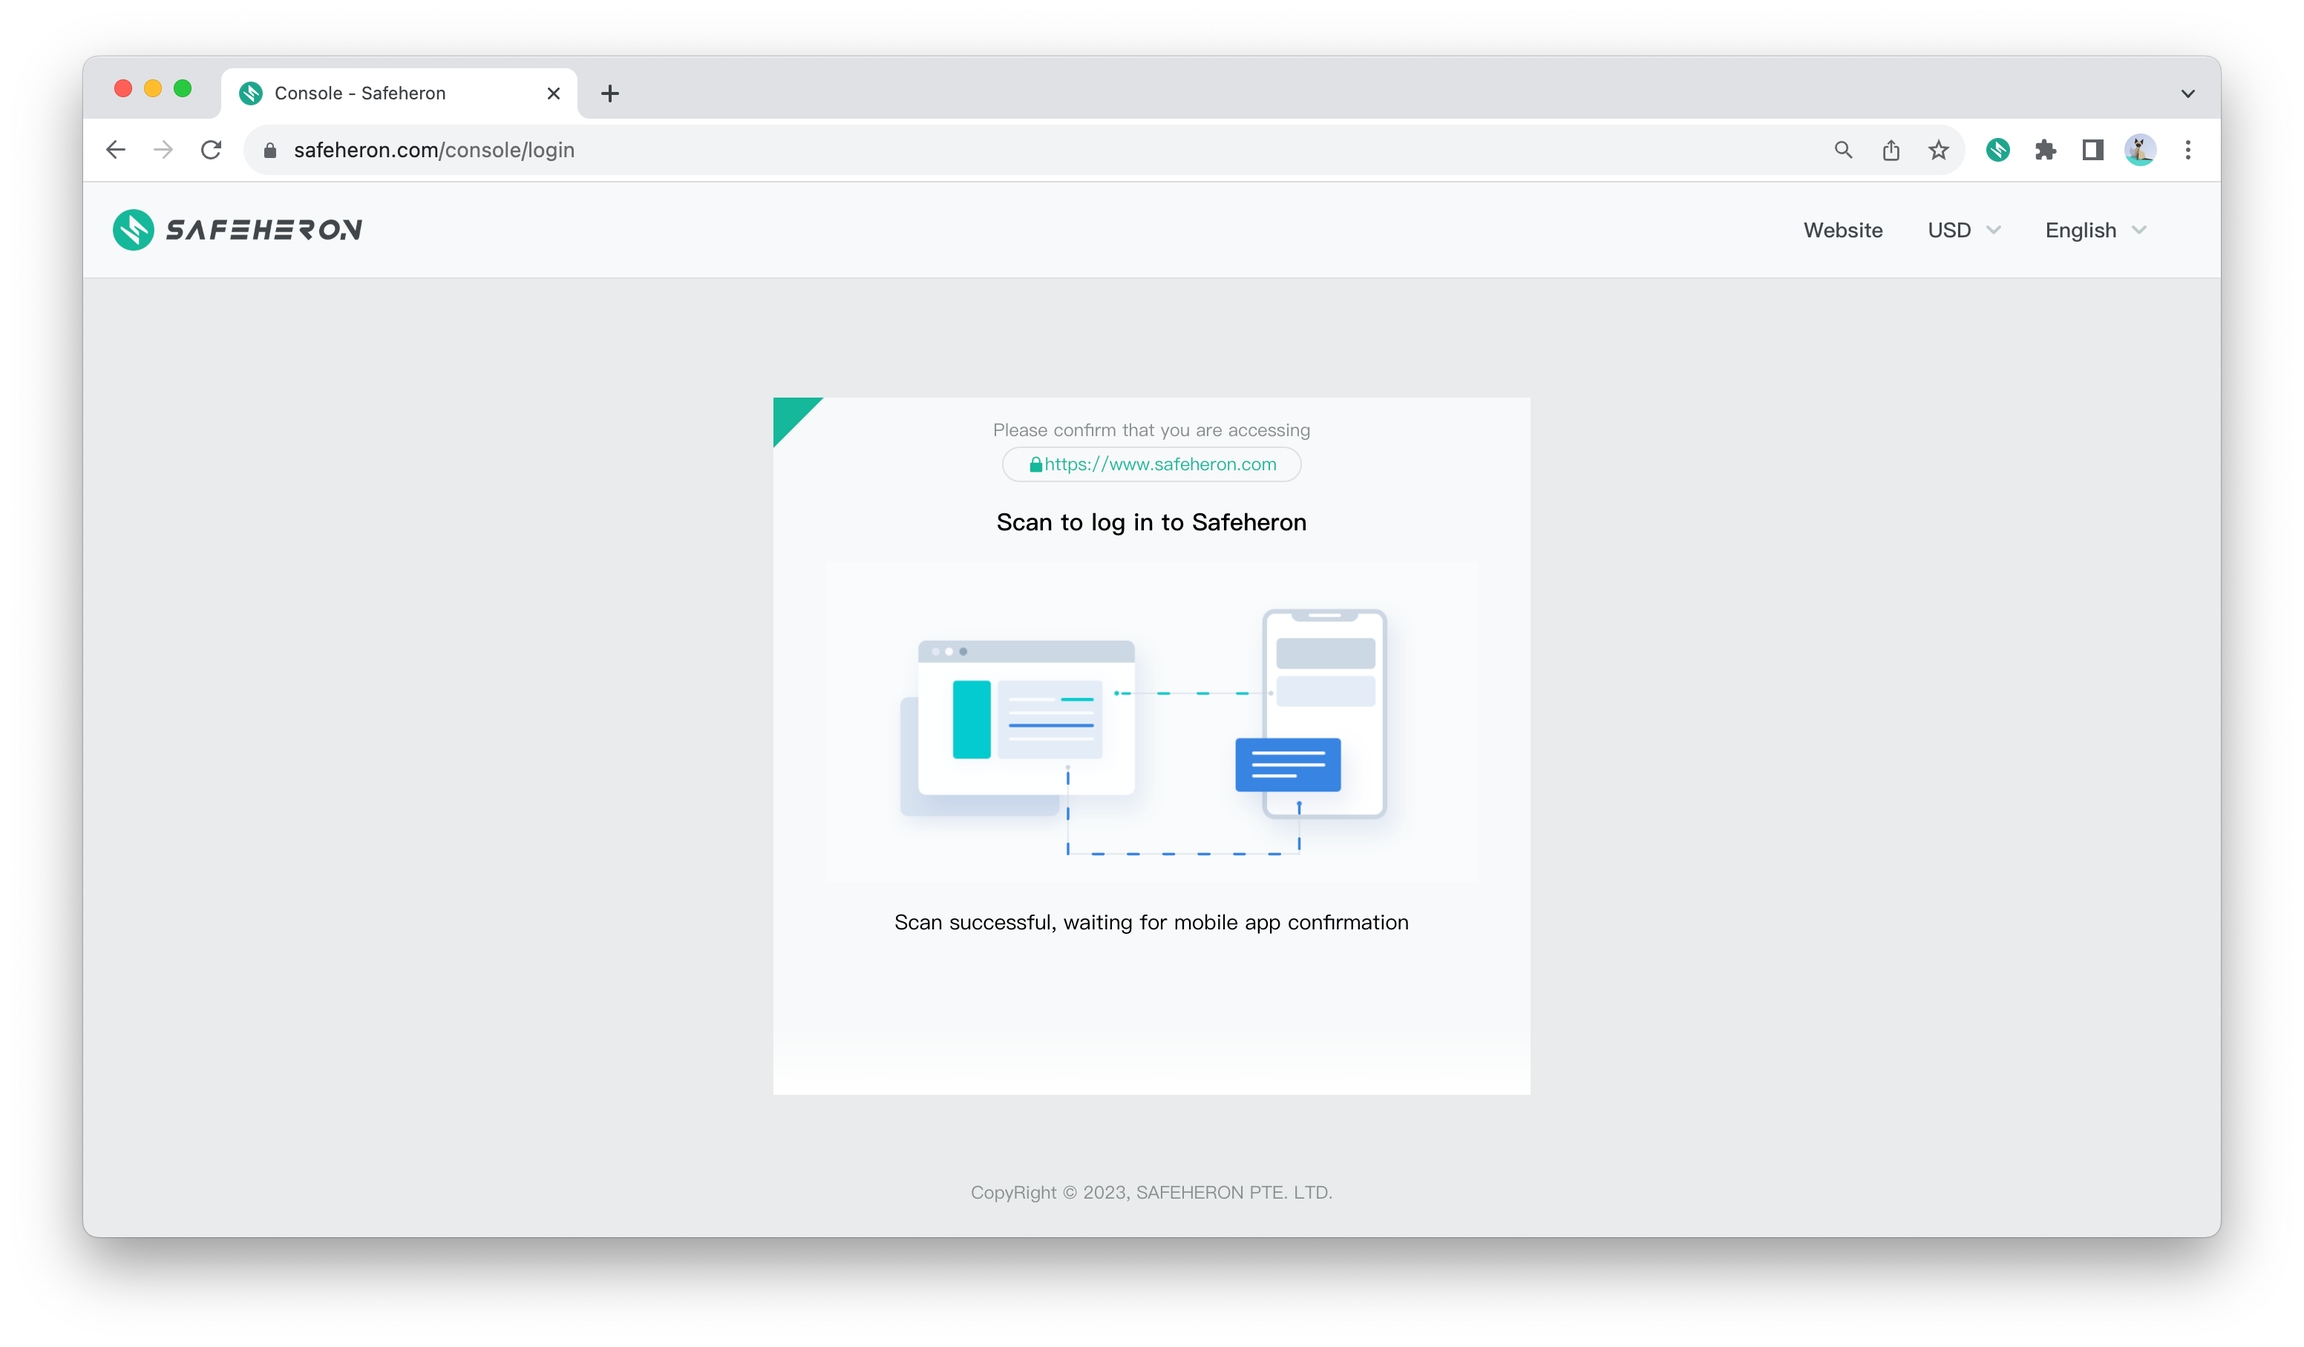
After scanning the QR code on the web browser, you need to confirm the login on the Safeheron App.
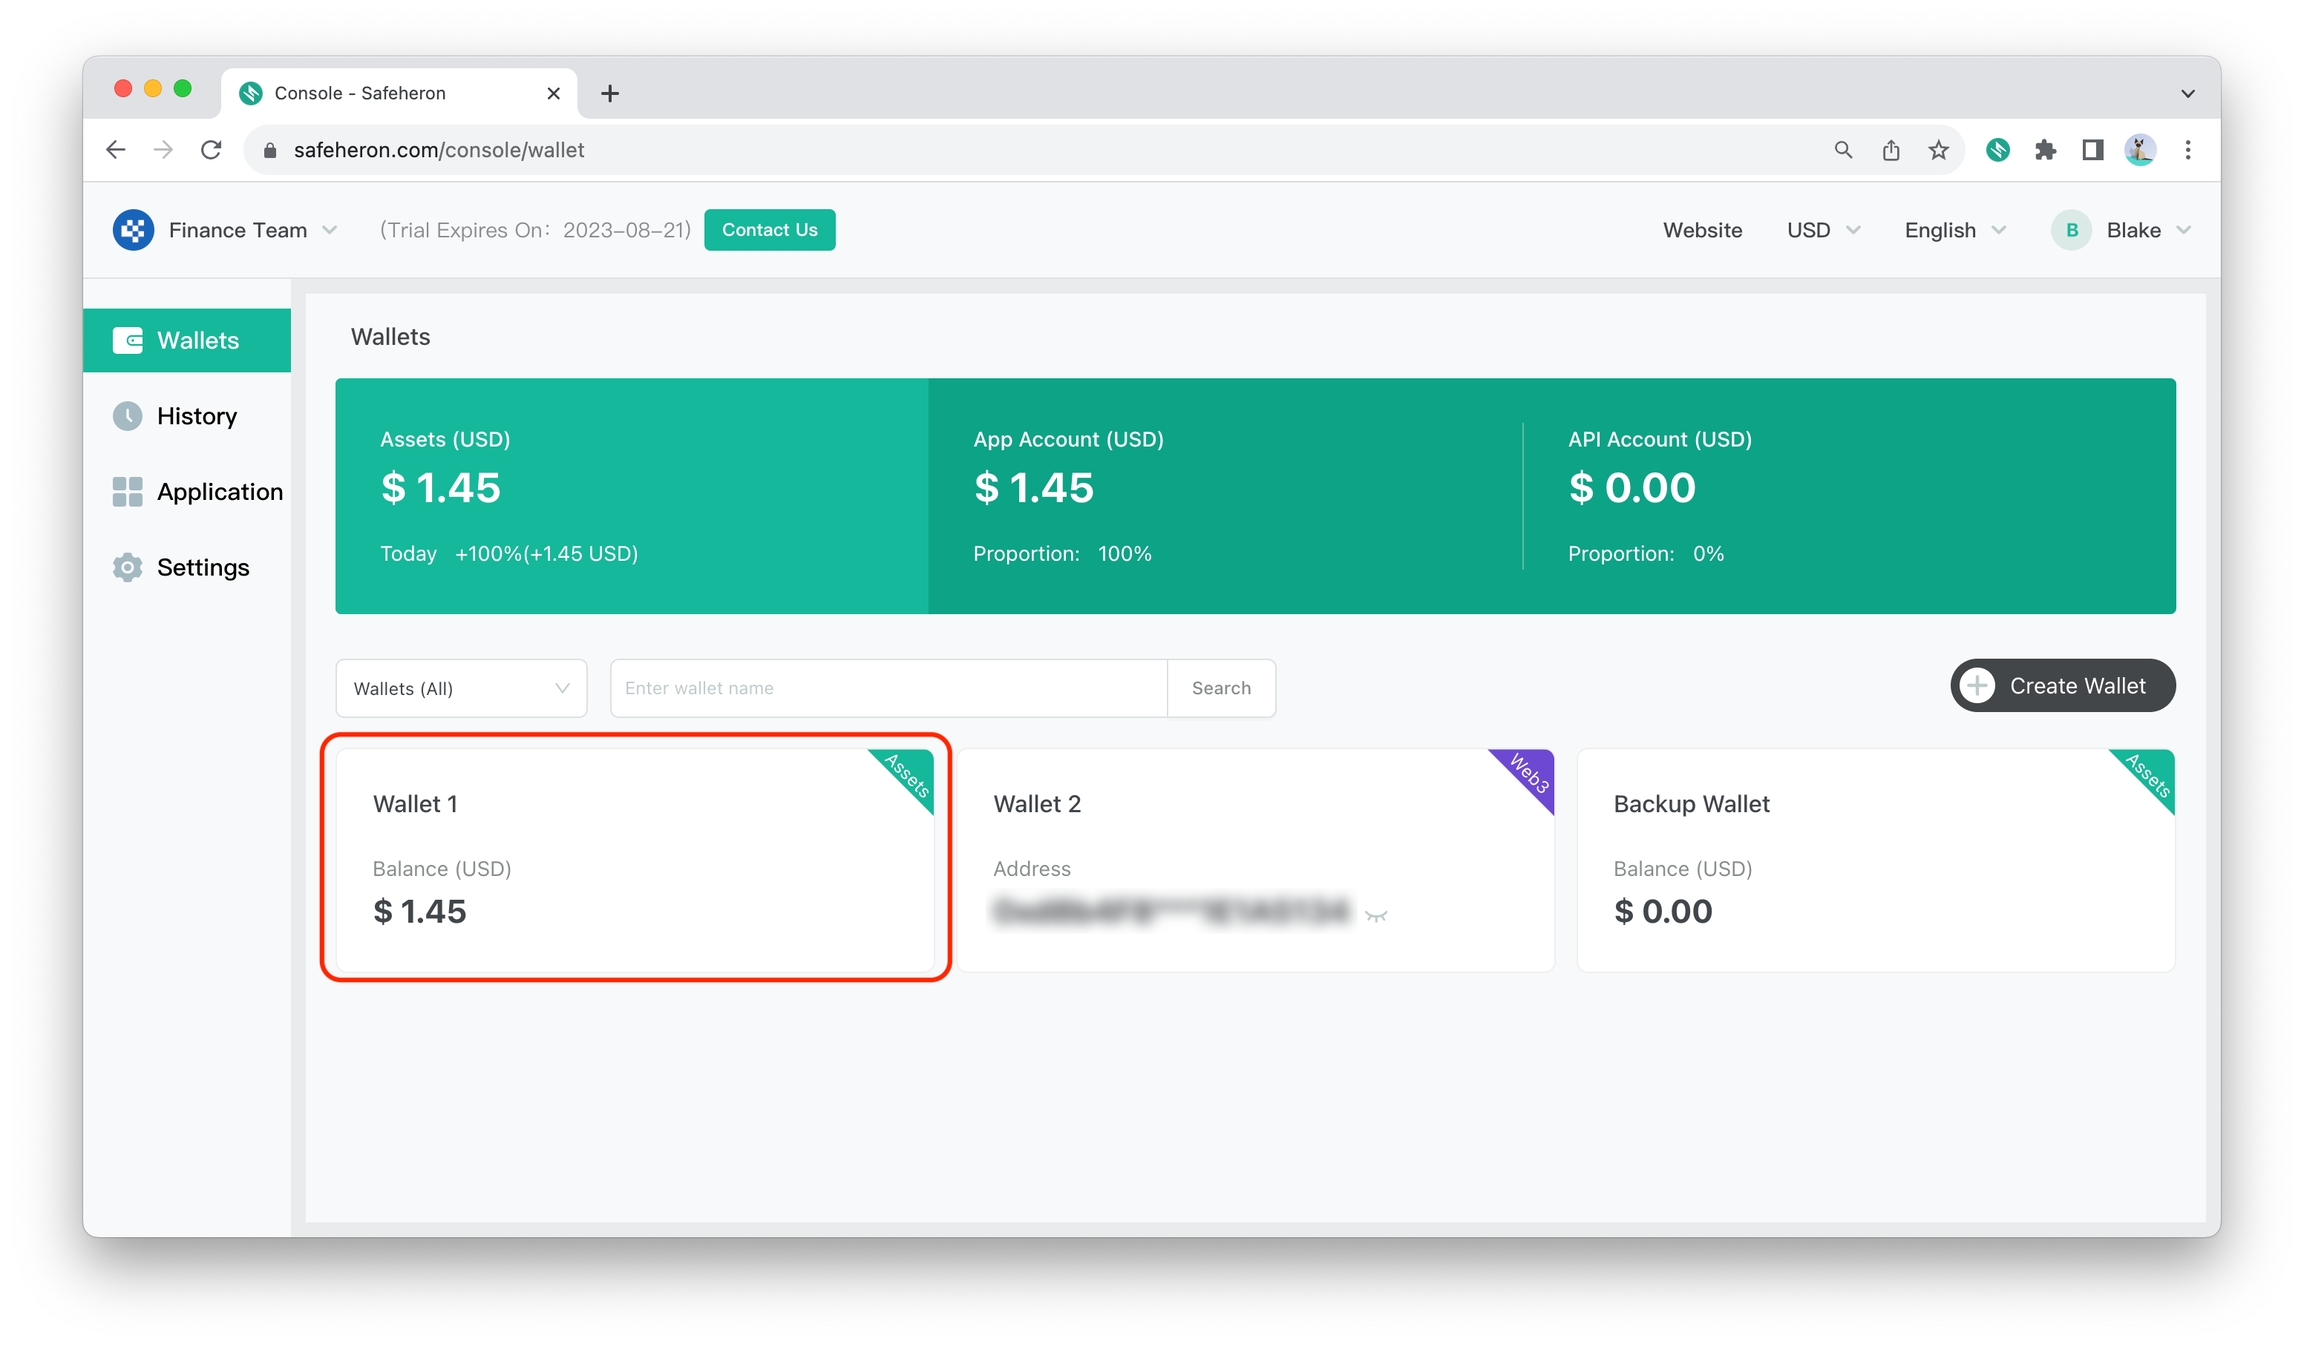
Once the Safeheron App confirms login, simply select the team you want to access on the Safeheron Web Console.
Send and Receive Tokens
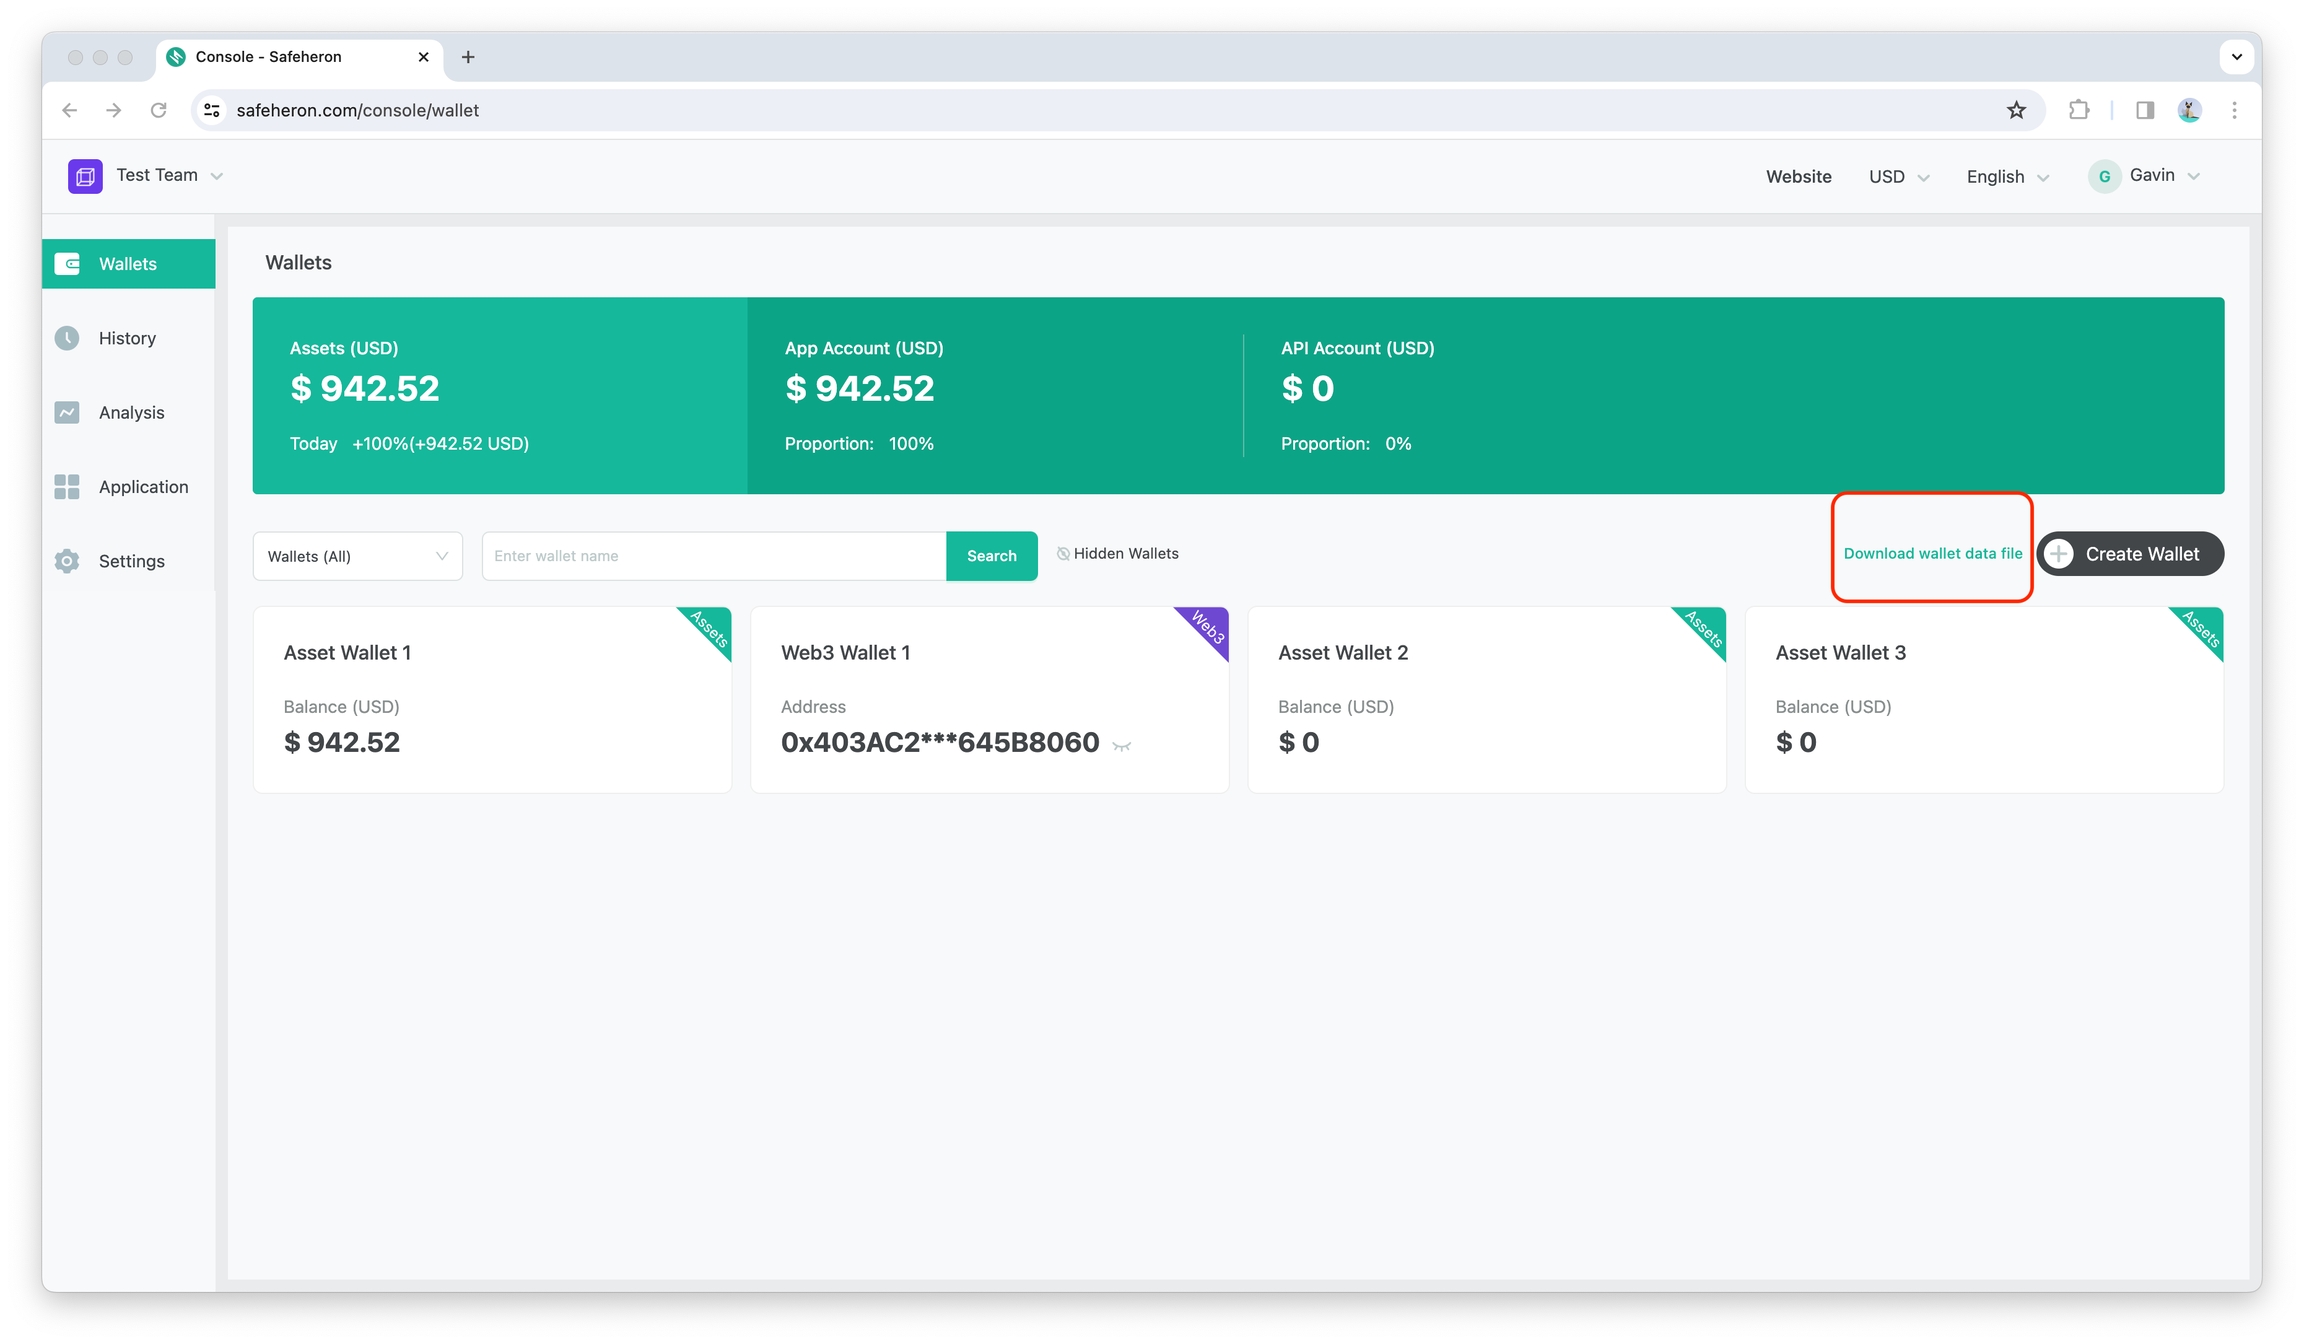
Download Wallet Data File
The Safeheron Web Console allows you to download wallet data file.
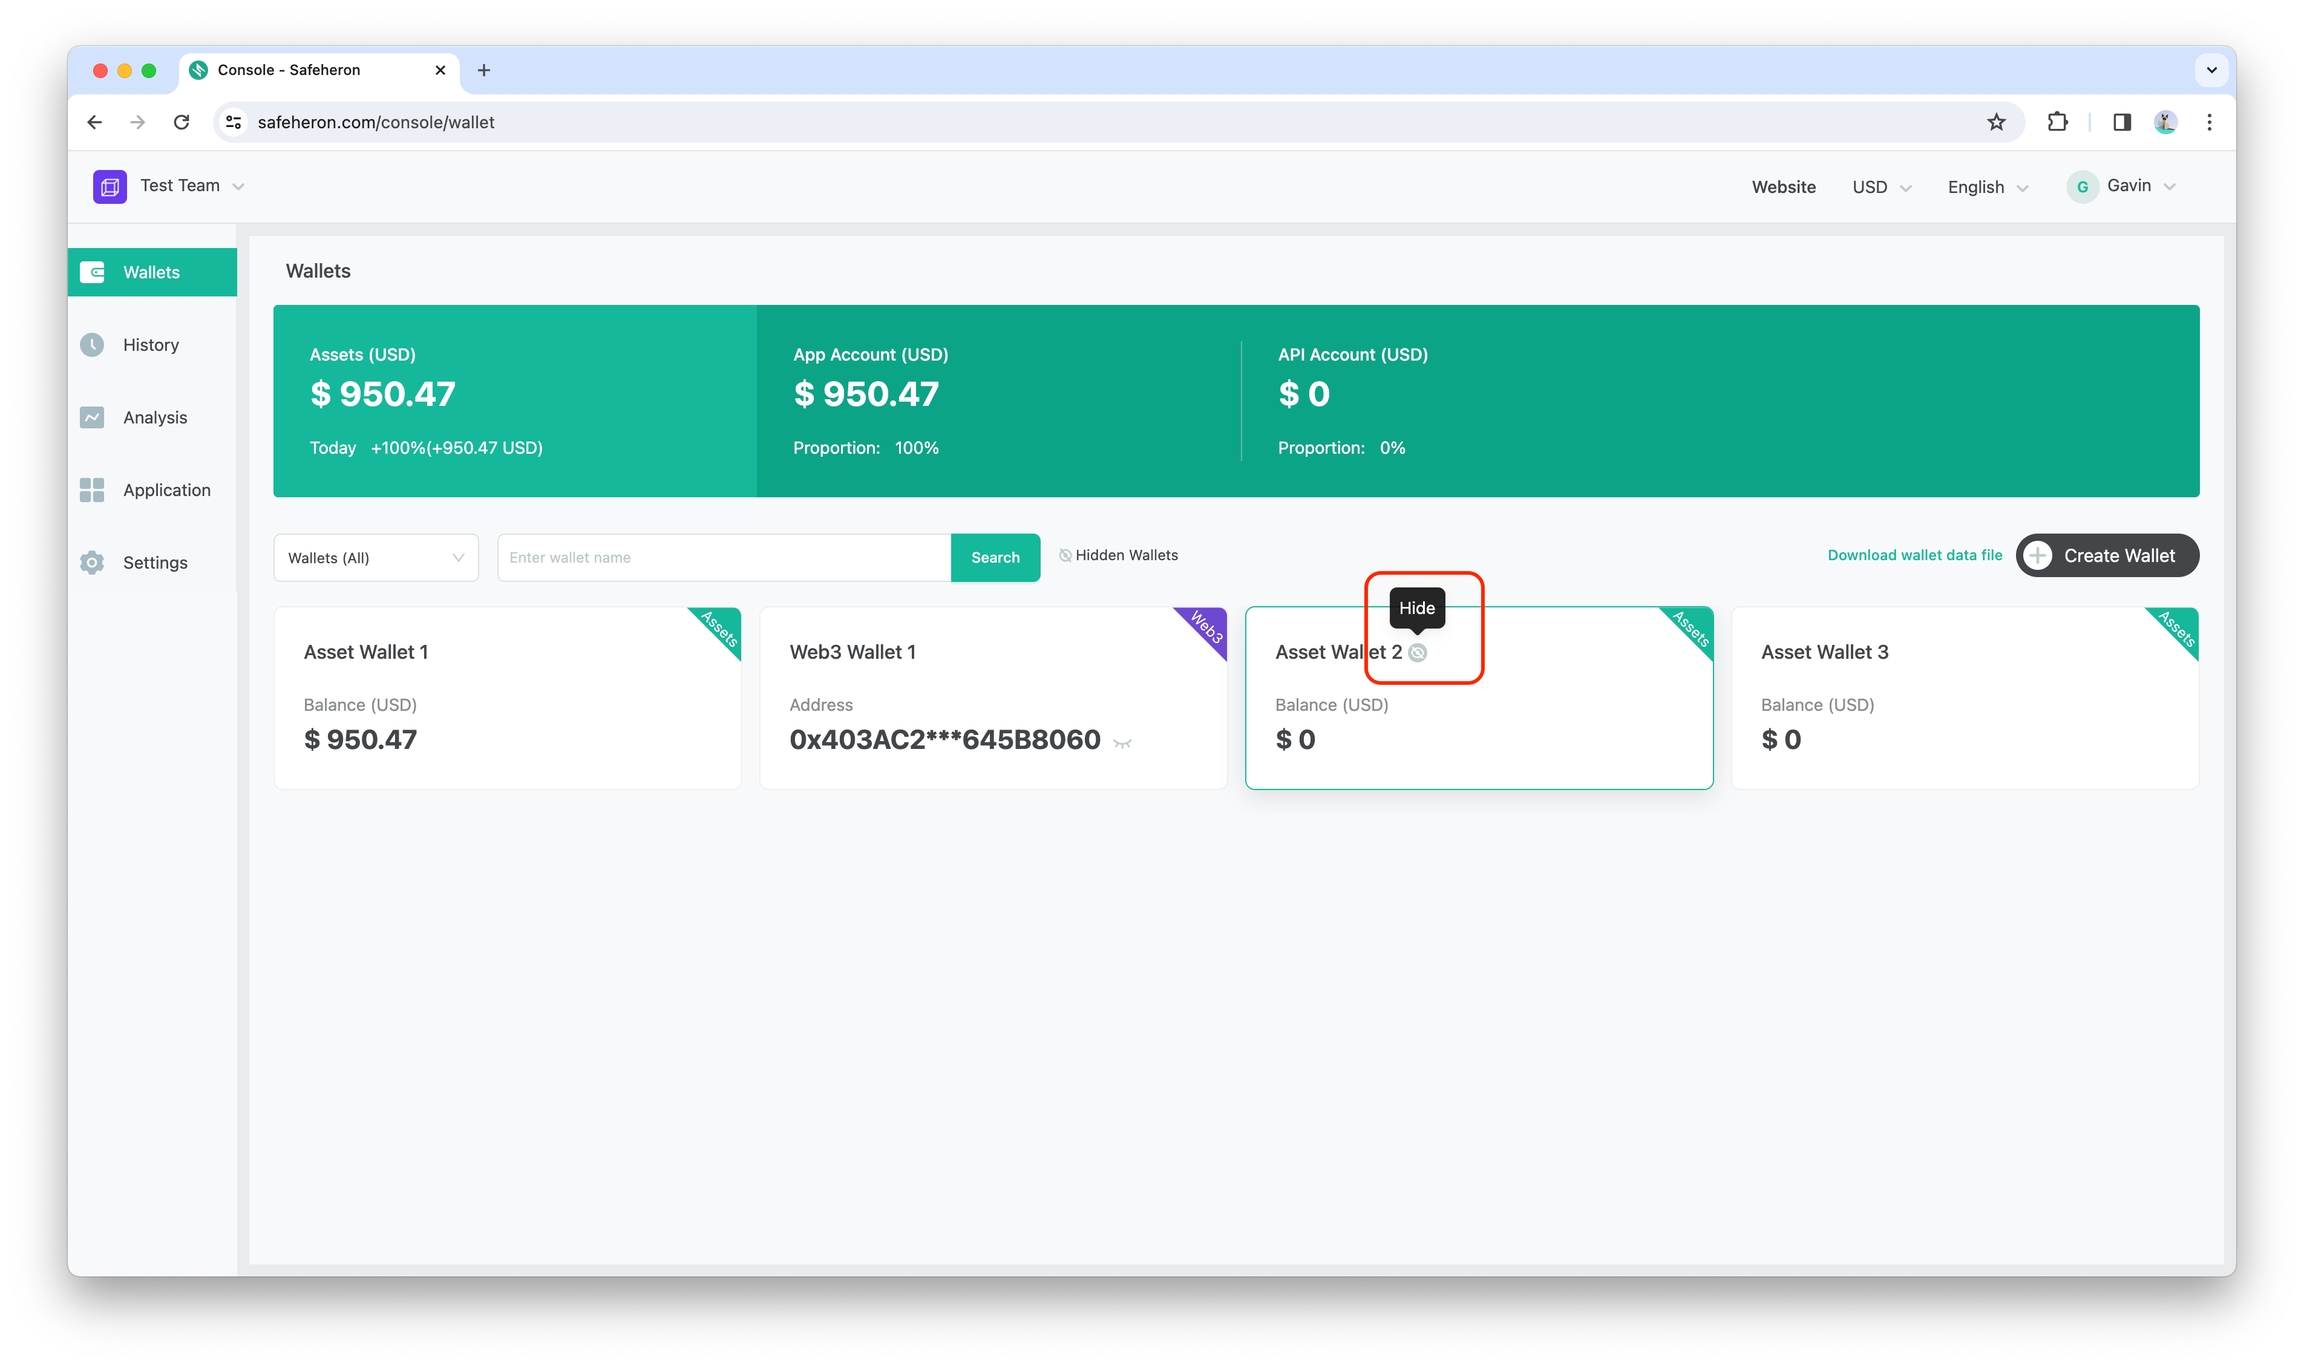
Hide Wallets
The Safeheron Web console allows hiding specific wallets.
Click the hide button to the right of the wallet name to hide that wallet.
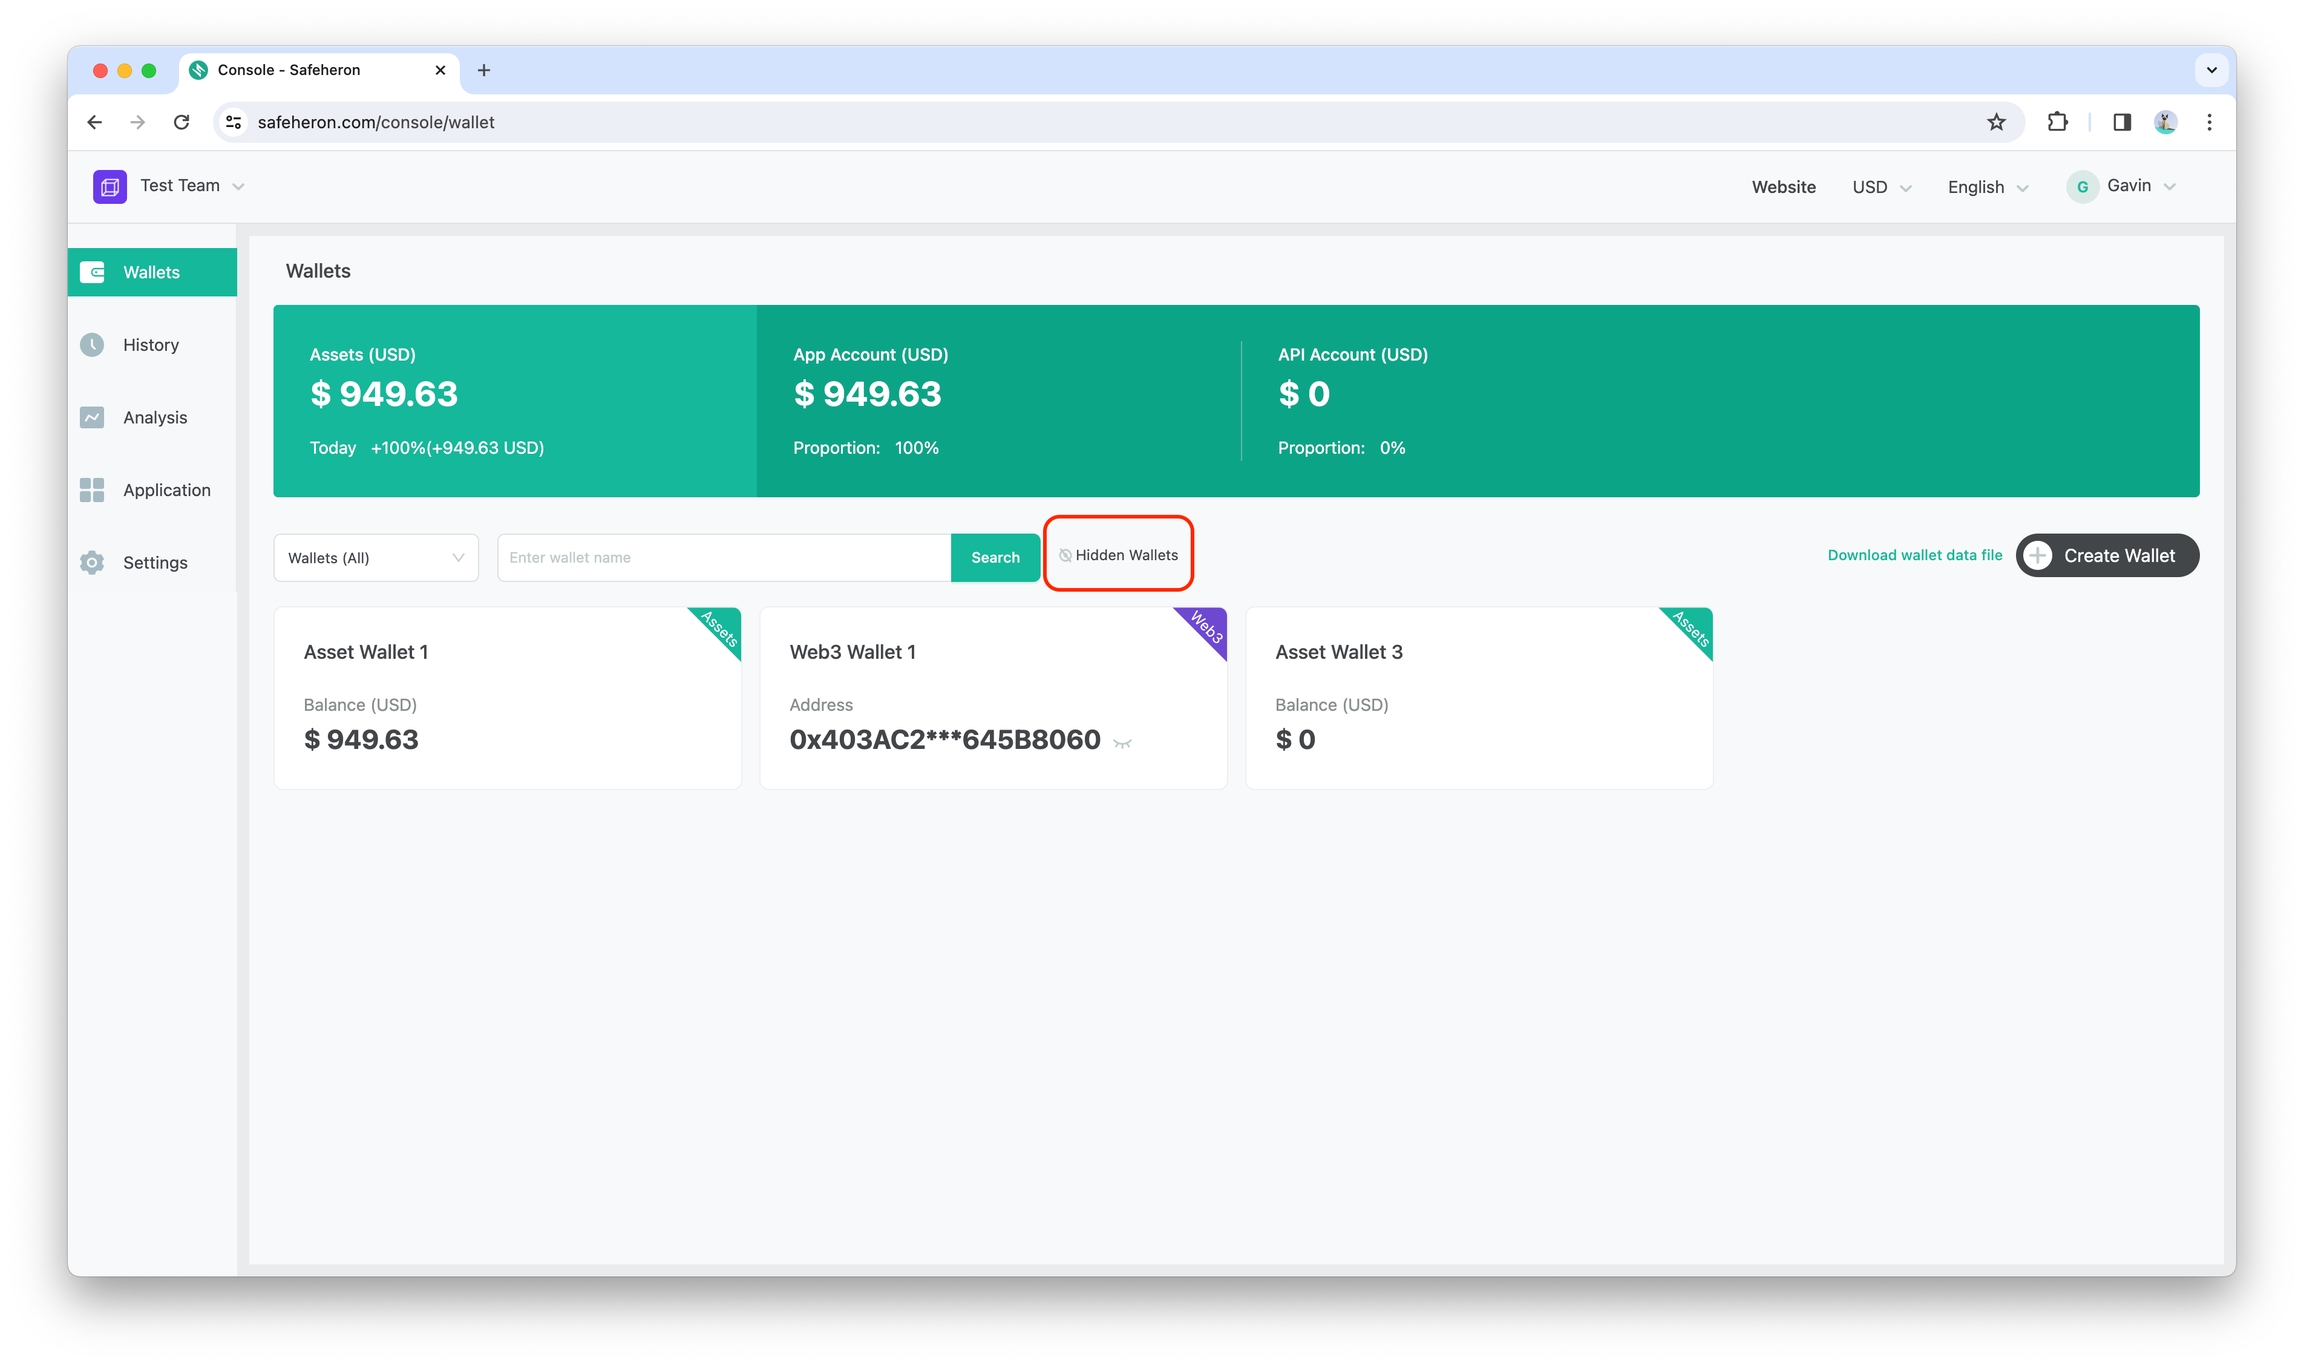
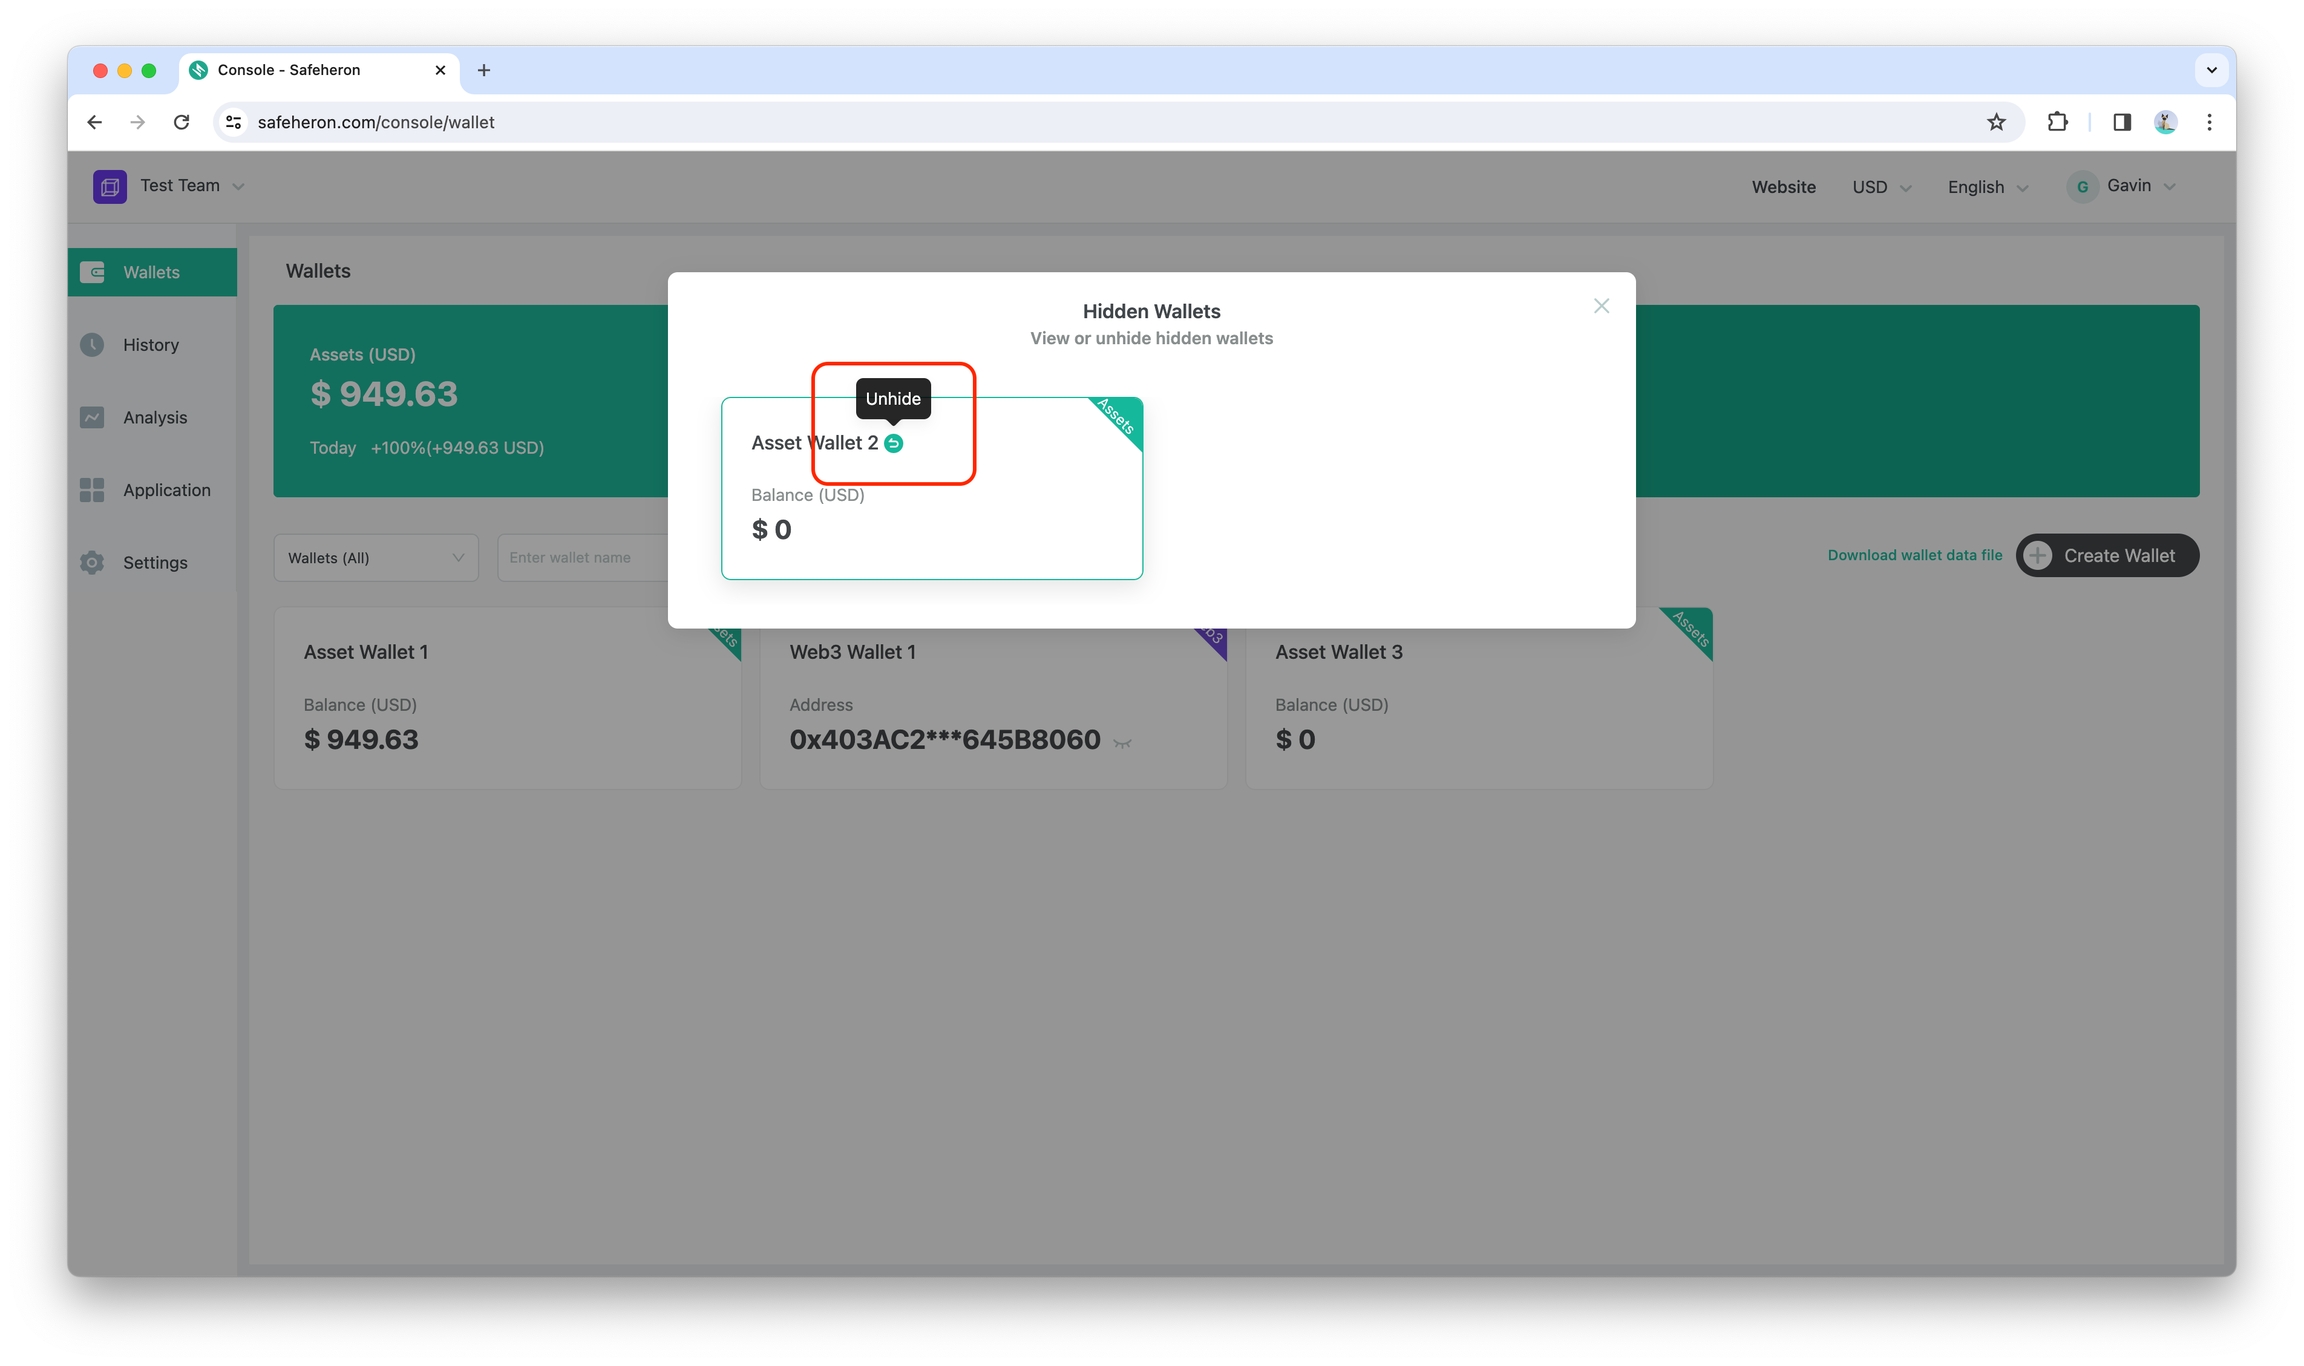
Unhide Wallets
If you want to restore a hidden wallet, refer to the following process.
Select the wallet you want to unhide it on the Safeheron Web console.
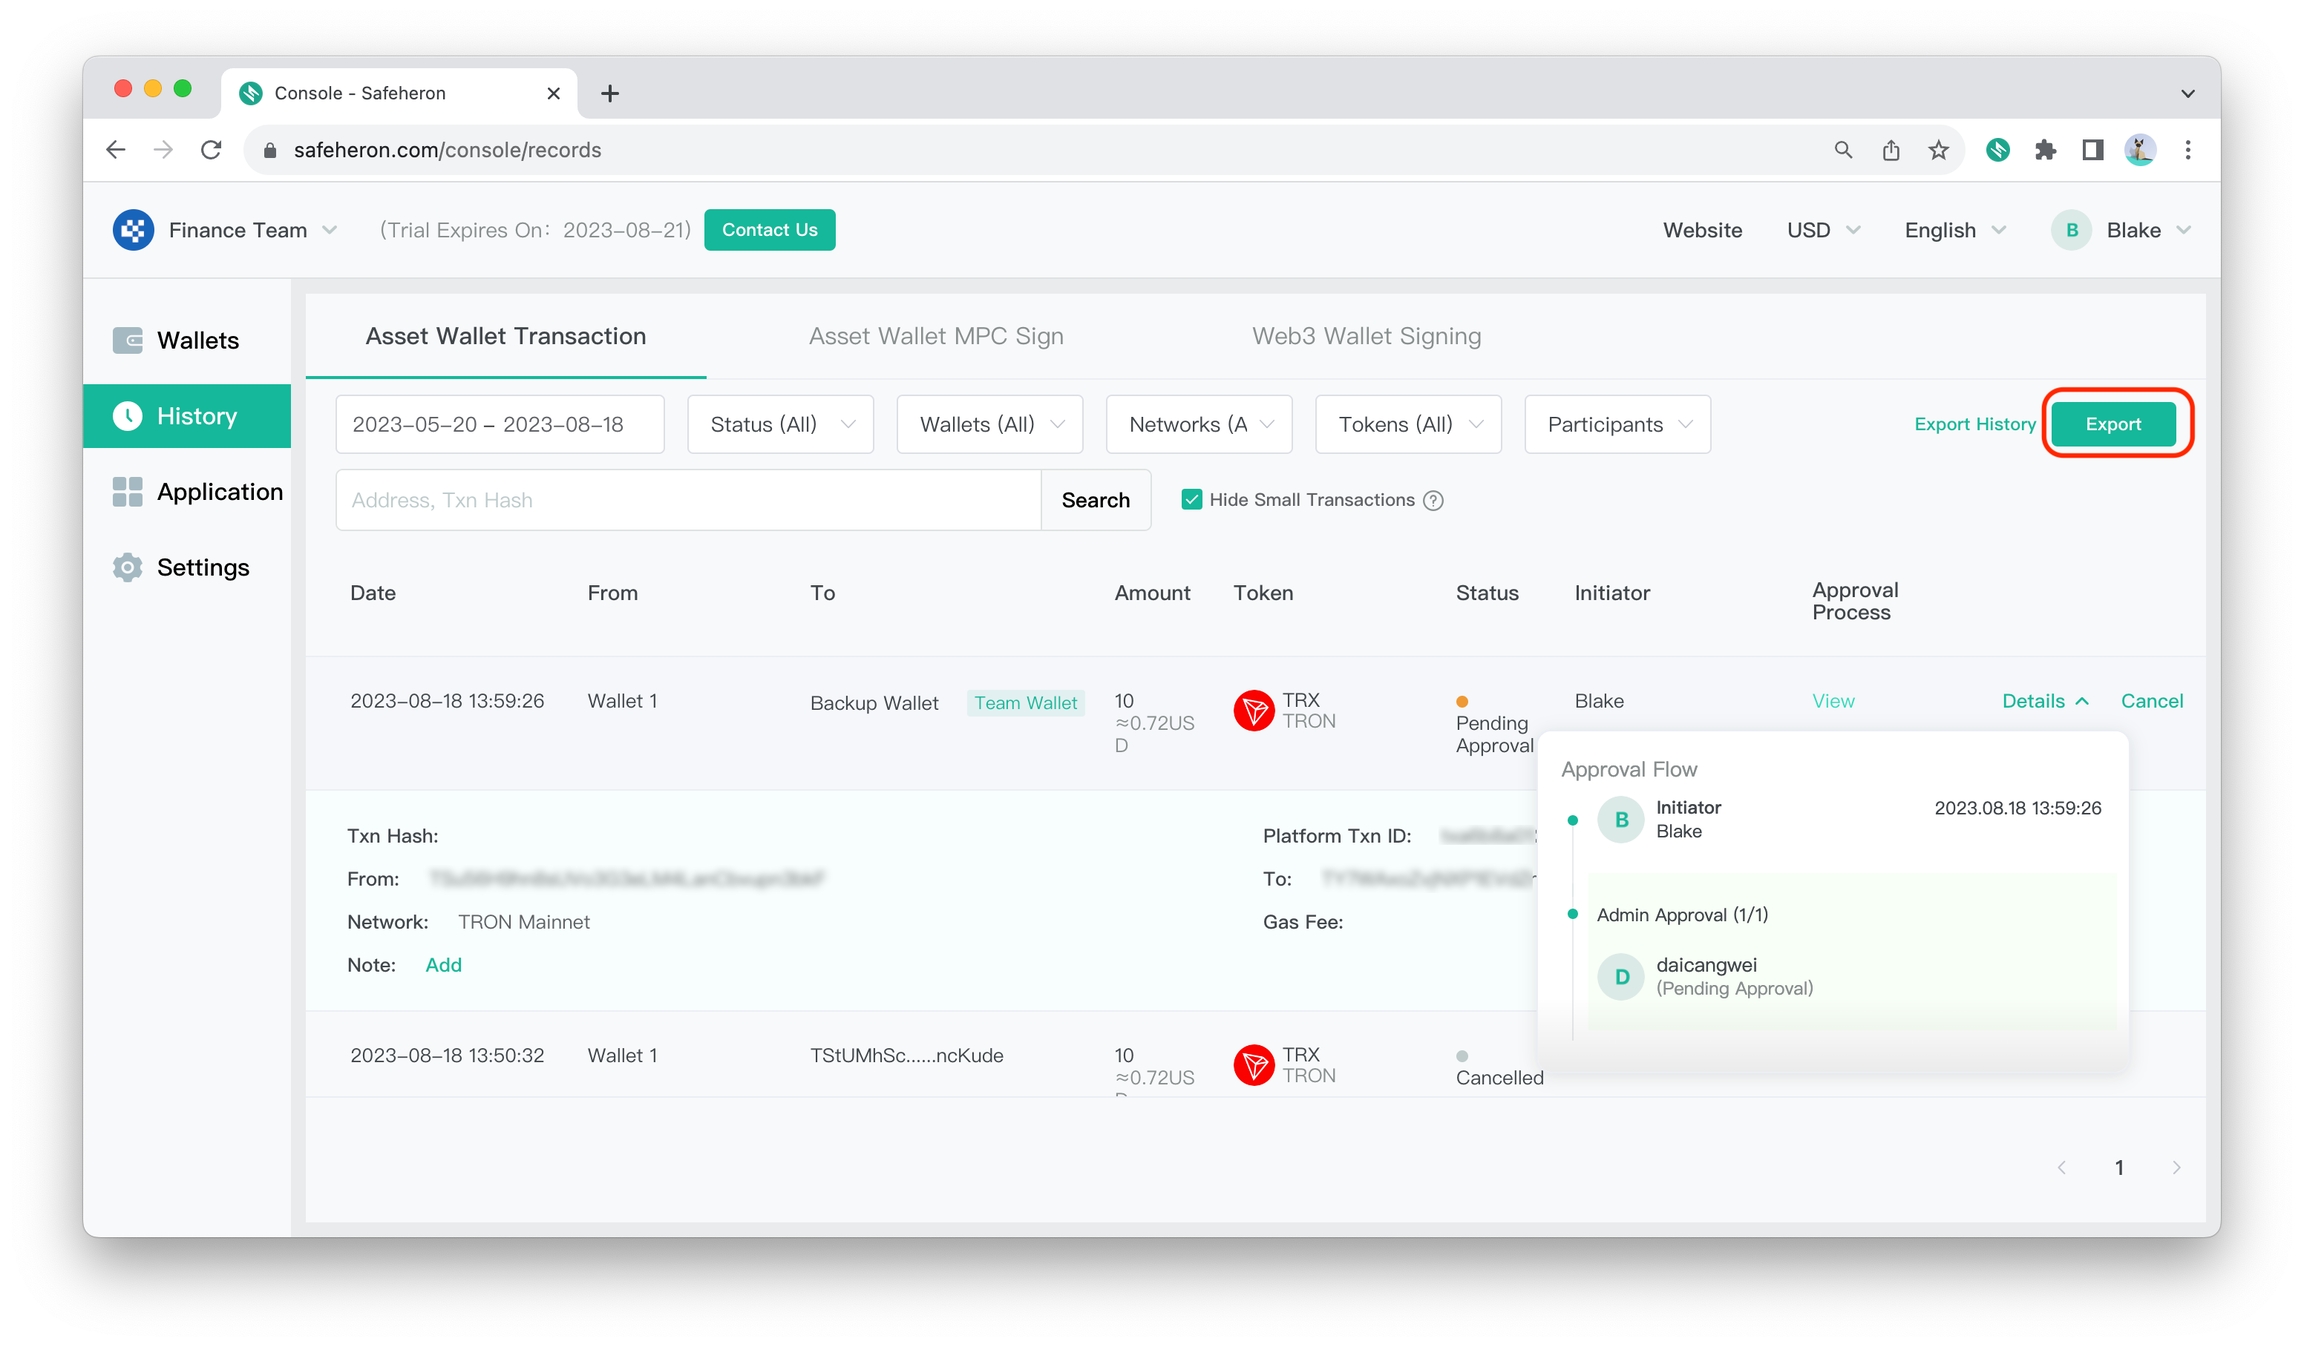
View & Export Transaction History
The Safeheron Web Console allows you to easily view and export needed transaction history.
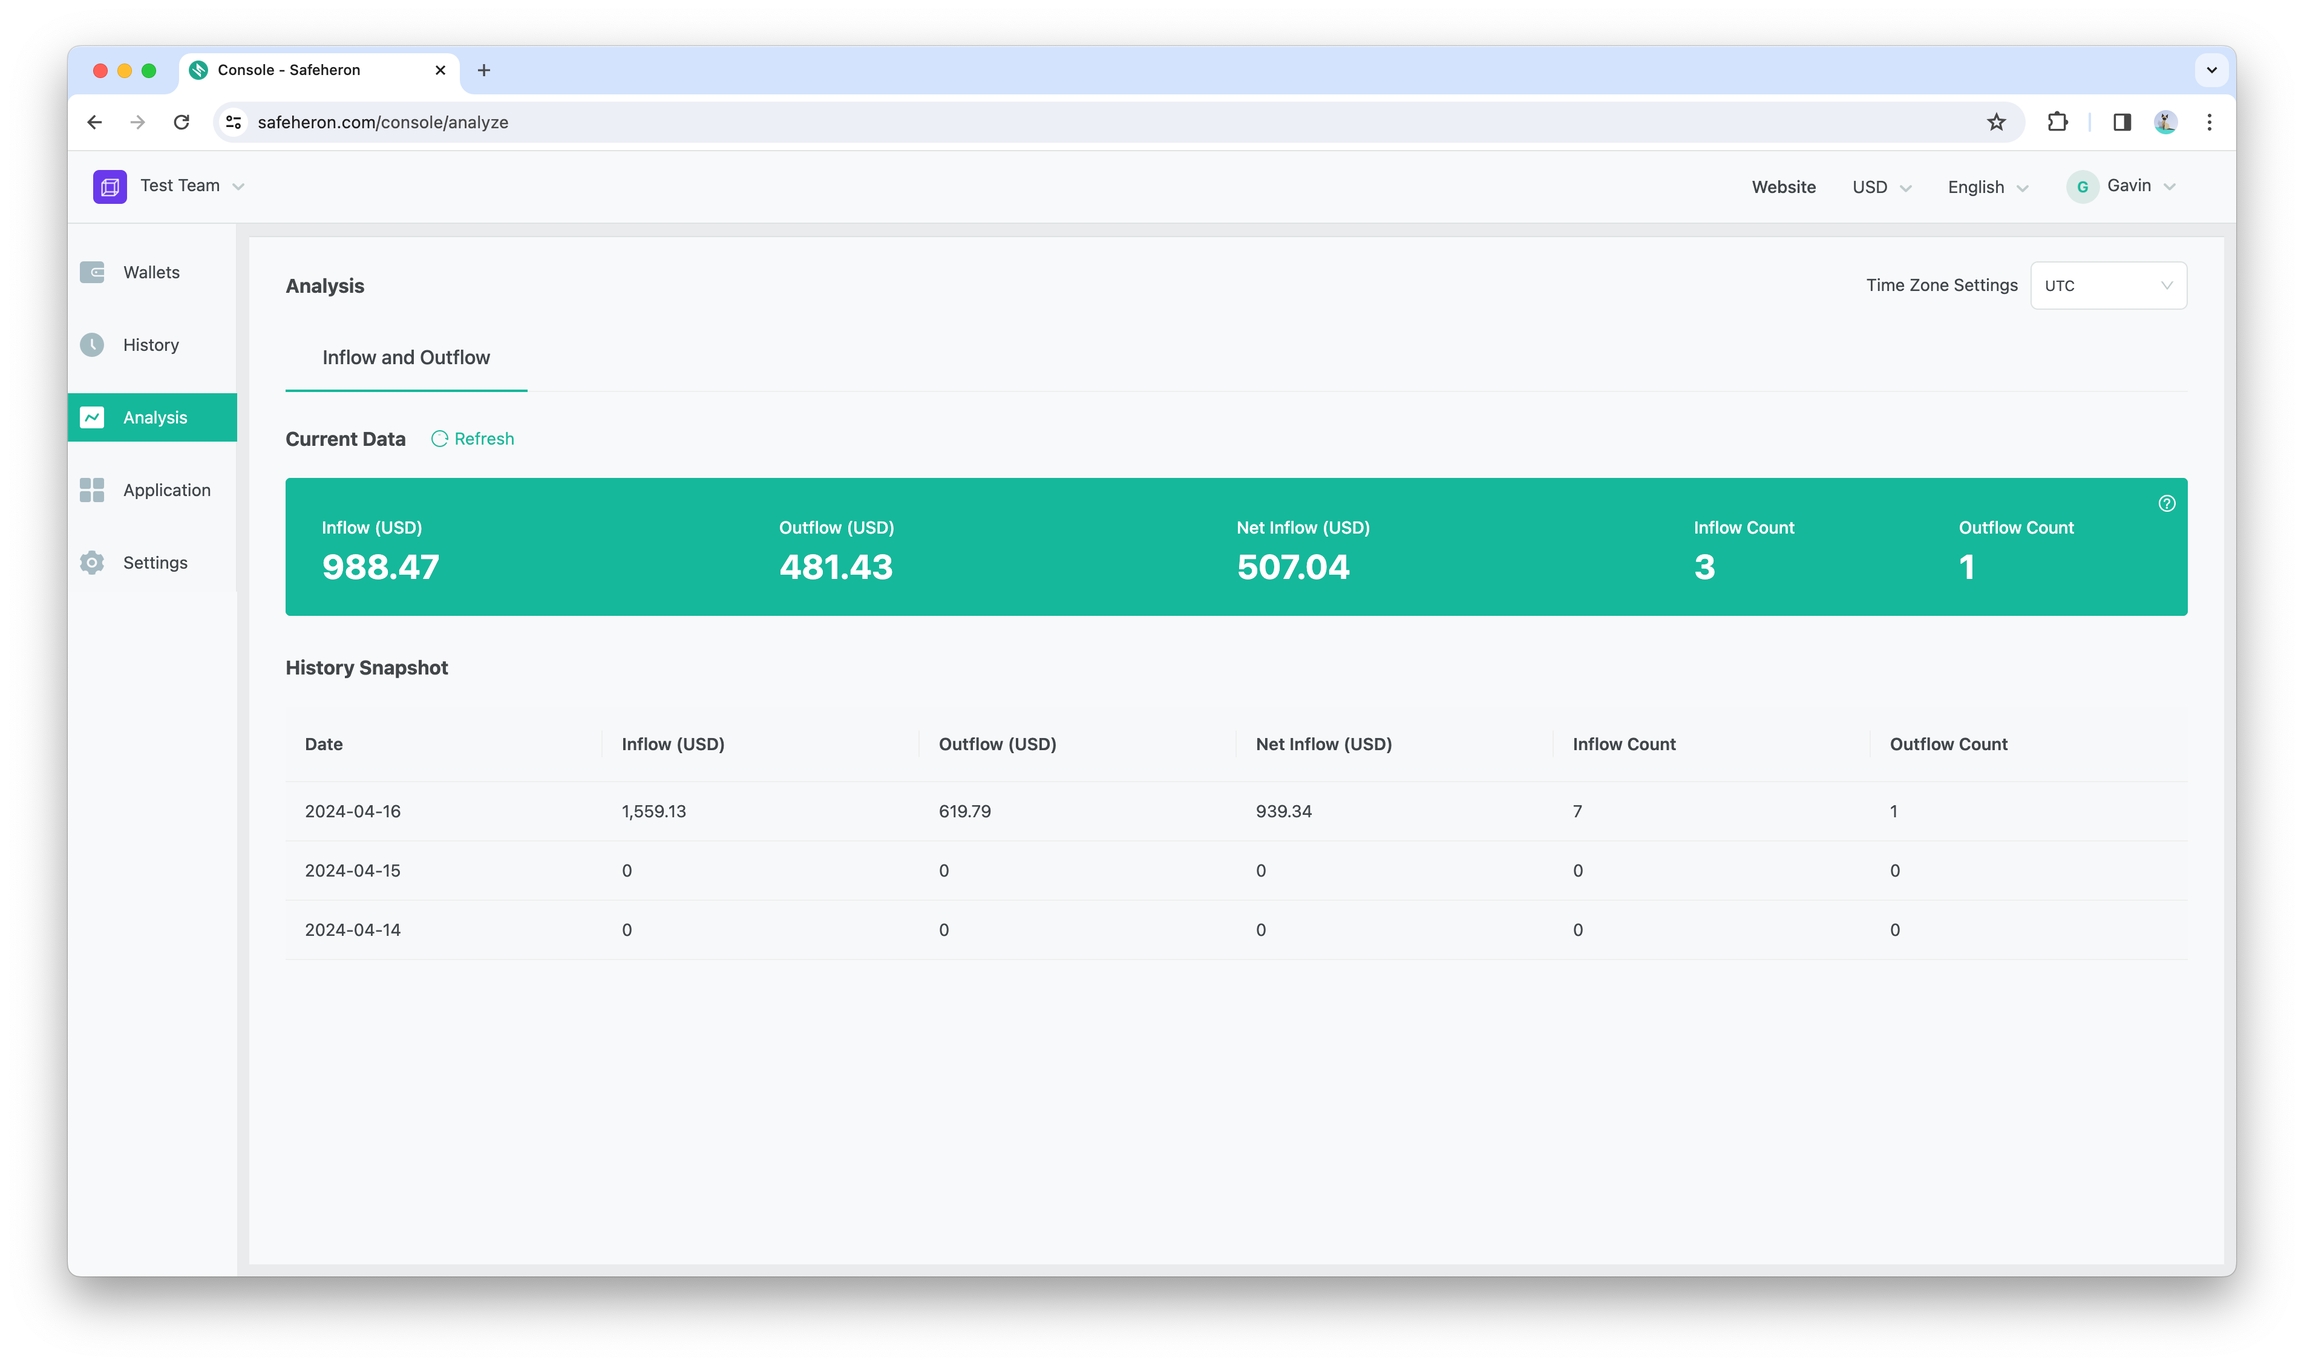
Asset Analysis
The Asset Analysis module supports you in quickly viewing the inflow and outflow of assets.
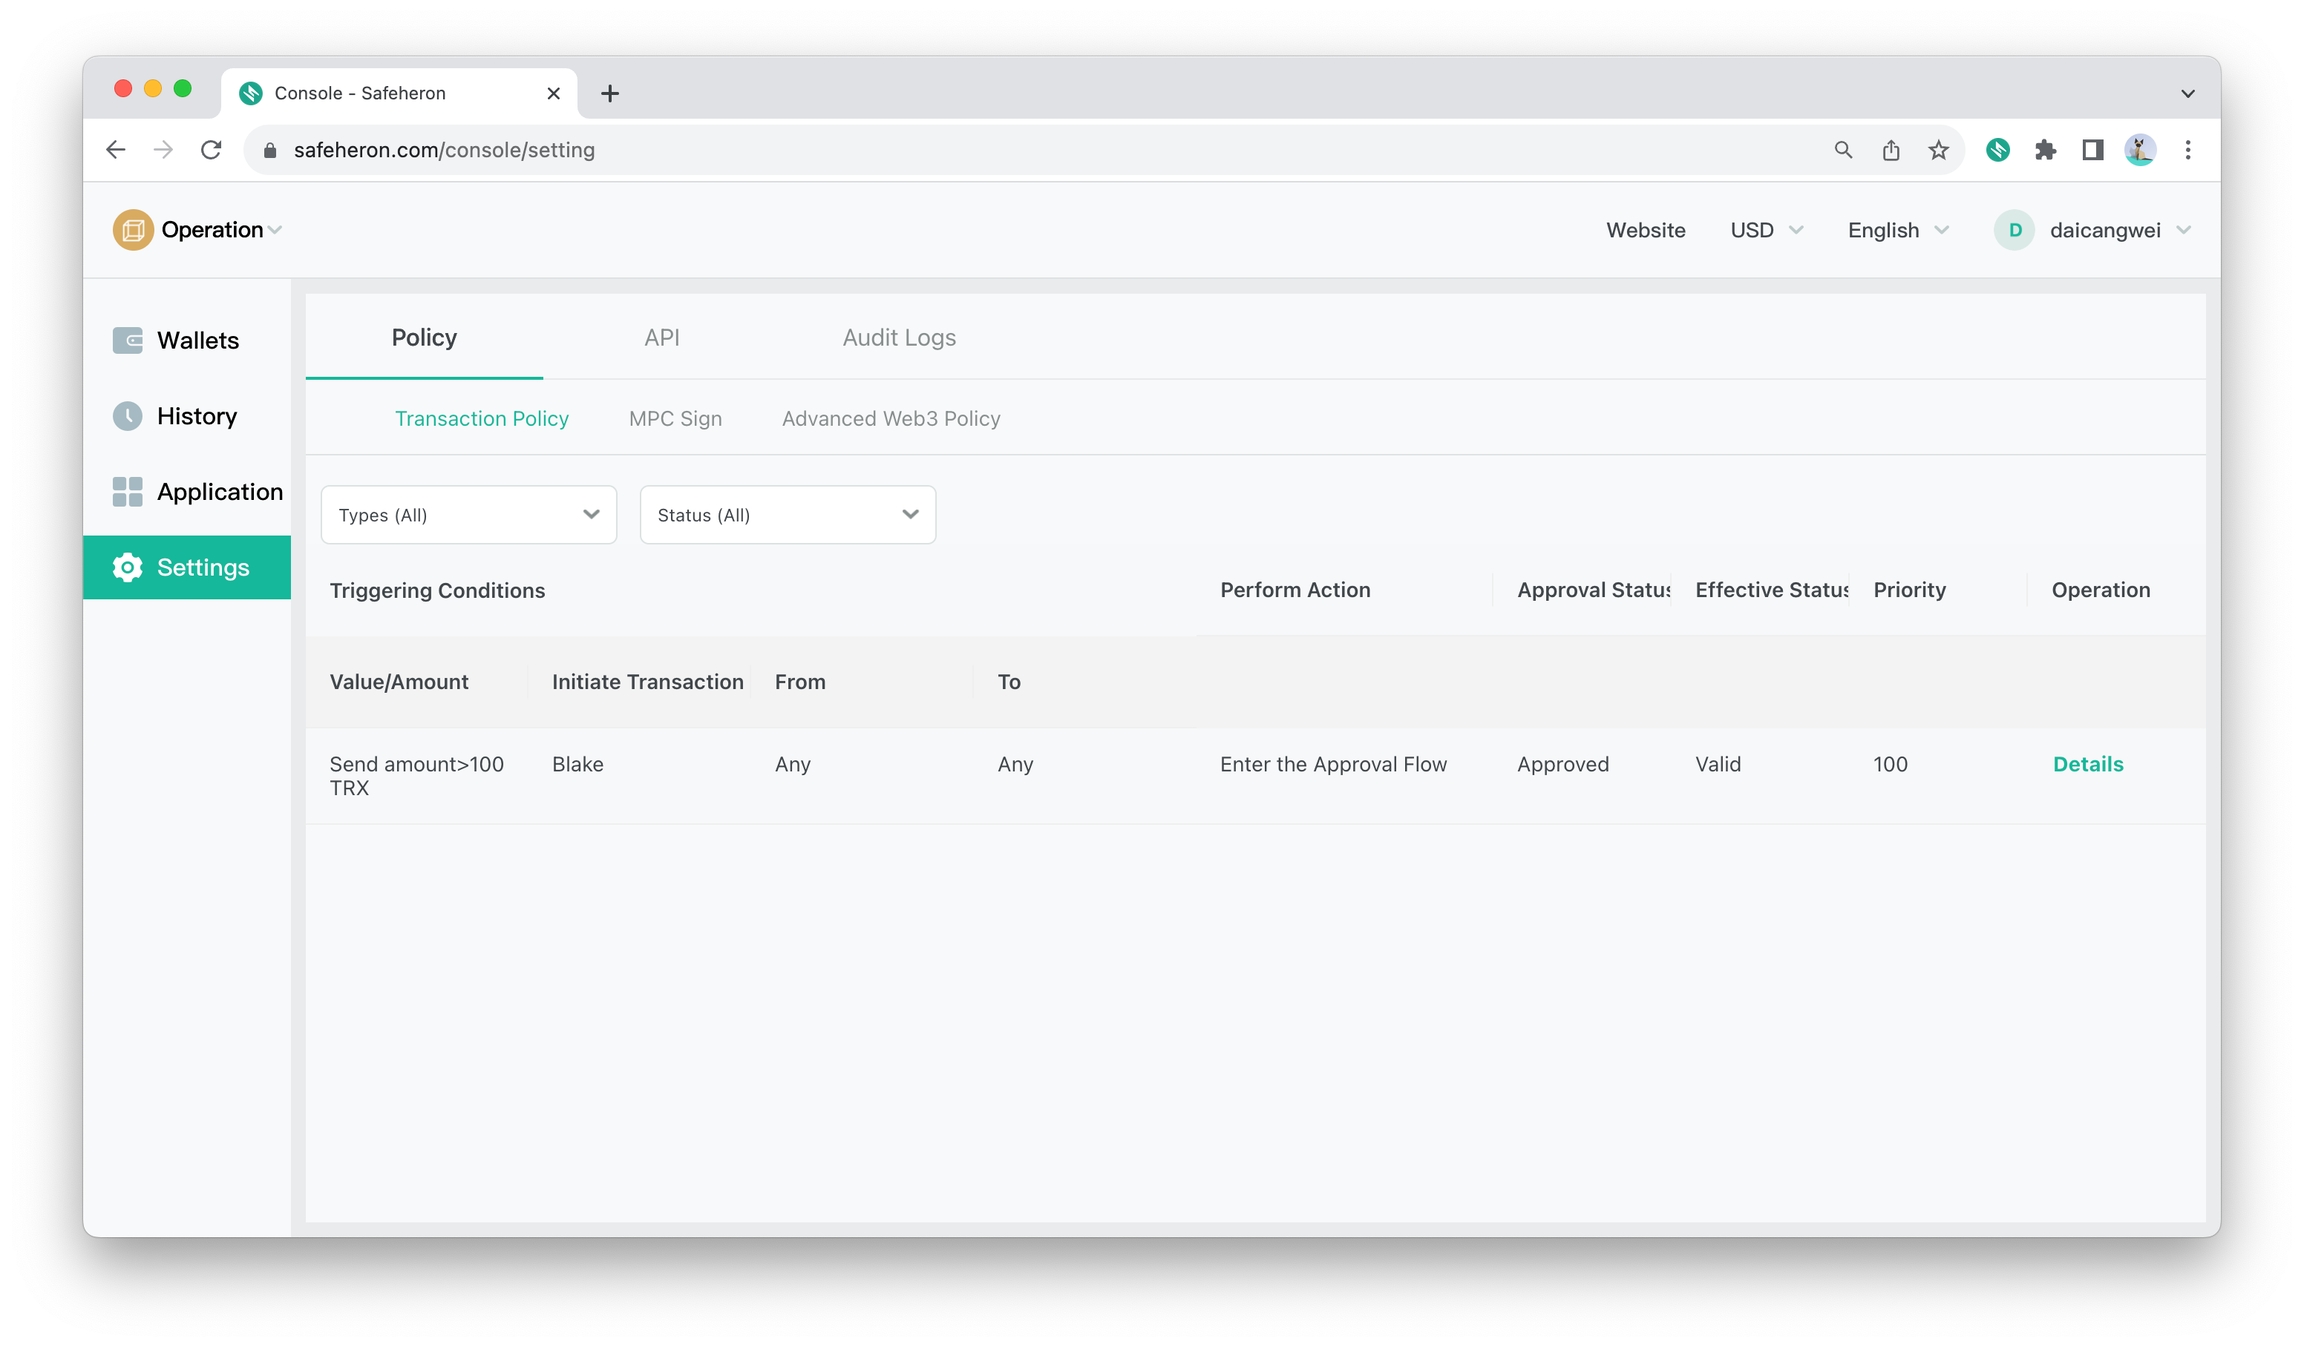
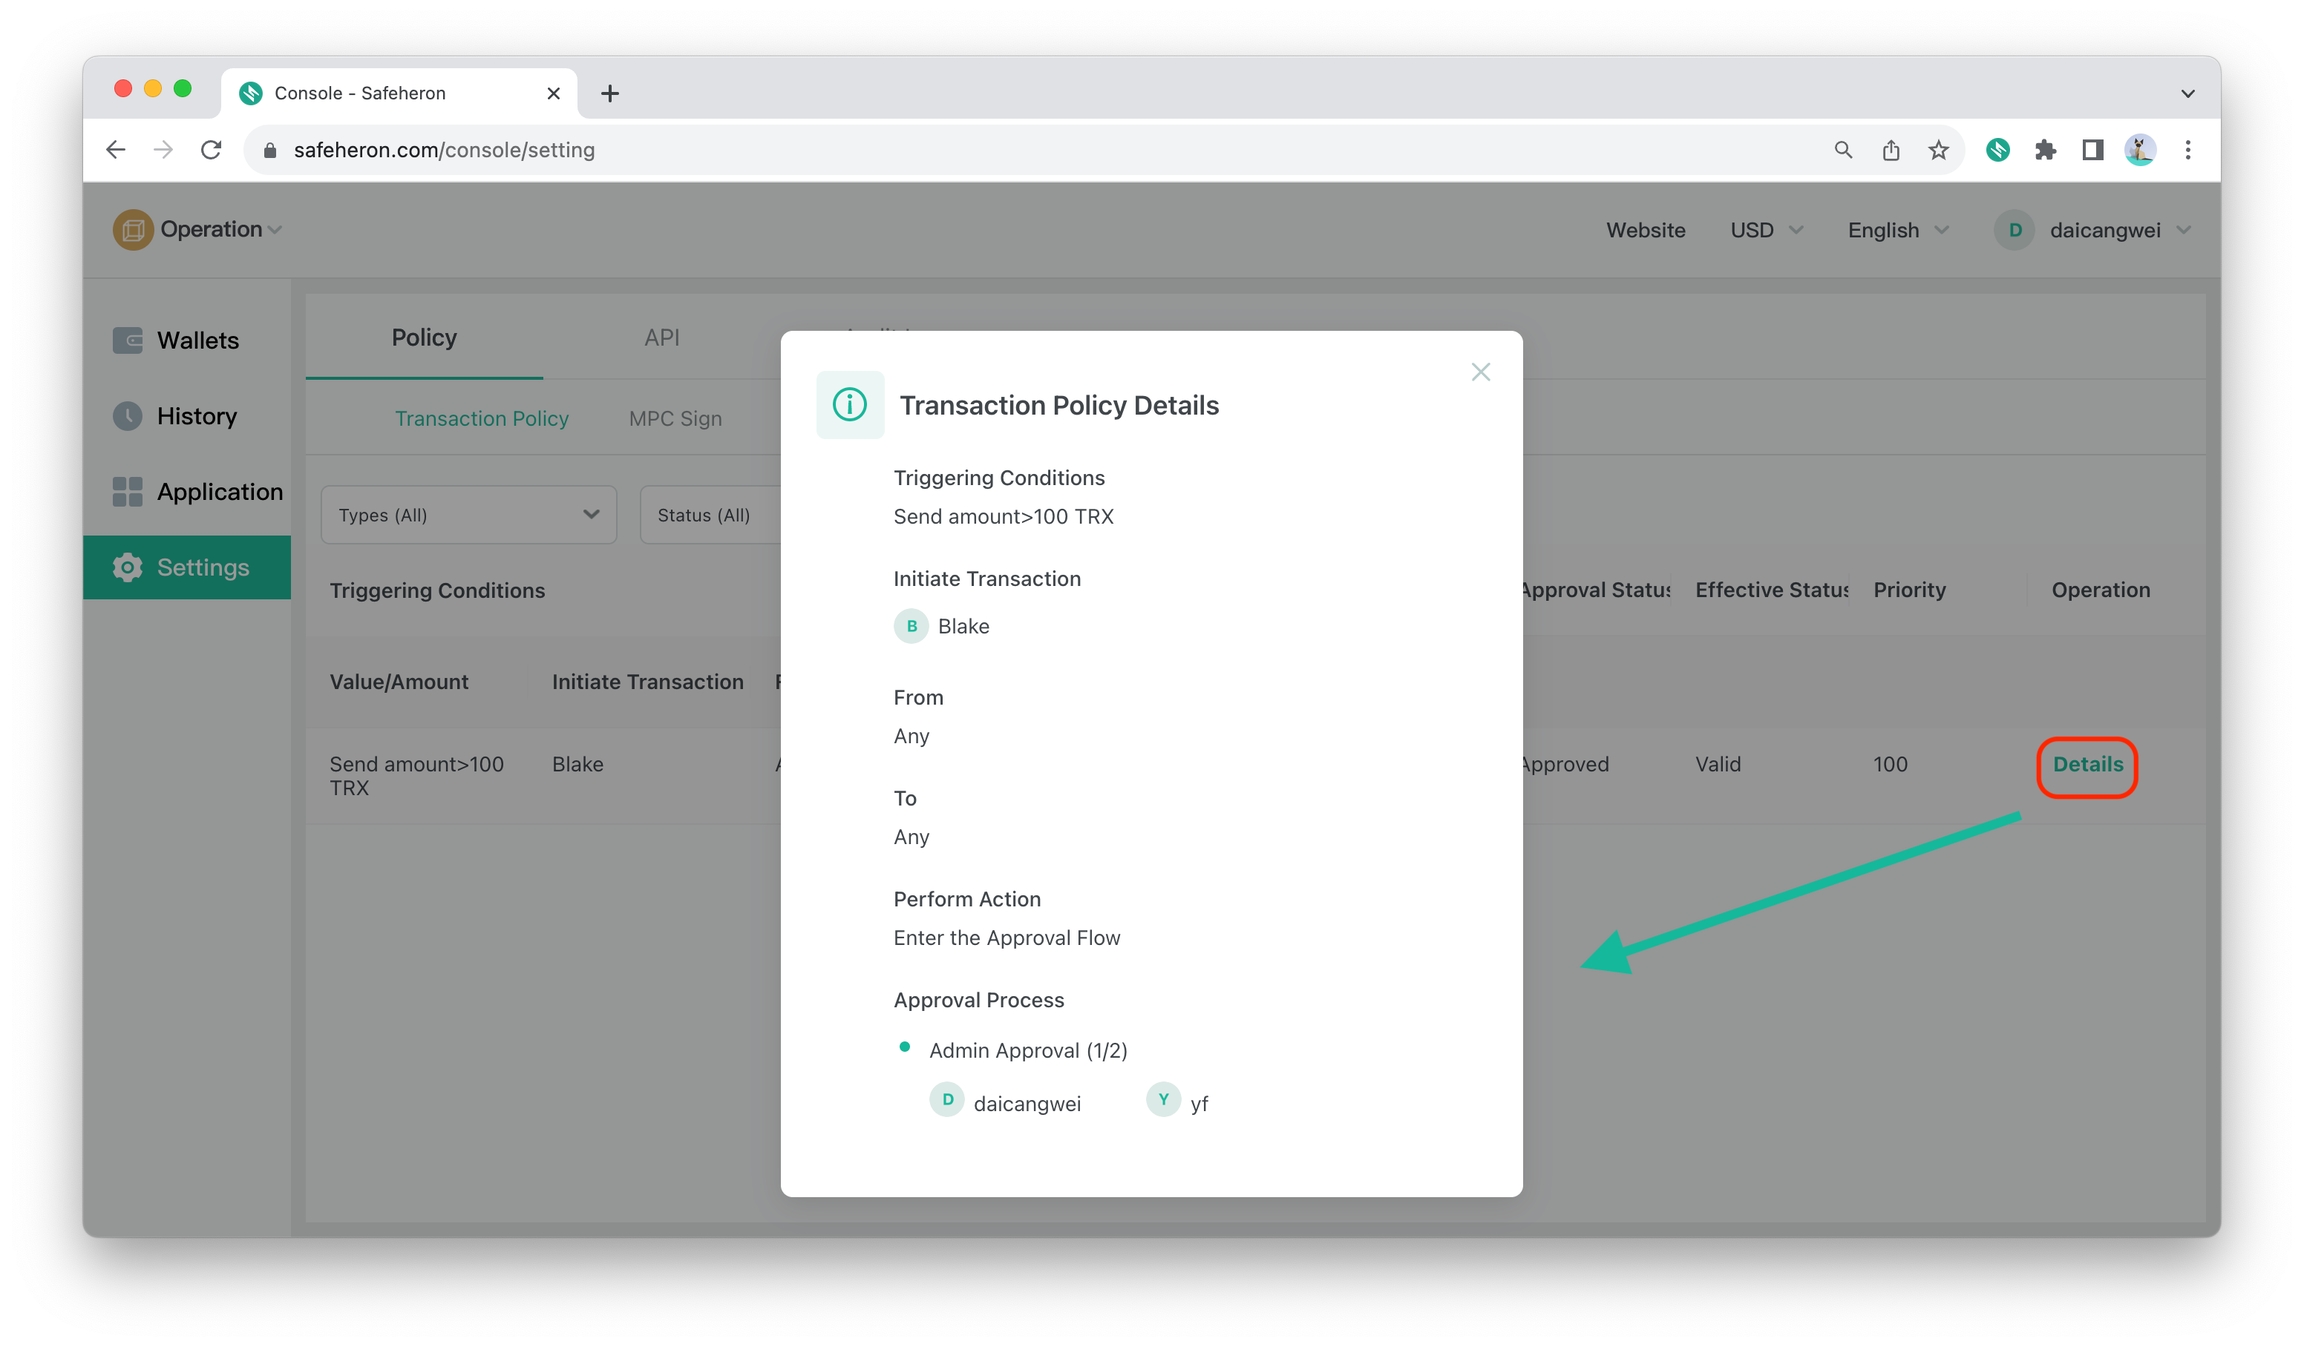
View Advanced Transaction Policy
You can view the advanced transaction policy on Safeheron Web Console.
Manage Whitelists
The Safeheron Web console supports managing whitelists, such as adding, modifying, and deleting whitelist operations.
Check out the same process in Whitelist Setup.
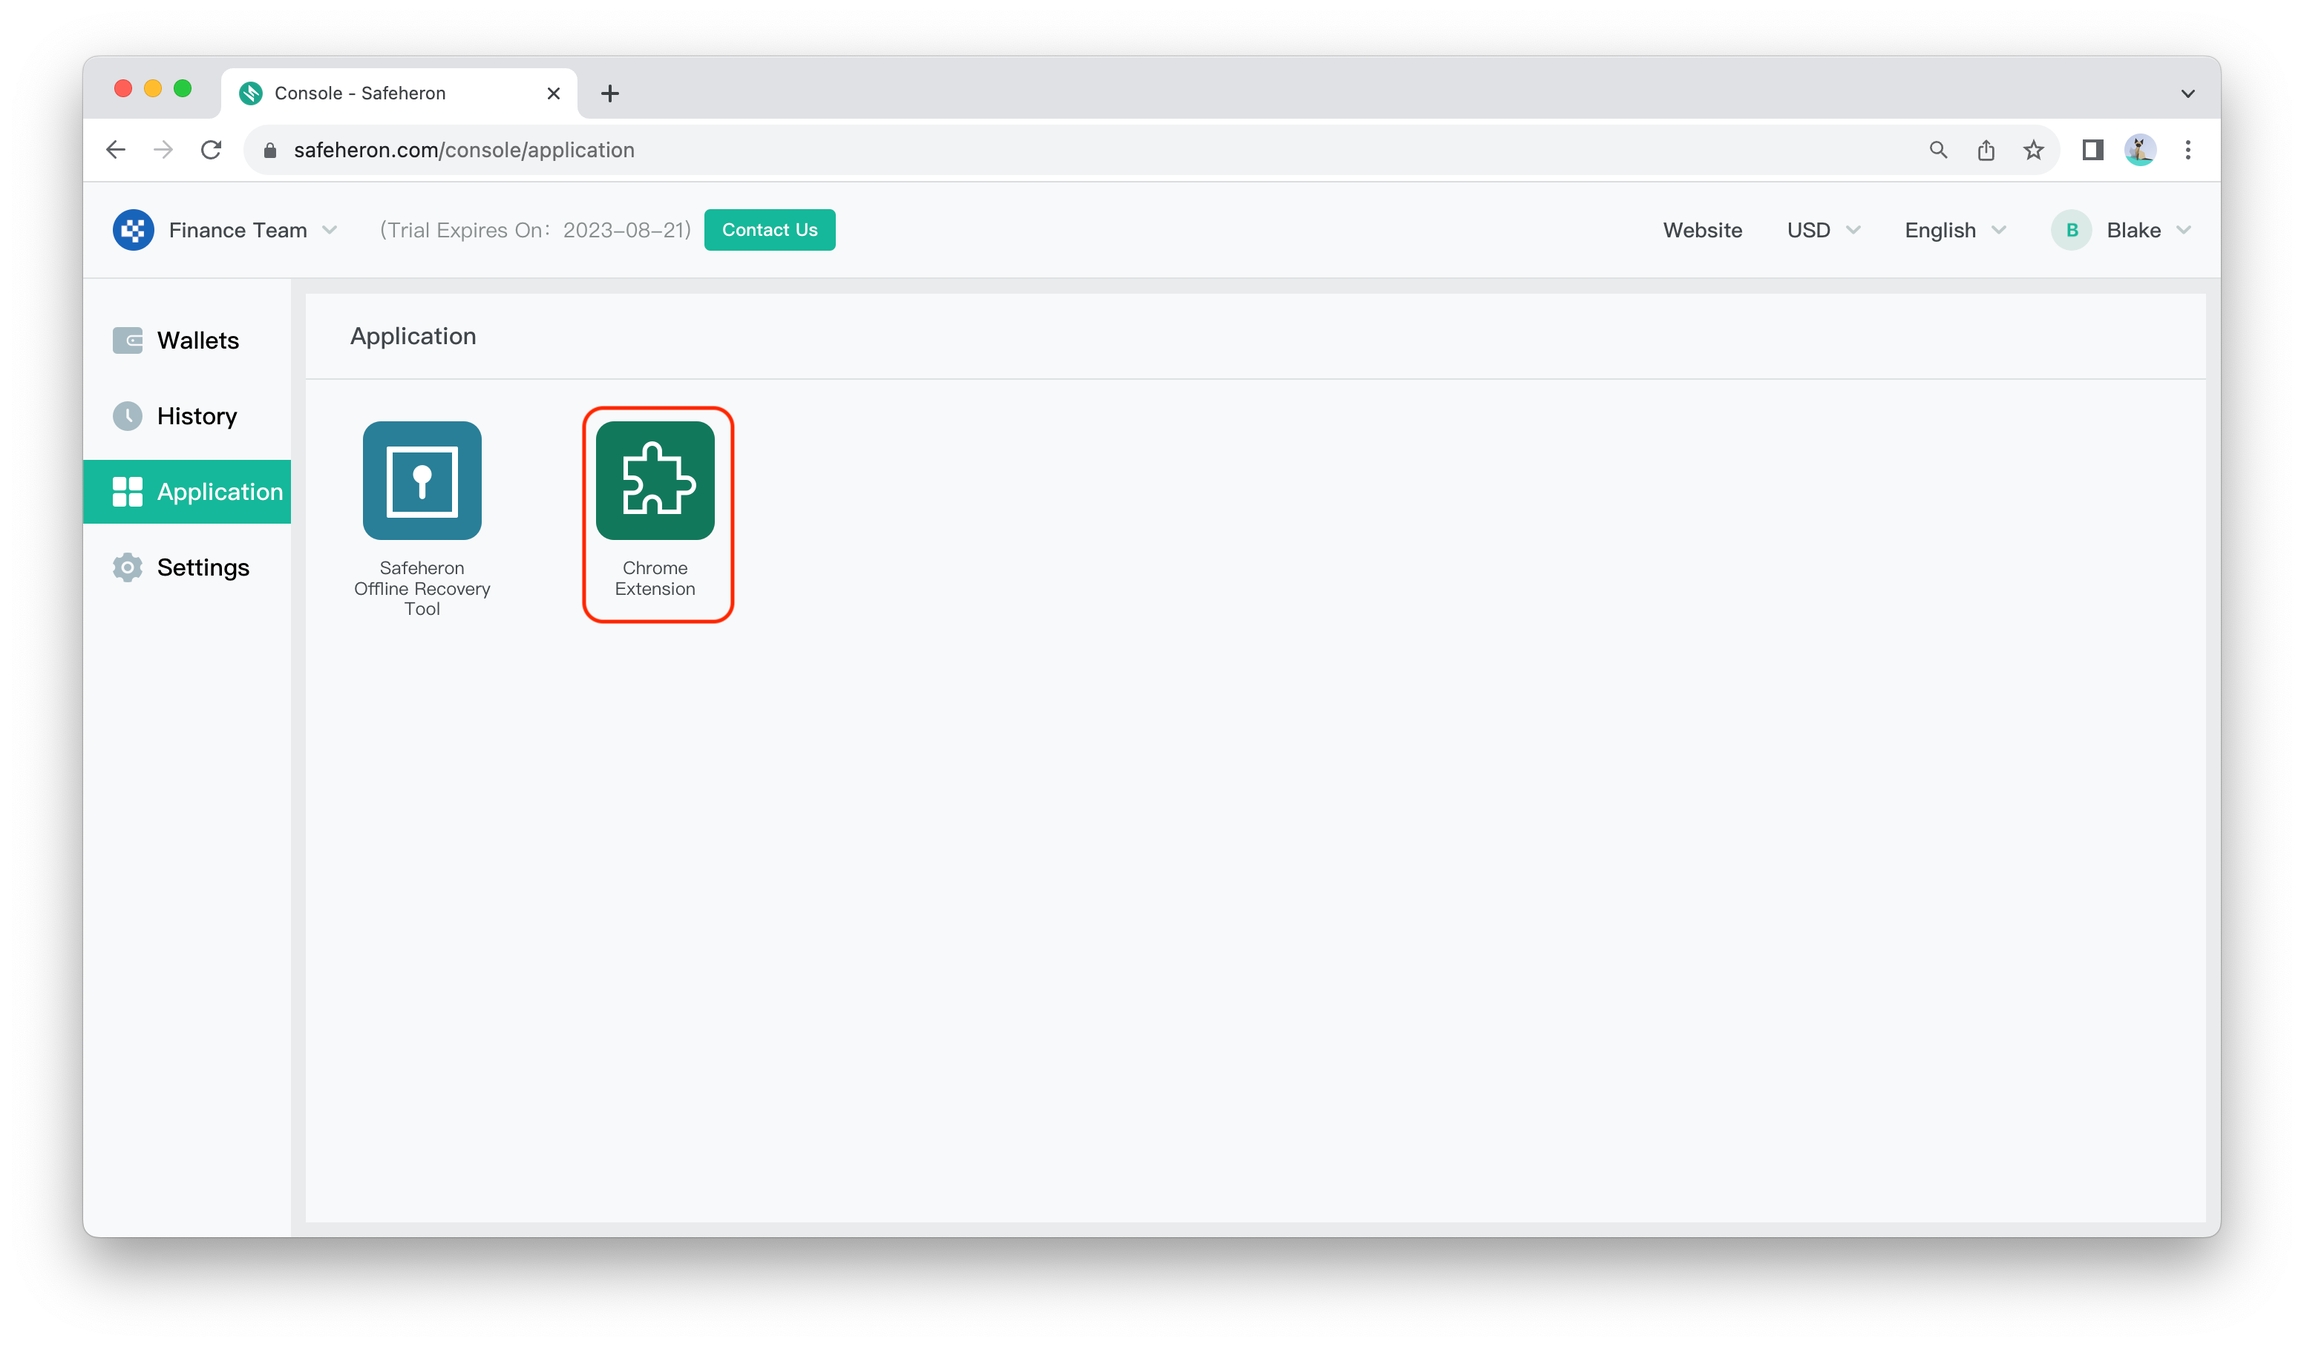
Safeheron Browser Extension
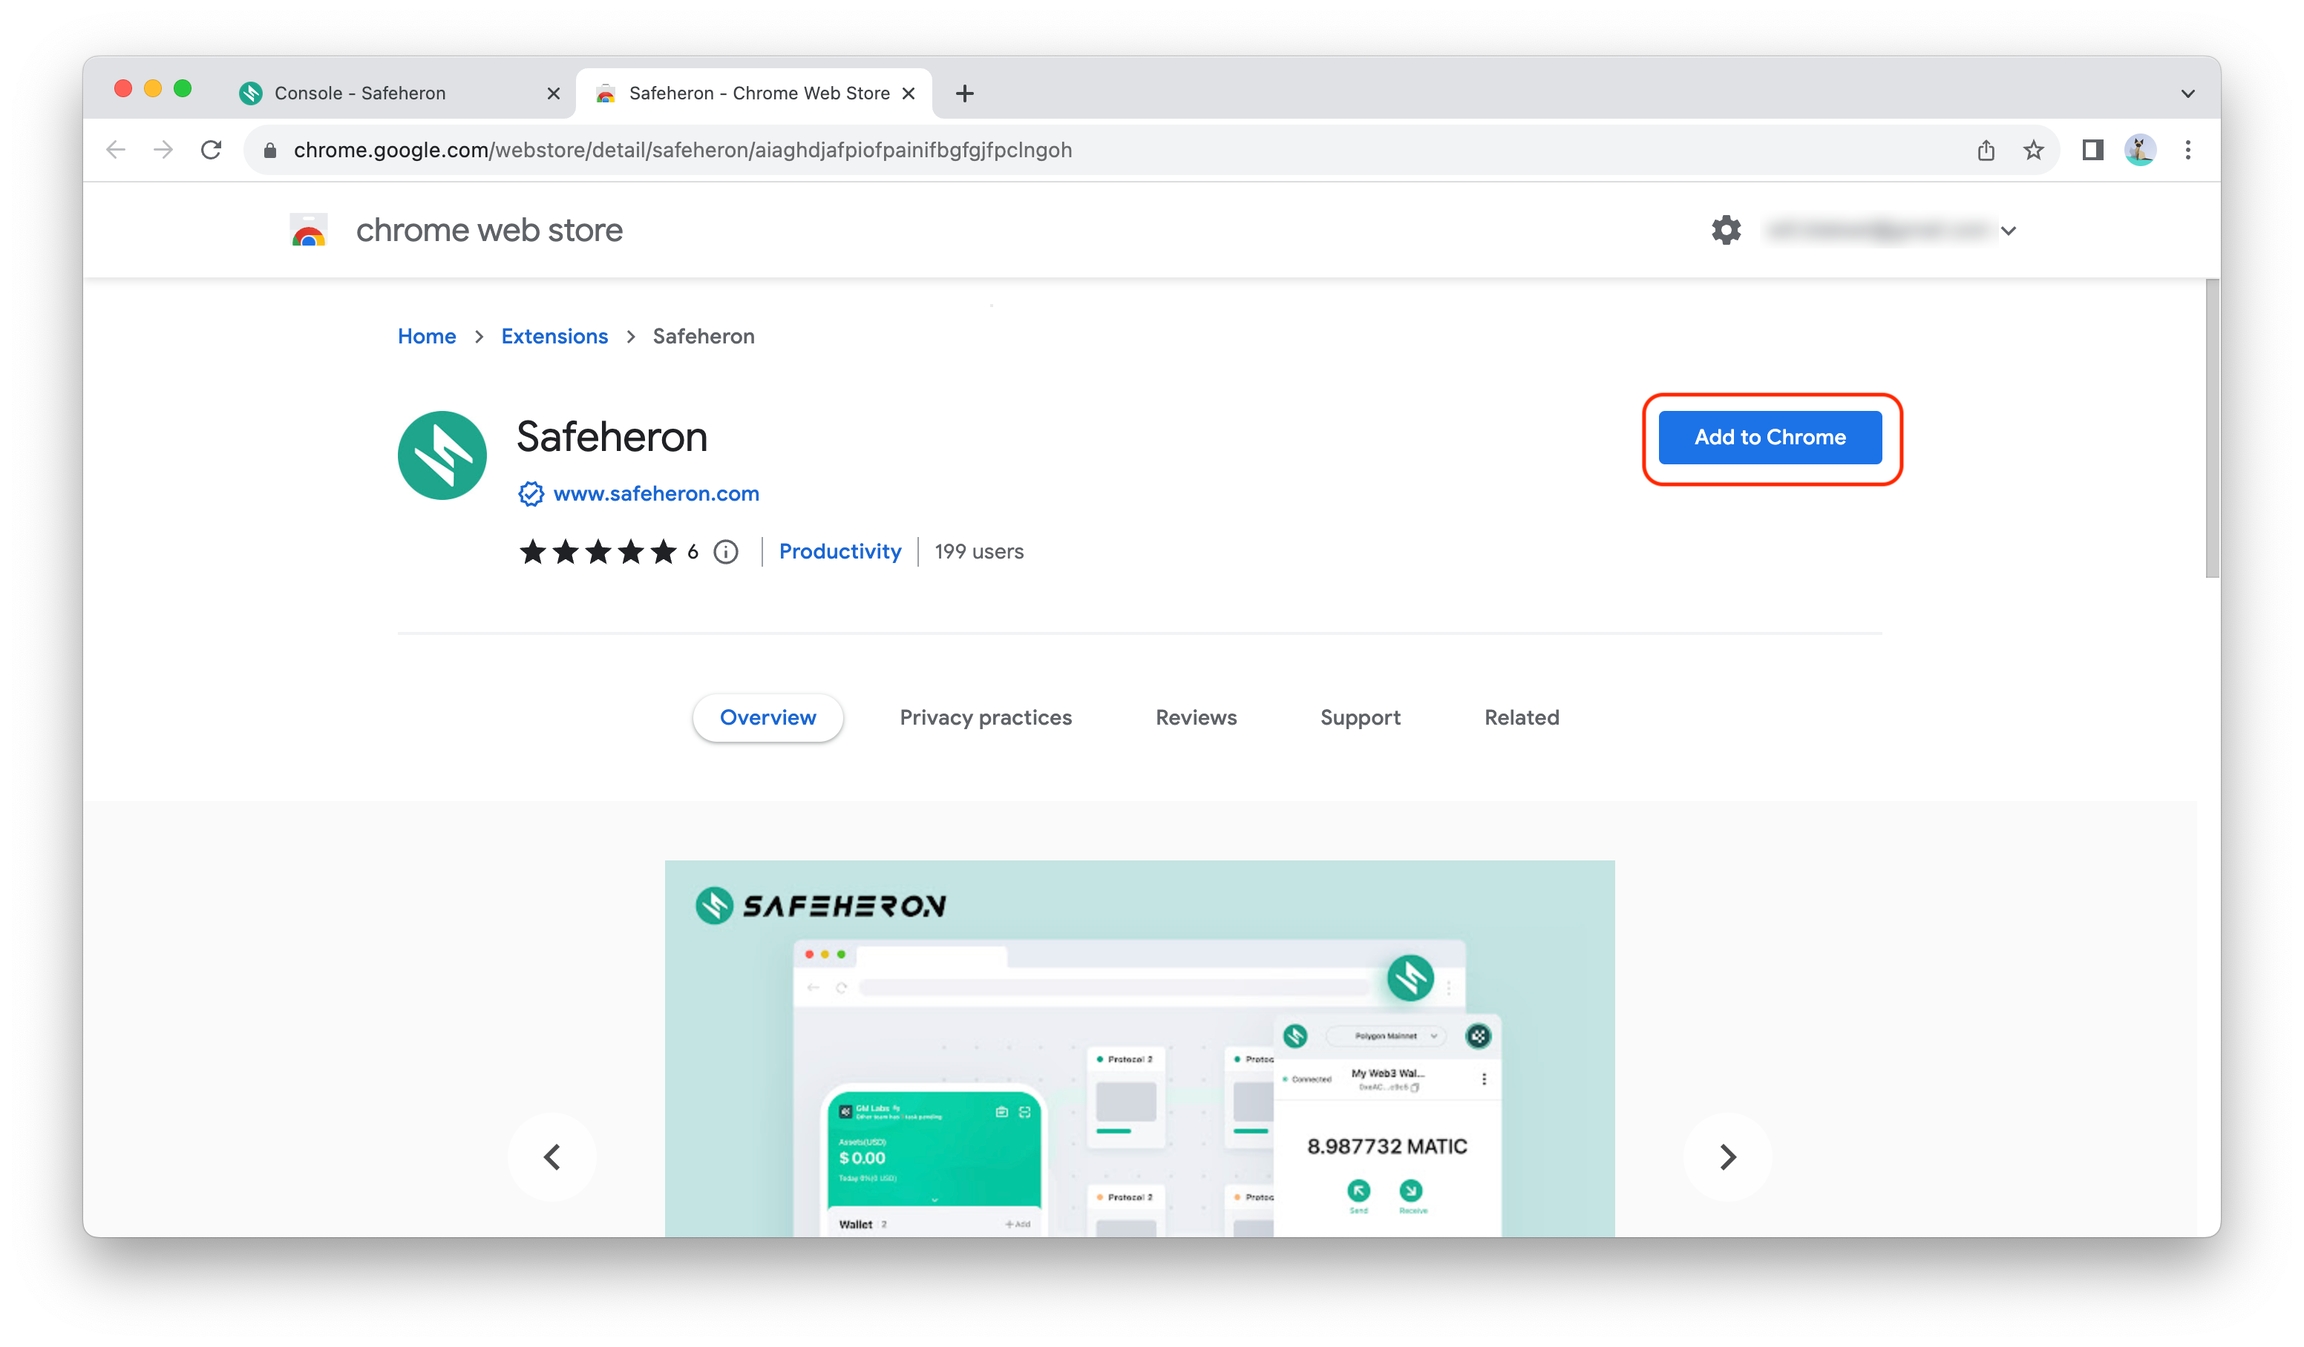
Download Safeheorn Browser Extension
The Safeheron Extension is currently only available for Chrome. In order not to conflict with other extensions, please use a new Chrome account to download it.
Once the extension has been installed, pin Safeheron in the Chrome Extension Manager for easy access.
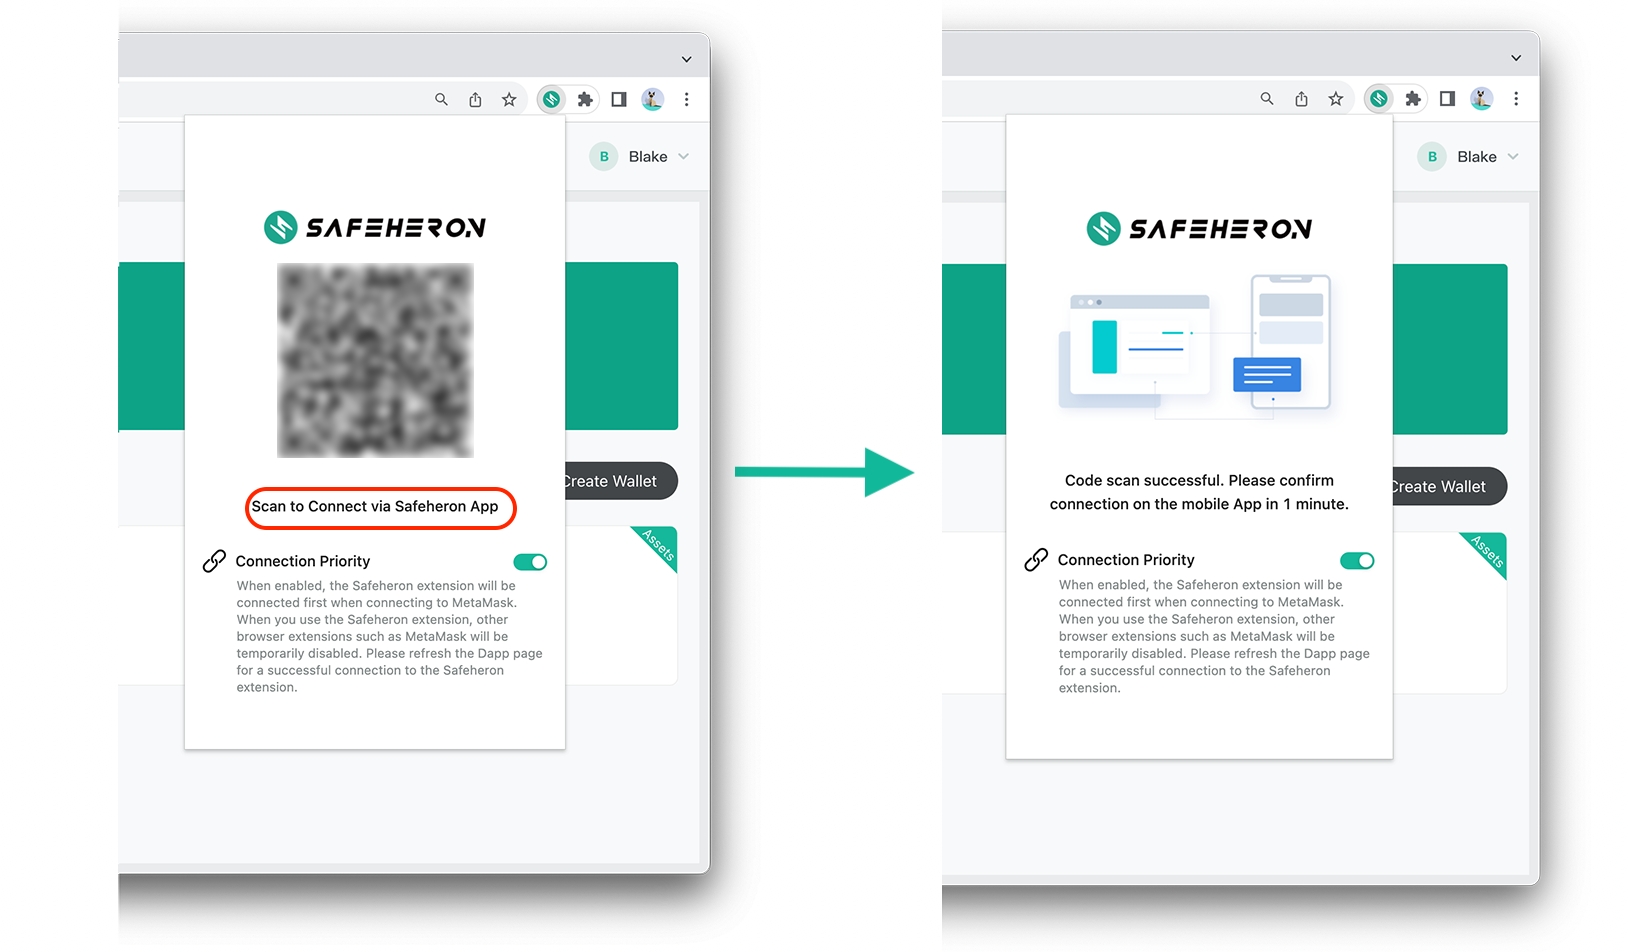
Log Into Safeheron Browser Extension
Click Connect on Safeheron App to log into Safeheron Browser Extension, interacting with all EVM chains.
Above are the introduction and user guide for the main features of the Safeheron App, Safeheron Web Console, and Safeheron Browser Extension.
If you have any questions or suggestions, you are more than welcome to contact us at support@safeheron.com!
Last updated